Split systems are used to purify the air and create a comfortable microclimate in the house. Due to the high cost of specialist services, many owners try to carry out the installation work themselves. This article is a step-by-step guide on how to connect an air conditioner in the house: do-it-yourself installation, choosing the optimal place for placing climate control equipment, general information about the device design and the principle of its operation.

In order for the equipment to work without failures, the installation of the air conditioner with your own hands must be done strictly according to the instructions
Content
- 1 The internal structure of the air conditioner and how it works
- 2 Overview of the design of the outdoor unit before connecting the air conditioner: diagram and structure
- 3 Indoor unit design overview, air conditioner installation: diagram and structure
- 4 What is more profitable: professional installation or do-it-yourself installation of a split system
- 5 How to do it yourself: servicing the air conditioner at home
- 6 How to install the air conditioner: choosing the optimal installation location
- 7 Recommendations for installing an air conditioner: instructions and step-by-step installation of a mobile device
- 8 How to install an air conditioner: installation of outdoor and indoor units
- 9 How the air conditioner evacuation procedure is performed
The internal structure of the air conditioner and how it works
Before installing an air conditioner in a house or apartment, be sure to familiarize yourself with the principle of operation of this device, as well as with its structural structure. This knowledge will not only speed up the installation work, but also perform them correctly.

The air conditioner consists of a compressor and an evaporating unit, connected by pipes
Split systems consist of an evaporating unit and a compressor. These elements are interconnected by tubes. For the installation of the outdoor unit or compressor, the plane of the outer wall is used, and the evaporator is placed indoors. In expensive models of climatic equipment, several indoor units may be present. All of them are connected to one compressor.
The principle of operation of split systems:
- Under the influence of high pressure, refrigerant is supplied through a nozzle into the evaporator chamber.
- There, the working substance expands and boils. The vapors that form during this process absorb heat.
- As a result of this process, water condensate is formed, which is deposited on the radiator in the evaporator block.
- From there, moisture enters a special tank and is removed from the room through a tube.
During the operation of the air conditioner with the working substance, the following occurs:
- The compressor evacuates the vapors and increases the pressure.
- The working substance is heated, which passes from a liquid state to a gaseous one.
- The refrigerant enters the condensate collection chamber as a dense mist.
- The fan cools the vapors of the condensate, which again turns into a liquid state.
- Then the working medium, driven by pressure, enters the evaporator nozzle again. The cycle repeats itself.

To install everything correctly, you should have an idea of the device and the principle of operation of the air conditioner
The efficiency of climatic equipment, as well as electricity consumption, depend on the conditions in which the air conditioner operates. If a heater is installed nearby, electricity consumption will increase.
Note! If you want to install an air conditioner in an apartment, you must take into account the position of the heating devices. Their close proximity increases the load on the climatic equipment, which can cause it to fail.
Overview of the design of the outdoor unit before connecting the air conditioner: diagram and structure
When installing the air conditioner with your own hands, it will be useful to get acquainted with its structure. This will allow you to avoid mistakes in the process of work and better master the technology.
The structure of the outdoor unit consists of the following components:
- fan;
- compressor;
- capacitor;
- four-way valve;
- filter;
- control boards;

To install an air conditioner with your own hands, you need to familiarize yourself with its structure
- choke type connections;
- protective cover with quick release design.
The fan generates air currents that blow off the condenser. In it, freon is cooled, and it condenses. The air that is blown through this radiator, on the contrary, heats up. The main function of the compressor is to compress the freon and maintain its movement inside the refrigeration circuit.
There are two types of compressors:
- spiral;
- piston.
Reciprocating compressors are cheaper, but less reliable. Unlike spiral ones, they react worse to the effects of low temperatures in the cold season. When connecting an inverter air conditioner, the control board is usually located in an external unit. If the model is not an inverter one, all electronic components are placed in the part of the split system that is installed indoors. This is done in order to protect the control board from humidity and temperature extremes.

The design of the outdoor unit includes the following units: compressor, valve, fan
Four-way valves are commonly found in reversible types of air conditioners. Such split-systems operate in two modes: "warm" and "cold". When the air conditioner is set to heat, this valve changes the direction of refrigerant flow. As a result of this, the functionality of the blocks changes: the inner one starts heating the room, and the outer one works for cooling. Fitting connections are used to connect copper pipes that connect the indoor and outdoor units.
A freon filter prevents copper chips and other particles from entering the compressor. In the process of installing the air conditioner with your own hands, small debris is formed. The filter retains particles before entering the compressor.
Note! If the installation of climatic equipment is carried out in violation of the technology, a large amount of debris can enter the system. In this case, the filter will not cope with the contamination.
The quick-release cover is designed to protect the terminal block for connecting wires and nipple connections. On some models, it provides partial protection by overlapping only the terminal strip.

Regardless of which structural type the split system belongs to, its outdoor module always has the same working units
Indoor unit design overview, air conditioner installation: diagram and structure
The indoor unit is located indoors, so manufacturers pay great attention to its appearance. The split system must fit into the interior design. In addition, the size of the indoor unit of the air conditioner is of great importance. Its width varies within 0.7-1.6 m, the depth can be from 16 to 20 cm, and the height is from 20 to 32 cm.
The indoor unit consists of the following components:
- front panel;
- coarse and fine filters;
- evaporator;
- fan;
- horizontal and vertical blinds;
- indicator panel;
- control boards;
- condensate collection tray;
- choke connections.
The front panel looks like a plastic grille. It provides air access to the unit. The coarse filter traps large dust particles, debris and animal hair. It is a plastic mesh that needs regular cleaning (at least 2 times a month). Fine filters are of two types. Coal types of products are aimed at removing unpleasant odors, and electrostatic ones remove plant pollen and fine dust from the air.

The air conditioning system must necessarily fit into the interior design
The indoor unit has a 3 or 4 speed fan. An evaporator is essentially a radiator where a cold working medium heats up and turns into a vapor state. The air currents that pass through this element, on the contrary, are cooled.
Horizontal louvers control vertical air movement. They are equipped with an electric drive. Their position is adjusted using the remote control. Horizontal blinds are capable of automatically oscillating movements, as a result of which the cooled air is evenly distributed throughout the room. The display panel is located on the front side of the split system. It is a set of light indicators that allow you to determine in which mode the air conditioner is operating. In addition, LEDs indicate breakdowns.
In the sump, which is located under the evaporator, water collects, it is discharged outside using a drain hose. The control board consists of an electronics unit and a microprocessor. Fitting connections are used to connect tubing between outdoor and indoor units. Vertical louvers control the horizontal air movement.
Note! The position of the vertical louvers is manually adjustable. Only some premium split-systems can be configured using the remote control.

The indoor unit is a complex device from a technical point of view, consisting of many elements
What is more profitable: professional installation or do-it-yourself installation of a split system
The price of installing an air conditioner depends on the complexity of the work, on the capacity and size of the equipment. In order for the comparison to be correct, as a basis, we can consider the cost of professional services for the installation of a household appliance of low power, for example, 3.5 kW.
This service includes:
- installation and connection of both blocks;
- harness laying (up to 5 m);
- the formation of through holes in the wall.
Also, the cost of installing the air conditioner includes the cost of consumables. On average, professional installation of low-power split systems costs a client 5500-8000 rubles.
Average prices for renting a tool and purchasing materials for installing an air conditioner in an apartment with your own hands:
- Perforator ("Makita") - 500 rubles per day.
- Two-stage pump - 700 rubles / day
- Installation kit + communications (5 m) - 2500 rubles.

Self-assembly of the split system saves from 1500 to 4000 rubles
In some cases, equipment is leased only on a security deposit. It is approximately 4000-8000 rubles. The amount of the deposit depends on the cost of the equipment rented. If pipe rolling is required, then to the specified list you will have to add sets of tools designed for this purpose. The cost of their rent is 350-500 rubles / day.
The total amount reaches 3700 rubles. To this value you need to add 10%, which will cover unexpected costs and the purchase of consumables. As a result, you get about 4000 rubles. This means that self-installation of the split system saves from 1500 to 4000 rubles.
It should be noted that the minimum amount for a professional installation does not always include a complete list of works. The client may have to pay extra for some of them. Taking this into account, we can conclude that the savings are about 2500-3500 rubles.
Note! Economic benefits can be achieved only as a result of the correct installation of the split system with your own hands. Repairs and alterations will only incur additional costs.

The cost of installing the air conditioner includes the cost of consumables
How to do it yourself: servicing the air conditioner at home
To achieve savings, many apartment owners resort to self-service of HVAC equipment after installing the air conditioner with their own hands. Videos from the network contain a lot of useful information on this issue, so there are no particular problems.
Related article:
How to choose an air conditioner for an apartment: effective cooling and air ventilation
Types and features of devices, additional functions. Calculation of power by the parameters of the room. Care tips.
The simplest cleaning method is foam rinsing. For this, a special detergent is used, which is sold in the form of an aerosol can.
The procedure for cleaning the split system with foam:
- Disconnect the air conditioner from the mains, open its cover and take out the filters.
- Rinse the filters with running water and leave to dry.
- Treat the fins of the evaporator with foam from a spray can and maintain the time specified in the manufacturer's instructions (10-30 minutes).
- Install the filters back and turn on the air conditioner, setting it to ventilation or heating mode (the choice of the mode depends on the recommendations of the foam manufacturer).
- After 30 minutes. the air conditioner can be turned off and ventilated.

The most common way to clean an air conditioner is to rinse it with foam.
In the video "How to clean a split system at home" you can get acquainted with this process in more detail. This method is suitable for removing dirt from the heat exchanger. To clean the drain pan, fan and hidden areas of the air conditioner, you will have to disassemble it.
How to install the air conditioner: choosing the optimal installation location
Usually, there are no problems with installing an air conditioner with your own hands in a private house. The main thing is that the outdoor unit is fixed to the load-bearing wall. If installation work is carried out in an apartment, you will have to reckon with neighbors and adhere to standards.
The following norms are provided for placing the indoor unit:
- The distance between the split system and the ceiling is at least 15 cm.
- Between the air conditioner and the wall (left or right) - at least 30 cm.
- Between the split system and the floor - 2.8 m;
- The distance to the nearest obstacle is at least 1.5 m.
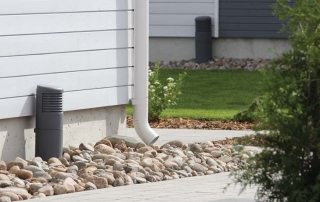
The outdoor unit is most often mounted near a window. On the first and second floors of the building, the structure is located as far as possible from passers-by. On floors above, the unit can be installed to the side of the window or directly below it.

The efficiency and correct operation of the equipment depends on the correctly chosen place of installation of the air conditioner
The length of the route between indoor and outdoor units should not exceed 6 m.Otherwise, an additional amount of working substance will have to be pumped into the system. If the distance between the evaporator and the compressor is 1 m, then the length of the route should be no more than 5 m. In this case, all unnecessary is collected in a ring and hides behind the block.
Interesting fact! Each manufacturer has its own maximum between blocks. For Panasonic, it is 3 m, and Daikin recommends a distance within 1.5-2.5 m.
To install a window air conditioner with your own hands, certain requirements are also assumed. The structure is placed directly on the windowsill. For installation, a special casing is used, which comes with the device, or a jumper is inserted into the window. If you do not want to spoil the double-glazed windows, the window window will be the best place for such an air conditioner.
It is not recommended to mount the window device into the wall if its thickness is more than 25 cm. In this case, the intake grilles may be blocked, which will restrict air access, reduce the efficiency of the air conditioner, and its parts will fail prematurely.

Open air conditioners must be installed on the floor
The requirements for the installation site of a mobile air conditioner with your own hands depend on the type of device. Closed models are best placed in the corner of the room, on a cabinet or shelf. Open-type appliances, on the other hand, must be installed on the floor. In this case, the air duct of mobile air conditioners is led out through the window.
How best to place the air conditioner: do-it-yourself installation to the left and right of the outer wall
The indoor unit in the room can be placed to the left or right of the outer wall. Each installation option has its own characteristics. If the block is located on the left, and its route extends out of the room exactly, then the air conditioner is fixed at a distance of at least 50 cm from the outer wall. This segment can be reduced to 10 cm. To do this, it is necessary to wrap the track onto an adjacent wall, making sure to keep its length equal to 50 cm. It is not allowed that this figure is less.
If it is not possible to place the track on an adjacent wall, there is an alternative. The outlets can be led out from the left side of the air conditioner. To prevent the pipes from spoiling the appearance of the room, they should be laid in grooves. This option is possible if the area of connection between the route and the terminals is hidden under the cover and, if necessary, access to them is provided.
If the work will be carried out on the front side of the building or the house is of cultural or historical value, it will not be possible to stretch pipes and cables along the outer wall without spoiling the appearance of the facade. In this case, the air conditioner route is mounted indoors. Communications fit into the grooves. This method of installation requires significant costs and efforts, but the result is aesthetic.

The indoor unit can be installed to the left or right of the outer wall.
Helpful advice! The most budgetary way to lay a route indoors is to install communications in the corner of the room. Special boxes are used as camouflage.
The connection option for the air conditioner to the right of the outer wall is one of the standard solutions. In this case, the track in a special box is led directly into the wall. If necessary, communications can be directed downward in the corner of the room using the same box. It is also allowed to use strobes for laying the route indoors.
How to choose a place to connect an external air conditioner unit
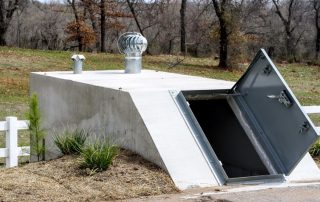
There are many more problems with the placement of the outdoor unit, since not all buildings can be equipped with such equipment on the walls. In this case, there are two options:
- Installation of climatic equipment in a room intended for these purposes - air conditioning.
- Installing an air conditioner through a loggia or balcony.
In buildings where the installation of climatic equipment on the facade is prohibited, balconies and loggias are usually glazed. In such conditions, it is very difficult to provide optimal conditions for the operation of the air conditioner. It is imperative to organize a cooling system to prevent overheating of the equipment. You should also take care of the effective removal of air that has already been exhausted.

The outdoor unit is often hung under or on the side of a window
If there are no bans on the placement of climatic equipment, then the split system is usually fixed on the wall or on the balcony fence. You can do this on the front or on the side. If it is planned to install the air conditioner on a glazed balcony, the outdoor unit is mounted so that there is an opening sash above it. Otherwise, the maintenance of the split system will be problematic. On the loggia, equipment can only be placed on the front side.
If the apartment has neither a balcony nor a loggia, the external block is hung directly under the window or on the side of it. This is done in the place where there is an opening sash. Otherwise, do-it-yourself maintenance, cleaning or dismantling of the air conditioner will be impossible. To carry out these operations, you will have to call industrial climbers.
Recommendations for installing an air conditioner: instructions and step-by-step installation of a mobile device
To install an air conditioner at home, you will need to build a special structure consisting of a frame from a mosquito net and plexiglass. The configuration of the air conditioners has a branch pipe designed to discharge exhaust air outside the premises, as well as the connecting parts necessary for its fastening. To prevent hot streams from getting back into the room, you need to buy a special air duct in the form of an outlet. Subsequently, it will be mounted in plexiglass.
Helpful advice! On sale you can find various options for sockets that are fixed with glue or screws. It is better to give preference to products equipped with pressure rings. They are the most convenient.

Mobile air conditioner can be used as a temporary alternative
Instructions for installing a mobile air conditioner in an apartment with your own hands:
- A mosquito net is taken, the dimensions of which correspond to the size of the sash, where hot air will be removed from the room.
- Its dimensional parameters are measured and transferred to plexiglass. To do this, you can use an awl or a breadboard knife.
- A piece is cut out of the plexiglass in accordance with the markings.
- The edges of this section should be sanded with sandpaper.
- In the place where the air duct will be attached, a hole is cut in the plexiglass for its installation.
- An air outlet-outlet is inserted into this hole and sealed in place. For this, a pressure ring, if provided, or a sealant can be used.
- Plexiglas is glued to the previously degreased surface of the frame.
- The mosquito net is carefully removed from the frame using pliers or tweezers.
All that remains is to open the sash of the window for ventilation and insert a frame with plexiglass there, connect the air duct to the outlet and turn on the device. Of course, a mobile unit is not as efficient as a full-fledged split system. On the other hand, it is much more difficult to install a more powerful air conditioner with your own hands. The mobile device can be used as a temporary alternative. It is also suitable for cooling a specific area in the room.
Air conditioner installation instructions and a step-by-step description of all operations
Before starting work, you need to make sure you have the necessary tools and consumables. By appointment, they are divided into several groups. For installation work, you will need to purchase power tools:

If you are going to install the air conditioner yourself, you need to prepare in advance all the tools that you may need
- grinder;
- puncher;
- drill.
To install the air conditioner yourself, you will need a measuring tool and marking devices. In order for all structural elements to be installed evenly, it is imperative to use a laser or building level. Markers or marking pencils are required to draw lines.
High-quality installation of climate control systems is impossible without specialized equipment:
- Tools for working with copper pipes - gas torch and solder (for joining by low temperature welding), pipe cutter and pipe bender, as well as a rolling or rimmer for forming a chamfer.
- Industrial vacuum cleaner - for removing small debris and dust.
- Vacuum pump - for drying the line.

Before you start installation, you need to study well the installation process of split systems
Installation of climatic equipment is impossible without plasterboard, pliers, stepladders, screwdrivers and other auxiliary tools. Before starting work, you need to carefully study the process of installing split systems, videos on the Internet can provide invaluable assistance in this matter.
Important! Do not use a hacksaw for cutting pipes. When using this tool, small chips are formed, which will enter the line and cause damage to the air conditioner.
How to install an air conditioner: installation of outdoor and indoor units
First, you need to determine the places where the blocks, the route and other elements of the climatic equipment will be located. To do this, you need to walk along the entire route with a device designed to detect wiring and apply a preliminary marking.
After that, a plate is attached to the wall to fix the indoor unit. This element is placed strictly in a horizontal position, so in the process of work it is imperative to use a building level.

The choice of brackets for mounting outdoor units must be approached very responsibly
Indoor unit installation procedure:
- The plate is applied to the wall, leveled and marked where the fasteners will be placed.
- The plate is removed, and holes are made at the marked points with a drill.
- Fasteners are installed. In wooden houses, you can use self-tapping screws, for concrete and brick buildings it is better to take dowels.
- The plate is put in place and securely fixed. Particular attention should be paid to the latches that hold the block in place at the bottom.
It remains only to check the horizontalness of the plate and fix the evaporator on it.
Then you should install the air conditioner yourself from the outside. To do this, taking into account the standards, markings are applied, in accordance with it, metal corners or brackets are installed. As fasteners, you can use stainless steel anchor bolts measuring 10x1 cm. The choice of brackets must be approached very responsibly. These elements must not only support the weight of the outdoor unit, but also cope with wind and snow loads.
After making sure that the brackets are level, the outdoor unit is bolted to them. The compressor must be lowered to the installation area very carefully, having previously tied it with ropes. In the place where communications will pass through the wall, a through hole of the required size is made with a puncher.

Do not install the air conditioner close to the ceiling or side walls
Helpful advice! To prevent the walls from becoming saturated with moisture, it is advisable to use pipes in a heat-insulating shell.
The second stage of installing the air conditioner with your own hands: connecting blocks
A cable and copper pipes of two diameters are used to connect the outdoor and indoor units. The dimensions of the connecting elements are usually indicated in the instructions that come with the split system. The length is calculated taking into account the placement of the blocks. To the resulting value, add 30 cm.Copper tube processing:
- a cut of the required length is made from the bay;
- the edges are straightened, and all burrs are removed;
- plugs and plugs are installed at the ends;
- thermal insulation is put on.
After that, the pipes must be brought out through the hole in the wall and bent in the right places using a pipe bender. Crimp terminals are installed on both sides of the cable, after which it is inserted into the hole and connected in accordance with the instructions.
When installing the split system, the drainage tube is connected to the indoor unit with your own hands (a special outlet is provided for this) and is led out to a distance of about 80 cm from the wall.To eliminate sagging, it should be fixed at every meter. Before laying communications in a plastic box, they should be tied into a bundle using metallized tape or ties.

The outdoor unit is installed first, and then the system is mounted indoors.
How to connect an air conditioner: connection of copper pipes
First, the tubes are connected to the indoor unit. On its side wall there are two ports with fittings of different diameters. You need to unscrew the nuts from them. As a result, a hiss will appear, indicating that nitrogen that has been injected by the manufacturer is escaping from the block. It is necessary to protect internal parts from oxidative processes.
Next, you need to remove the plugs from the tubes and once again check their edges for defects. The surface must be flat. After that, the union nuts can be put on the pipes.
Important! It is imperative to make sure that the thread is pointing in the right direction.
Then flare the ends of the tubes. During this procedure, you need to hold the product with the hole down so that dust and small chips do not get inside. The tube is clamped in the holder so that 2 mm remains outside. Then the roller is installed, the screw is tightened. This is done until the cylinder stops lowering. As a result, a "skirt" is formed on the product.

Copper pipes are connected to the indoor unit of the air conditioner
The tube is connected to the outlet of the indoor unit with a flared edge. A union nut is used as a connecting element, which is tightened with a wrench. No need for sealing materials. The tubes are connected in the same way to the external unit.
How the air conditioner evacuation procedure is performed
The evacuation procedure is necessary to remove residual argon and air from the system. This will extend the life of the equipment. This will require a vacuum pump with two pressure gauges to monitor the system pressure. This tool connects to the filler port on the outdoor unit. Within 15-20 minutes. residual nitrogen and air will be completely removed from the system.
After the specified time has elapsed, do not immediately disconnect the pump. It turns off and remains in this position for another half hour. During this period, you need to carefully monitor the readings of the manometers. If they change, it means that the system is leaking. In most cases, the problem is in the area where the copper pipes are connected. This malfunction must be eliminated.
If the reading remains unchanged, open the bottom valve fully without disconnecting the pump. When a noise appears, this will mean that freon has begun to fill the system. Wear gloves and quickly disconnect the pump hose and then open the top valve on the track.

Installation of a split-system necessarily ends with the evacuation procedure
The procedure for installing an air conditioner with your own hands without a vacuum pump:
- Unscrew one cap on the top port and two on the bottom.
- For the outlet of the lower port, which is located perpendicular to the side wall of the split, it is necessary to select a hex key of the appropriate size.
- The key is inserted into the slot and rotated counterclockwise 90 ° for 1 second. Working substance will start to come out of the block.
- The same port has a spool outlet. For a split second, press the spool with a long object, but not with your fingers. A hiss will appear, indicating that a gas mixture is coming out of the unit. Don't let it out completely.
It is necessary to repeat the cycle again: open the supply of freon with a hex key for a split second, and then release the gas mixture. This will be enough for a 4 m track. It remains only to tighten the plug at the outlet with the spool and open the valves on the upper and lower ports using a hex wrench to release the working substance into the system.
This completes the installation of climatic equipment. Vacuuming the air conditioner without a pump can be used as an alternative solution in the absence of a tool, but there is a possibility that there will be a small leak of freon.

After installing the split system, all excess air and moisture should be removed from its device
Installing an air conditioner is a complex procedure. However, subject to all requirements and recommendations, it is quite possible to carry out this event yourself.