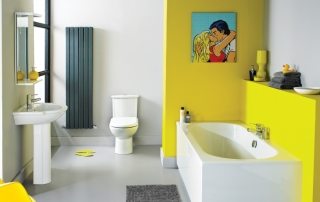
Plasterboard is a popular material used primarily for wall and ceiling cladding. However, due to its pliability in work, it is often used to create partitions and various structures that can fully replace massive furniture. One of the varieties of such products are drywall shelves in the bathroom, which are practical, original and durable.

Drywall is a popular material for mounting shelves in the bathroom
Content
- 1 Shelves in the bathroom made of plasterboard: design features
- 2 Materials for creating drywall shelves in a bathroom
- 3 Drywall shelf above washing machine
- 4 How to make bathroom shelves with side walls
- 5 Creating a drywall niche in a bathroom with shelves
- 6 How to make curved wall drywall shelves
- 7 Laying tiles in the bathroom on drywall
- 8 Finishing a niche in a plasterboard bathroom with plaster
Shelves in the bathroom made of plasterboard: design features
Drywall is a finishing material that is used for the roughing layer. It is finished with ceramic tiles, wallpaper, paint or other cladding. The material does not have a bearing capacity, it reacts poorly to mechanical and shock loads. Drywall can deteriorate from constant exposure to heavy and damp objects.

Long shelf with LED lighting
Important! For rooms with high humidity, you should choose a material marked with blue or green gypsum fiber board, which is impregnated with special protective compounds against moisture and fungus.
A surface faced with tiles, mosaics or porcelain stoneware acquires strength, durability, rigidity and aesthetic value. Such shelves can be safely installed in bathrooms for storing various accessories, cleaning and detergents. The moisture-resistant finishing surface reliably protects the drywall from the harmful effects of moisture, contributing to a long period of operation of the structure.
Plasterboard sheets are attached to a frame made of a galvanized profile using self-tapping screws. The material can be used to create various multi-tiered storage systems. You can close the plasterboard pipes in the bathroom by securing the stationary shelves under the washbasin and bathtub and covering them with a screen. The material is suitable for creating curved structures that are built into the space between plumbing fixtures, which allows you to rationally use free space without overloading the overall environment.
Drywall bathroom shelves have many undeniable advantages.The material is environmentally friendly and safe, does not contain harmful components, does not emit toxic substances into the atmosphere. Drywall is characterized by good sound insulation properties. It is quite flexible, so it is easy to work with it.

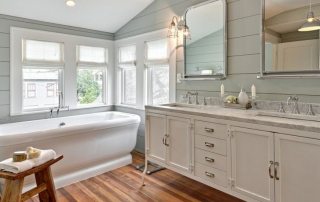
Shelves in the bathroom made of plasterboard and wood
From drywall, you can easily create shelves in the bathroom with your own hands of various configurations and sizes, which, due to their low weight, will not burden the structure, will not create additional load on the floor. The design of the surface of products depends solely on the preferences of the owner. Correctly installed structures are quite sturdy and capable of supporting significant weight. Plasterboard products are low cost.
Varieties of plasterboard bath shelves
There are many variations of drywall bath shelves. The classic product is a cantilever design without side and rear walls. This shelf is notable for its shallow depth. It is attached to a steel profile previously fixed to the wall. Since it is not able to withstand serious loads, the shelf width usually does not exceed 20-25 cm.
Such a shelf can be installed in any free spot on the wall. Anchors are used as anchors for the bathroom shelves. The frame is sheathed with plasterboard on all sides. Further, the structure is finished with facing material.
Useful advice! To increase the load-bearing capacity of the cantilever structure, it can be reinforced with straps at the top and jibs at the bottom.

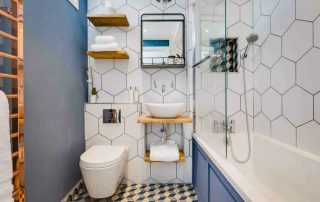
When cladding the installation in the toilet, a compact and functional shelf is formed
Do-it-yourself corner shelves in a toilet or drywall bathroom are more durable and rigid, since they are attached on both sides. Such products in shape can be rectangular, convex semicircular with an outwardly protruding radius edge, concave semicircular, or arbitrary design. The last version of the products is the most difficult to manufacture, but they have a high decorative value.
The next type is the shelf with side walls. Such a product can rest on the floor, in which the side parts are elements of the fence and stiffeners, or rest on a horizontal surface. The last option is characterized by a high load-bearing capacity. It can be implemented in an existing niche or in a created plasterboard false wall with shelves.
Curved shelves made of gypsum plasterboard look beautiful and organic in the bathroom, which simultaneously rest on the floor and are fixed to the wall. In their manufacture, an arched profile is used to create radius sections. Before sheathing the frame, the drywall sheets are soaked or cut into narrow elements with a width corresponding to the inner side of the bend radius.
Materials for creating drywall shelves in a bathroom
The main materials for making do-it-yourself bathroom shelves are drywall and metal profiles. The frame of the structure is created from galvanized profiles. It is based on UW or UD guides in the form of a kind of rails made of thick metal sheets. Elements can be 50, 75 and 100 mm wide and 40 mm deep. The basis for the gypsum plasterboard is CD bearing profiles, which are fixed on the guide elements.

For the manufacture of shelves, sheets of drywall and a metal profile are required
When creating curved structures, arched profiles in the form of slats with reinforced perforations are used. Such elements can bend in any direction due to the presence of a large number of holes and notches in their structure.
The frame created from the profiles is sheathed with plasterboard.It is represented by sheet building and finishing material, which consists of a core, protected on both sides by a cardboard layer. Cardboard gives the product the necessary rigidity, helps to reduce the stress of gypsum during installation and during operation. It also protects the inner layer from abrasion.
There are several types of drywall, each of which is used for a specific task. To create shelves, moisture-resistant plasterboard is used in the bathroom under the tile with the GKVL marking, where the "B" symbol indicates the moisture-repellent performance of the product. Such sheets have a green or bluish tint. The composition of drywall contains special modifying components that reduce the absorption of moisture, and prevent the appearance of fungus and mold on its surface.
Plasterboard has a number of distinctive advantages, which makes it in demand when organizing the interior space of premises. The material is environmentally friendly, resistant to temperature extremes, good noise insulation qualities, and durability. Drywall is malleable in work. The material does not lend itself to deformation without appropriate efforts. Elements of various configurations can be created from it.
Important! Drywall is a fragile material, so you should work with it carefully and slowly.

For the bathroom, you must use moisture-resistant drywall, which has a greenish tint.
Drywall shelf above washing machine
On the wall above the washing machine, you can create several independent drywall shelves by placing the necessary accessories on them. The first step is to build the base of the structure in the form of a frame made of metal guide profiles. Additional reinforcement is created with the help of supporting elements. The profiles are attached in different directions, due to which the frame will acquire the correct geometric shape.
How to hang a drywall shelf on the wall? For this, special anchors are used. The fixed frame is sheathed with plasterboard on all sides. For this, parts of the required dimensions are cut from the material. They are attached to the profiles with self-tapping screws. Corner sections of the structure are hidden behind perforated corners.
The surface of the structure is primed. With the help of putty, all joints are sealed, which are pre-closed with a reinforcing mesh. The material is applied in two layers. After the putty has completely dried, all irregularities are smoothed out with an abrasive mesh. A layer of primer is applied to the finished surface.
Important! In the case of using a backlight for a shelf made of a profile and drywall, the wires should be hidden in the middle of the frame, laying them inside the corrugation.

GKL can be used to mount a worktop and shelves above the washing machine
The final stage of making a shelf on a drywall wall with your own hands is its finishing. The simplest solution is to paint the surface. A shelf faced with mosaics or ceramic tiles looks more aesthetically pleasing and stylish. The material is glued onto a special compound that is designed for wet rooms. It is not recommended to use standard glue, as the glued product may fall off over time.
How to make bathroom shelves with side walls
There are often situations when you need to close the space between the wall and the washbasin or the side of the bathtub. It is impossible to purchase such a storage system in a store, since the dimensions of free space are non-standard, and there are no ready-made solutions. The most suitable and budgetary option is to create gypsum plasterboard shelves on the wall.
The first step is to apply markings to secure the metal profile to all supporting structures. The locations for the starting profile are marked on the floor and slab.On adjacent walls, the designations of the vertical lines of the racks are applied, taking into account the thickness of the drywall and facing material. Lines are also drawn under the horizontal starting profile, depending on the number of shelves.
Plasterboard construction is created using starter and rack profiles. The first type is fixed along the walls to the ceiling. The rack profile is inserted into it, due to which the stiffening ribs of the load-bearing frame are formed. It is fixed with cutters or self-tapping screws. The uprights of the frame must be additionally fixed to the walls with hangers using two dowels-nails for each element.

The side panels for the shelf must be planned during the renovation phase
The finished frame is sheathed with drywall sheets in one layer if thick material with a thickness of more than 8 mm is used, and in several layers using thin gypsum board. The head of the self-tapping screws is screwed in flush. Long screws should be screwed into the starter profile.
Useful advice! To reduce the thickness of the shelf, plasterboard pieces can be inserted into the starter profile, rather than using material to clad the frame outside.
The finished storage system is finished with tiles or mosaics. The first option helps to increase the shelf life. Mosaic is preferable for small curved structures. The final stage is grouting with moisture resistant material.
Plasterboard shelves on the wall can also be painted in any color. In this case, the surface can be left flat or embossed. In the latter case, the process is performed at the stage of filling the structure. When exposed to a wet putty with hard bristles, it will be possible to get a kind of ripple. You can create a raised pattern by stroking the surface with your fingers. Rounded decorative fragments are obtained with a fine spatula, when turning it around its axis.

Drywall niche shelf can be built from wall to wall
Creating a drywall niche in a bathroom with shelves
The box with drywall shelves created in the bathroom looks original and aesthetically pleasing. It doesn't take up much space. This storage system has a shallow shelf depth.
The first step is to outline the structure. Two parallel lines are drawn from the ceiling, denoting the boundaries of the niche, taking into account its width. A mark is made on the ceiling corresponding to the depth of the structure. It is laid at an angle of 90 degrees from the main lines. Using a plumb line, all lines are projected onto the floor. The location of the built-in shelves is marked on the wall. According to this marking, the guides of galvanized profiles are fastened, which are fixed to the ceiling and floor using special fasteners.
Further, bearing profiles are attached to the edges of the horizontal guides. Horizontal elements will be fixed to them, which will be the basis for future shelves. Then sheathing of the vertical struts of the structure is performed with plasterboard sheets. If it is impossible to mount one element in height, it must be installed with a joint that will rest on the lintel. This solution will eliminate the formation of cracks at the joint.
In the process of cladding, grooves are created for horizontal profiles. The rails are attached from the inside of the racks from bottom to top at a distance equal to the size of the shelves. The horizontalness of the elements is checked by the level. The supporting profile is cut in accordance with the length of the shelves. You need two elements for each surface. One fits into the groove. Pressing against the wall, the profile is fixed to the posts and the plane. The second element is also installed in the groove, but is attached to the outer edge of the structure.

Niche is the perfect place to arrange storage shelves
Important! When creating a wide niche with shelves in the bathroom with your own hands, the frame should be reinforced with jumpers that are located between the supporting elements and screwed to them.
The finished structure is completely sheathed with plasterboard sheets. All joints are putty. After complete drying, the surface is sanded. A niche with built-in shelves can be painted in any shade, finished with tiles or decorative plaster with a water-repellent effect.
Related article:
GVL sheet size: how to choose the right material based on the purpose of use
What is the material, where is it used and how it is used. Specifications: dimensions and weight. What to consider when choosing.
How to make curved wall drywall shelves
The creation of curved drywall storage systems is a complex and time-consuming process. Before you make a shelf in a bathroom with an unusual configuration, you should first prepare a template from a durable material. For this, plywood is suitable, from which the curved part is cut. A plasterboard sheet will subsequently be laid out on it.
To obtain a curved element, a drywall blank is processed with a needle roller, which makes small holes in the cavity, and is moistened with water using a sponge so that the liquid comes out of each hole. The part should be soaked for 10 minutes, but the drywall should not be completely wet. The wet element is applied to the curved template and left to dry.
Important! The needle roller should not be rolled back and forth several times, but once enough to get the required number of holes.
A special flexible profile is used to create the frame. The lathing is performed according to the principle described above. However, instead of the usual profiles, arched elements are used.

Curved corner shelves in the bathroom
Useful advice! If there is no arched profile, a regular guide can be made flexible by cutting its edges into small pieces.
Do-it-yourself fastening of a curved drywall shelf in the bathroom comes from the highest point, gradually moving to the edges. In this case, the screws should be located in increments of no more than 15 cm.
Finishing of the finished structure takes place in the traditional way. However, arched corners made of plastic are installed on the outer corners, which lend themselves to deformation due to sections on one side. Conventional perforated corners will not work for curved structures.
Laying tiles in the bathroom on drywall
Before laying bathroom tiles on drywall, prepare the surface. It is pre-primed in 2 layers. Next, all joints are putty using a reinforced tape, which will prevent the formation of cracks in the future. The finished surface is primed again in 2 layers.
When finishing a plasterboard structure with ceramic tiles, you should take special care when choosing an adhesive composition. The best option is an elastic tile adhesive. The material is available in the form of dry powder or ready-mixed. It provides reliable adhesion of the surface to the tiles, which will not fall off over time. The most convenient to use is a modern composition in the form of liquid nails, which is produced in plastic bottles. You will need a special pistol to work with it.

Plasterboard partition tiled and completed shelves made of wood
Tiles on drywall in the bath are laid out according to the selected scheme. You should start from the place that is most visible. Each tile is pre-wetted. The adhesive is applied to the plasterboard surface and the back of the finishing material using a notched trowel. The correct position of the product is checked with a level.The next tile is laid in the same way.
Useful advice! Tiling starts from the edge of the structure if there is a gap at the end of the row that is more than half the width of the tile, or from the center to the edges when the gap is less than half the width of the tile.
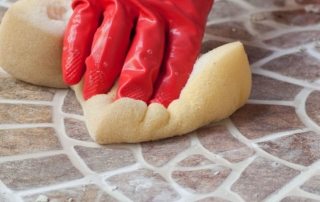
Crosses are placed between the elements in order to form an even and neat joint. The final stage in the manufacture of a shelf for a bathroom made of plasterboard and tiles is to grout the gaps between the finishing elements.
Facing with mosaic plasterboard shelves in the bathroom
Plasterboard shelves decorated with mosaics look beautiful and organic. Such facing material consists of small rectangles or squares. There are also other forms of fragments in the form of an oval, diamond, honeycomb or circle.

Bathroom shelf tiled with mosaics
The mosaic can be piece or assembled on a paper, polymer or silicone base, which greatly simplifies the process of laying the material on the surface. The tiles are available in different designs. The most popular are ceramic options. Products can have a glossy or matte surface, contain a pattern, be in different colors.
Surfaces decorated with glass mosaics look spectacular. Shelves decorated with mirrored puzzles will become an elegant decoration of the room, contributing to the visual expansion of the space. Salt mosaic in the form of opaque glass has a special property of refracting light. Thanks to this finish, the tile shelf in the bathroom can become an accent element of the room.
Thanks to the flexibility of the substrate, the mosaic can be laid on any surface configuration. It will completely repeat the contour and bend of the product, so this finish is ideal for curved structures. Interesting design solutions are shown in the photo of the shelves in the bathroom made of plasterboard and mosaic.
Important! Before putting mosaic tiles on drywall in the bathroom, the surface should be perfectly leveled, otherwise all its defects and flaws will be visible.
The modules are laid according to the same principle as when using ceramic tiles. Products on a mesh basis are attached with mosaics to the outside, and the module on a paper basis - mosaics to the inside. After stacking, the paper is peeled off the surface. The modules should be leveled with a rubber roller. Grouting is carried out 1-2 days after laying the tiles.

The back wall of the niche in the bathroom is tiled with mosaics
Finishing a niche in a plasterboard bathroom with plaster
The storage system in the plasterboard bathroom, finished with plaster, looks stylish and original. There are several types of material that create different effects.
Structural plaster contains pebbles, which can be of different sizes. The finishing material is applied to a flat, primed surface with a trowel or spatula. The future engraving will depend on the direction and nature of the movement. A different texture is obtained due to the granular structure of the material. The surface hardens after 3 hours. Complete drying occurs after 7 days.
Textured plaster creates a unique pattern on the plane. It contains binders and special additives that give the material plasticity and slow setting. It is applied with a spatula, with which various reliefs are recreated. The original texture can be obtained by adding pebbles, wood, cotton fibers, mica, fine-grained sand to the mixture. The surface dries up after 5 hours.
Useful advice! To create a unique surface texture, special rollers for decorative plaster are used.

Decorating bathroom walls and furniture with decorative plaster
The niche will look impressive and presentable with shelves or a plasterboard countertop in a bathroom finished with Venetian plaster.The composition contains marble flour, which creates a slight overflow on the surface. The material is applied in a thin layer with a spatula. After complete drying, excess and roughness is removed from the surface. Thus, 10 layers of plaster are applied in stages. The final stage of creating a marble surface is the application of white wax and its polishing.
The storage system looks especially luxurious in the form of a box in a plasterboard bathtub, finished with silk plaster. The result is a shimmering, velvety surface in the desired shade. The plaster is applied in 2-4 layers until the desired silky texture is formed. One layer dries in 4 hours.
Drywall, as a material for the manufacture of shelves for toilet and bathroom, has proven itself from the best side. It can be used to create structures of various configurations. Plasterboard shelves with decorative trim from tiles or plaster are strong, durable and attractive in appearance.