The drip-in pools for summer cottages are an ideal alternative to natural reservoirs. If you are an adherent of an active and healthy lifestyle, then it is high time to equip your suburban area with a swimming pool. A photo of summer cottages testifies to a huge variety of foundation pit models of various sizes. Choosing an acceptable option is a responsible decision. In order for the structure to be stationary and serve for a long time, give preference to dug-in structures.

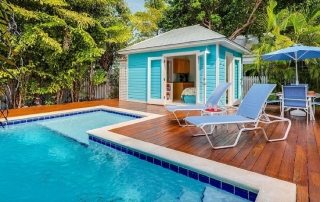
Comfortably equipped recreation area with a swimming pool
Dug-in pools for summer cottages. Types of structures
The properties of dug-in pools in the courtyard of a private house (photo options can be seen on the Internet) primarily depend on the building materials used in their construction. Requirements for artificial reservoirs include the following:
- complete tightness of the pool bowl;
- the purity of the water in the tank for a long period (for these purposes,disinfectant tablets);
- durability of the pool cover material;
- decent appearance of the structure;
- justified construction price.

The presence of various bowl sizes allows you to install a pool even on the territory of a small summer cottage
Many manufacturers offer models of built-in outdoor pools for summer cottages from different materials. However, in order to choose the optimal structure and material for finishing the container, you need to decide which criteria are the main ones for you. For those who plan to build a pool in the country with their own hands, it will be necessary to carry out a competent project, taking into account the use of one or another type of waterproofing and finishing.
Reinforced concrete pools
For the construction of such structures, high-strength steel is used. The process of making concrete pools is relatively long and painstaking, but such structures will also serve for several decades. In addition, their advantage is the absence of restrictions in size, bowl shape and design in general. After several months, you can get a completely unique version.

Small pool of simple rectangular shape
The advantages of reinforced concrete pools include excellent frost resistance, strength and long service life, the ability to experiment with the shape and additional elements (steps, springboards, parapet, etc.), as well as a great appearance. Such pools can be mounted in an open area, indoors, or one part can be done inside the building, and the other - under the open sky.
The disadvantages include labor-intensive installation, expensive materials (reinforced concrete structures are expensive), a large percentage of manual labor during installation, and the presence of a sufficient amount of free territory for installation. However, the resulting pool will imitate a natural body of water, around which you can arrange a beach area, a place for games or a recreation area. For clarity, you can see the photo of the pools in a private house.
, 9 - lattice overflow tray")
Diagram of the device of a reinforced concrete pool bath: 1 - reinforcement cage, 2 - concrete M350, 3 - plaster layer, 4 - waterproofing, 5 - reinforcing fabric, 6 - waterproofing, 7 - tile adhesive, 8 - tile (mosaic), 9 - lattice overflow tray
The construction of a concrete pool with your own hands is associated with the presence of special equipment and certain installation skills. Therefore, it is better to entrust the construction of the structure to professionals who can build a pool of any shape and size you like. In addition, specialists in this field can equip the reservoir with additional devices: fountains, attractions, hydromassage equipment.
In addition, concrete pools can be equipped with steps for easy descent and ascent, counter-currents, wave-formers. Pools equipped with underwater colored lighting look spectacular. When building a concrete pool with your own hands, it is necessary to provide for all these points.

A concrete pool can be decorated with a beautiful waterfall
Many people prefer to attach the pool to the sauna. This neighborhood allows you to effectively use the method of hardening the body. Pools can be located both inside the bathhouse itself and outside. A selection of photos of a bath with a pool illustrates the functionality of such a union. Use a photo of a pool in a private house as an example when building your own structure.
Related article:
Children's pools for summer cottages: lots of fun for kids. Features and Benefits. Slide pool options. Product care, review of popular models. Where to buy children's pools.
If you still think about how to make a pool with your own hands in a concrete cottage, you should carefully read the stages of installation of such structures and the advice of specialists. In addition to step-by-step instructions, on the Internet you can find a video "How to build a pool with your own hands."

The dug-in pool is often placed indoors or a canopy is mounted above it.
Useful advice! When pouring a concrete reservoir yourself, do not forget to provide a box for mounting a pool skimmer. You can install the device with your own hands using the instructions for its installation.
Some people prefer to equip pool pavilions with their own hands. The presence of such a structure helps to maintain the temperature of the water, excludes its evaporation, and also protects the pool from the ingress of debris, leaves and small objects. Photos of indoor pools in the country show the various shapes and sizes of such pavilions.

You can remove visible debris from the pool using a net
Composite structures
Among the owners of suburban areas, composite pools in the country are gradually gaining popularity. Photos of models of elegant and sophisticated shapes indicate that such designs fit into any landscape and complement it with dignity. The presence in them of Roman steps made of a trauma-safe coating makes it possible for children and elderly people to indulge in water procedures.
Composite pools are made by contact molding of several layers of high-strength polymeric materials (resin, acrylic, UV additive, dye, reinforcing composition). Each layer is manually applied to the matrix mold of the bowl and impregnated with polyester resin. As a result, a pool tank is formed from a multi-layer high quality composite.

The composite pool is characterized by an anti-slip surface of the bottom and steps
Important characteristics of such pools are:
- flawlessly smooth surface without joints and seams;
- resistance to decay, UV exposure, mold and mildew;
- low thermal conductivity;
- quick installation (installation of the pool can be completed within a week);
- the possibility of equipping with additional equipment;
- ease of care and maintenance;
- durability (last up to 60 years);
- the possibility of building a composite pool on the site with your own hands.

Composite bowl installation diagram
Those who decide to install a composite pool on their site should keep in mind that when ordering a product, you will need to take care of its transportation. Since the pool bowl is one-piece, special equipment will be required. In addition, it is necessary to take into account the high cost of the pool and the need to attract professional workers for the preparatory work and installation of the structure.
How to build a pool in the country with your own hands? An informational and educational video of the pool with your own hands will help you deal with the main technical aspects of installation, ways of decorating the beach area of a composite structure and options for facing.

Spacious mosaic pool
Useful advice! Reinforcement and concreting of the area around the composite pool contributes to the reliable fixation of the bowl in the pit.
A do-it-yourself photo of the pools illustrates various options for finishing the site around the structure. The most reliable and popular finishing material for these purposes is porcelain stoneware.

In-ground composite pool with roman steps
Pools made of polypropylene
Plastic pools for summer cottages are a great opportunity to acquire a garden pond if your financial capabilities are limited. Polypropylene pools have a frame structure and can be installed in a pit or simply on a site cleared of debris and vegetation. The bottom of the polypropylene pool bowl is made of blue plastic 10 mm thick, and the steps for the descent are made of this material. The walls are made of less durable 8 mm sheets.

Plastic pool in the yard of a private house
The main advantages of plastic structures include the following positions:
- environmental friendliness and durability of the plastic used, capable of maintaining the temperature of the water in the pool for a long time;
- complete tightness of the container;
- bactericidal and hydrophobic properties of the plastic surface of the bowl;
- resistance to ultraviolet exposure and temperature extremes;
- the ability to give the pool capacity of any shape and size;
- do not need treatment with waterproofing and facing material;

Various shapes and sizes of the plastic bowl
- quick installation and durability (service life up to 20 years);
- availability of transportation;
- reasonable cost of the pool and installation with proper construction quality.
It should be noted that when using polypropylene pools, damage often appears on the bowl cover in the form of scratches and cracks, which are very noticeable. This is due to the fact that polypropylene is vulnerable to mechanical stress, as a result of which its appearance deteriorates. In addition, without proper processing of the container material with an extruder, seams will become noticeable.

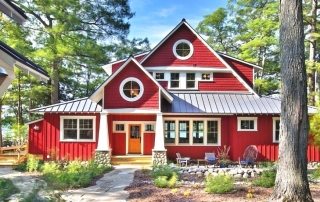
A beautifully designed pool will decorate the yard
Photos of swimming pools in private houses indicate that polypropylene structures look somewhat rustic in comparison with their concrete or composite counterparts. This trend is due to the texture and color limitations of this material.
DIY polypropylene pool installation
Polypropylene is a tough, hard, environmentally friendly material that allows you to create a completely sealed and durable pool bowl.Structures can be of any desired shape, size and do not require the use of waterproofing. Sealing of the pump and filter system bushings, as well as additional equipment, is performed in a plastic sheet by means of special gaskets and bolts.

Installed polypropylene pool in section
Pit construction
If you opted for the independent construction of a polypropylene pool, check out the video "How to make an inexpensive pool in the country with your own hands." From the thematic video, you can find out the peculiarities of making the bowl and the nuances of installing the structure. In addition, useful advice from professionals or amateurs who already have experience in installing such a pool will be very important.
Work begins with the preparation of a pit for a future structure. The dimensions of the pit depend on the size of the container itself. The pit should be about 1 m wider than the bowl in width on each side and 0.5 m deeper. This size of the pit allows you to easily install the pool bowl there and bring all the necessary communications.

Step 1. First of all, it is necessary to determine the place for the pool and dig a pit of the appropriate size
The pit can be dug mechanically, but at the same time the site must be accessible for the movement of the excavator. In this way, you can make a hole in just a few hours. However, often the presence of a fence and the limited territory of the site do not allow the use of equipment. Then you cannot avoid digging the foundation pit by hand.
When constructing a recess for a pool, it is necessary to mark the line of passage of the sides of the pool in order to be guided along it by what distance to deepen. When the pit is ready, a layer of rubble is laid on its bottom, then a layer of reinforced concrete. This is the base and will take an extra half meter of depth, protecting the bowl from sinking into the ground. They will help in the correct organization of work on the construction of a pool in the country with their own hands - step-by-step photos and instructions.

Step 2. A cushion of a mixture of cement and sand is formed at the bottom of the pit
Installing the pool bowl
You can order a polypropylene bowl, which will be manufactured in production using special equipment and the finished product will be brought to the installation site. If you decide to make the container yourself, then you will need to assemble the bowl elements on the spot. To do this, you need to learn how to weld plastic sheets using special technology and equipment.
Helpful advice! The cost of making a do-it-yourself polypropylene pool bowl for a summer residence will be identical to the finished product, since you will need to purchase rather expensive equipment for thermal welding (extruder).

Step 3. Foam plastic with a thickness of 5 cm lies on the finished pillow
The first step is to make the bottom of the bowl. Geotextiles are laid on a concrete pad, and expanded polystyrene on top. The seams of the coating are performed following the recommendations and instructions of the polypropylene manufacturers. The sides of the pool are welded inside and out, getting a double seam. External seams are made using a PP soldering rod. Further, the bowl of a homemade pool in the country house is equipped with stiffeners with its own hands.
For a detailed study of the stages of construction, check out the video "Pools with your own hands in the country".

Step 4. Installing the pool bowl in the pit
Equipping the pool with the necessary equipment
In order for the pool to function fully, it will need to be equipped with pumping and filtering devices. In the places provided for by the project, holes of the required diameter are made. In these holes, pipes are attached for supplying and draining water. It is worth taking care that all pipes and devices have high-quality thermal insulation.
The hydraulic system includes skimmer, water return nozzles, filters, bottom plums. The pool should be equipped with a separate closed filtration system. In addition to the main one, the pool provides additional water heating equipment, lighting fixtures, counterflow and other equipment. The main and auxiliary equipment can be placed in a separate room, for example, in a nearby basement.

Step 5. Around the perimeter of the bowl, a formwork made of foam plastic is placed, then embedded elements are inserted and equipment is connected
After installing the pumps and filters, it is necessary to make a test run of the system and check its correct functioning. To check the quality of the welding joints, the pool is filled with water, after installing spacers. If there are no water leaks and everything is working properly, you can proceed to the next stage of construction, which consists in fixing and concreting the pool bowl.
Securing the bowl and pouring concrete
Before filling the space around the bowl with mortar, care should be taken to maintain the shape of the container. To do this, you can install spacers between the walls of the bowl and the pit. Next, the formwork is assembled and reinforcement is performed. To control the deflection of the structure, the container should be filled with water to a depth of 30–35 cm.

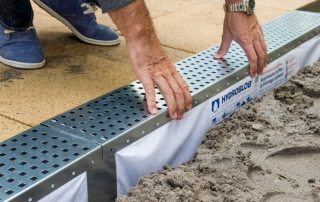
Step 6. Fill in the gap between the formwork and the pool with a dry mixture of cement and sand while filling the bowl with water. The distance between the formwork and the edges of the pit is covered with earth or sand
Concreting is carried out in stages, in small layers. Moreover, each previous layer should dry well before laying the next one. The first batch of mortar is poured 30 cm high and left for a day to set. Further, the bowl is filled with another 30 cm with water and the next layer of solution is laid out to the same height. So, the space is gradually filled to the entire height of the walls of the structure.
It remains to arrange the area around the pool. This can be done in a way that suits you: pour concrete or lay paving slabs... From the do-it-yourself photo of the pools in the country, you can see that many people prefer fem-tiles or paving stones in the design of the space around the reservoir. Such a coating perfectly decorates and complements the appearance of the reservoir.

Step 7. After the solution has solidified, the pool can be filled with water and swim
Before making a pool in the country or in the courtyard of a private house, it is necessary to make a comparative analysis of each material used for its construction. You should evaluate all the advantages and disadvantages of each option and familiarize yourself with the prices of products and their installation. The construction of a dug-in pool will certainly cost more inflatable and frame structures, however, a stationary structure will serve you for decades.