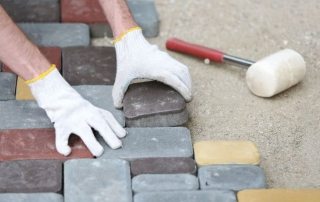
Paving slabs are one of the most popular building materials, widely used for various purposes. With its help, you can decorate garden paths on your personal plot, lay out the sidewalk, parking or playground. The mold for paving slabs with your own hands is relatively simple to make and allows you to significantly save on the purchase of materials.

Using the form, you can make paving slabs with your own hands
Content
Popular materials for making molds
Making a mold for self-casting paving slabs is relatively easy. Various materials can be used for this:
- Wood is the simplest and cheapest option, suitable for casting tiles of simple shapes.
- Gypsum is another easy way to make a mold with minimal costs.
- Plastic - used to create complex shapes of tiles, withstands a large number of castings.
- Silicone is durable and resistant to negative influences material.
- Polyurethane is the most durable and popular mold material.

Various materials can be used to make tile molds: wood, plastic, silicone, plaster
Do-it-yourself concrete mortar is poured inside a self-made mold for paving slabs. In order for it not to stick to the walls, the inside of the template must be lubricated. For this purpose, sunflower or palm oil, special lubricants or just fat can be used. The important point here is to prevent the white solution from staining other colors, so if you plan to make light-colored tiles, do not use coloring lubricants.
Let's take a closer look at the specifics of making molds for paving slabs with our own hands from different materials.
Wooden forms
Molds for wood tiles are made according to the formwork principle. To create them, it is enough to take wooden slats or moisture-resistant plywood, cut the material into pieces of the required length and connect them together with nails. The fasteners should be free to move so that when the mortar is dry they can be easily removed individually.

A wooden form is perfect for making rectangular tiles.
The good thing about a tile made of wood is that it can be made in a matter of minutes, it will not take much effort from you and practically will not require financial investments. Alas, this option has more disadvantages than advantages. Firstly, the wood does not tolerate regular exposure to moisture, and this design will be enough for a small number of castings.Secondly, with the help of wooden planks, you can assemble frames of the simplest configuration, but they will not work for creating complex shapes.
Related article:
Paving slabs for paths in the country. Prices, types and styles. Photo of paths at the summer cottage, paved with paving slabs. Correct selection of products. Tips for laying tiles with your own hands.
Creating a form from a tree is done like this:
- Bars are cut to the desired length.
- The resulting segments are fastened together with nails, screws or metal corners.
- The finished forms are laid on a metal surface or plastic wrap.
- A concrete solution is poured to the middle of the container.
- Reinforcing mesh is installed.
- The sides of the mold are tapped with a hammer so that the mixture is compacted.
- The second half of the solution is poured from above.
- The solution dries up within 1-2 days.
- The form is disassembled, the finished tile is taken out.

Making a mold from wood and paving slabs with your own hands
If you need to quickly and cost-effectively cast a dozen or so square or polygonal tiles, then a wooden shape is the best option. Otherwise, you will have to use other materials.
Plaster templates
Gypsum is another inexpensive and easy-to-use material for making DIY tile molds. Its peculiarity is that you can make a template of absolutely any shape from plaster, so your design imagination will not be limited by anything.

The plaster template allows you to create paving slabs of a wide variety of shapes and sizes
For casting, you will need a plaster mix and an example of the tile that you will be casting. The surface of the tile is carefully treated with a lubricant so that gypsum does not stick to it, then it is laid inside the wooden formwork.
Useful advice! In order for the gypsum not to seize ahead of time, it must be diluted before pouring.
To make the plaster mold stronger, you can add a plasticizer or cement to the mixture. Such a template will withstand more castings and will not crack over time. The resulting liquid mass is poured into the formwork to a height of several centimeters. Despite the fact that the gypsum solution hardens quickly enough, it is recommended to wait a day for complete drying.

Plaster template is easy to make and allows for many creative ideas
The good thing about the plaster template is that it fully reflects the surface of the original. Therefore, if you are interested in how to make a mold for paving slabs yourself so that you can cast a product with a large number of small parts, then the option with plaster will suit you perfectly. The disadvantage of such a template is its fragility. The plaster mold is easy to break or otherwise damage. This disadvantage is offset by the simplicity and low cost of manufacturing a new one.
The subtleties of making a template from plastic
The plastic template is one of the most reliable and durable options. It can withstand about 1000 fillings without any problems, does not crack and does not lose shape over time. Also, plastic allows you to accurately convey the geometry of the original surface, so it is convenient to use it in cases with non-standard tiles.

Plastic molds for molding paving slabs are durable and practical to use
A plastic mold is made using a wooden frame into which molten plastic is poured. To create a template, you will need the following set of tools and materials:
- bars or boards made of wood. Their length should be 2 cm longer than the estimated size of the tile;
- nails or screws for fastening parts of the frame together;
- screwdriver or hammer;
- saw;
- building level for checking planes;
- plastic for molding;
- sandpaper.

Using a plastic template, you can achieve extraordinary clarity of shapes and patterns
How to make a mold for paving slabs from plastic? To do this, you need to perform the following sequence of actions:
- Make a frame of wooden blocks, fastened together with screws or nails. When doing this, keep in mind that the inner frame size is the size of your tile. The frame can be made in the form of any geometric shape, since the plastic perfectly repeats straight, clear lines. With the help of a building level, it is necessary to check the evenness of lines and corners.
- The frame is installed horizontally, molten plastic is poured into it. The plastic hardens very quickly, 50-60 minutes is enough for the form to be completely ready.
- The template is extracted from the wireframe. For this, the latter can simply be disassembled into separate bars. If necessary, the resulting shape can be finalized with sandpaper.
The resulting plastic template will not differ much from the form that can be purchased at a building materials store, and its production will cost you several times cheaper. In addition, the geometry of the tile surface can be absolutely any. You can make not one, but several templates at once in order to fill several tile options.

The plastic mold is easy to make yourself and is much cheaper than buying it in the store
Useful advice! The plastic for the template can be poured not only into a wooden frame, but also into a sturdy plastic food container. Remember to use a paving slab mold lubricant.
Creation of silicone molds for paving slabs
Silicone tile template is the option that most accurately conveys the smallest nuances of the surface. If you are planning to cast complex-shaped tiles, then a silicone mold is exactly what you need. In addition, it does not crack, does not break, and it is very easy to remove the finished product from it.

Due to its high plasticity, silicone allows the smallest details of the texture to be transferred to the tiles
To create this shape, a three-component silicone is used. It contains a base, a catalyst and a hardener, which must be mixed precisely in the proportions set by the manufacturer. The temperature of each of the components must be at least 20 ° C.
In order to make a template from silicone, you will need the following materials and tools:
- container for pouring silicone. You can do it yourself or take a finished product;
- three-component silicone;
- rigid matrix in the form of future tiles;
- vegetable or other oil that will lubricate the form;
- sculptural plasticine;
- construction mixer for more convenient mixing;
- scissors.

For ease of removal of the mold, it is recommended to treat the surface of the container with a lubricant
You need to think in advance how to lubricate the mold for paving slabs. Without the use of lubricants, the silicone will stick to the tile surface that is being copied.
The silicone template is created in the following order:
- Preparing the container to be filled with silicone.
- Laying sculptural clay in a container. In this case, the layer of plasticine should be sufficiently thick and evenly distributed over the entire surface of the container.
- A matrix is installed on the sculptural plasticine, the pattern of which will repeat the silicone template.
- The matrix is lubricated with vegetable oil or other lubricant so that silicone does not stick to it.
- All components of the silicone mixture are thoroughly mixed. A sure sign that the solution has reached the desired consistency is the absence of air bubbles in it.
- The resulting mixture is slowly poured into a container.
- After the silicone hardens, the template is removed from the container, and unnecessary defects are removed with scissors.

Examples of silicone molds of various sizes
Silicone hardening time is about a day. The higher the ambient temperature, the faster the solidification occurs.
Silicone tile template is one of the most durable, stable and reliable options available. It allows you to exactly copy the shape of the surface, so if you plan to mold tiles of complex shapes and can afford to buy expensive components for making a template, then this option is for you.
Polyurethane template
Making a mold for paving slabs with your own hands from polyurethane is a little more difficult than from other materials. This is mainly due to the nuances of working with the material. The polyurethane mold must be cast in a well-ventilated area or outdoors, as the material emits substances harmful to health.
In addition, work requires personal protective equipment: gloves, respirator, glasses. If it comes into contact with the skin or mucous membranes, the mixture is irritating, therefore, direct contact should not be allowed. Also, polyurethane reacts to water, so it is undesirable for it to come into contact with damp or wet surfaces.

When casting a polyurethane mold, use personal protective equipment
If you nevertheless decide to make a mold for tiles from this material, then you will receive a very strong and reliable matrix that can be used not only for the manufacture of paving slabs, but also paving stones.
Polyurethane consists of two components, which are molded into a matrix. After that, the edges of the matrix are raised a few centimeters, resulting in the expulsion of air. The mixture hardens for 24 hours, after which it is removed from the mold and hardens for another 48 hours.
Useful advice! If you need a universal base for a range of concrete products, then the polyurethane option will be optimal.

The tile for laying in a semicircle is made using a polyurethane mold
Form for paving slabs do it yourself: photo instruction
If you do not know how to make a mold for paving slabs with your own hands, a video from the Internet will help you avoid common mistakes. In addition, there are a number of general points that will make life much easier when creating templates and the tile itself:
- If you want to make a mosaic structure or a complex pattern out of the finished product, then create several shapes at once that will complement each other. The main thing is to strictly observe the dimensions and parameters.
- When making a mold for paving slabs with your own hands, create corner patterns as well - this is much easier than cutting off an already frozen product later.
- Large volumes of mortar are best mixed with a construction mixer.
- The cheapest and simplest version of the template is from wooden blocks. Of course, only the simplest polygonal shapes can be made from them, but this does not require the use of either silicone or plastic.

Figure 1. Construction of a wooden mold for paving slabs: 1 - base, 2 - insert, 3 - longitudinal wall, 4 - transverse wall, 5 - screw, 6 - screw, 7 - nut
Of course, there are many specialized points of sale and sites on the Internet where you can buy a mold for paving slabs for relatively little money. But using a homemade option gives you a ton of benefits. This is not only saving money, but also the opportunity to create an absolutely unique tile that will fully match your design imagination.
For independent production of the material, specialized tools are not required, only basic skills in the field of construction and the ability to clearly follow instructions, which can be found in large quantities on the Internet.

Figure 2. Attaching the tile inserts to the mold base
By the way, it is also not very difficult to make a lubricant for paving slab shapes with your own hands.To do this, you may need only vegetable oil or animal fat, which will be applied to the surface of the template.
Material for the manufacture of paving slabs
In order for the future tile to have high performance characteristics, not only its shape is important, but also the material that will be poured into the template. The finished product must have the following properties:
- strength;
- low water absorption;
- resistance to temperature extremes;
- resistance to abrasion and mechanical damage;
- low porosity structure.

Figure 3. Dimensions of the longitudinal wall of the mold
All these qualities are possessed by concrete, which can be purchased in a specialized store or in a warehouse, or you can make it yourself. It will cost less, and the resulting mixture can be of any consistency and color. You can buy a mold for making paving slabs, and make concrete yourself, or do everything entirely on your own.
For homemade concrete, you will need cement, sand, fine crushed stone, water, various modifying additives of your choice, as well as a coloring pigment if the final product is to be colored.

Figure 4. Dimensions of the transverse wall of the mold
Cement is not only the basis of any building mixture, but also one of its most important components. The strength of the future product will depend on its quality, so you should not save at this point. If we are talking about the production of paving slabs, then it is worth taking cement not lower than M500 with a low content of tricalcium aluminate - 5-8%. This will give the finished product a high level of strength and good resistance to adverse natural influences.
As part of a concrete mix for production paving slabs there should be more sand than cement, and its modulus should correspond to 2. The ideal option is river sand, sifted through a fine sieve to remove impurities. In combination with sand, it is recommended to use a special plasticizer, which not only serves as an additional filler, but also binds the friable material.

Figure 5. Finished mold for casting paving slabs
Crushed stone is a large aggregate, which should be in the composition of concrete as much as sand. Crushed stone directly affects such operational characteristics of the future product as strength and frost resistance. If everything is done exactly according to technology and using high-quality materials, then the finished tile can withstand up to 300 freezing cycles. The optimal size of crushed stone fractions is 5-10 mm.
One of the important components of the building mixture for the production of tiles is a plasticizer. It gives the mortar such additional qualities as elasticity and water resistance, minimizes the likelihood of cracking of the product as a result of drying or delamination of concrete. The plasticizer can be purchased or homemade. The latter option is cheaper and involves the use of chicken protein, hydrated lime, polyvinyl acetate glue, laundry detergent or detergent.

Figure 6. Pouring concrete into a wooden mold
Useful advice! For greater reliability, polyamide or glass fibers can be added to the concrete composition, which will increase the strength indicators. It is important that their content does not exceed 1 kg per m³ of mixture.
If you want the finished product to be of a certain color or shade, then you can use special coloring pigments. The best option in this case would be the use of inorganic oxides, which dissolve in water and are stirred in concrete. The proportions are chosen depending on what color saturation you want to get in the end.

Figure 7. Finished paving slabs
Thus, using a home-made mold and making tiles with your own hands will significantly save the cost of arranging the local area.In addition, the finished paths and areas on your site will have an individual and unique design.