When arranging a roof, many prefer metal tiles. Such popularity of the material is due to its good performance, availability and ease of installation. The guarantee of the long-term operation of the structure is strict adherence to all requirements for arranging a roof made of metal tiles: the installation of each element of the system has its own characteristics and sequence of actions, which is detailed in the article.

Metal tile is a facing material made of galvanized sheet steel
Content
- 1 Metal roofing device: coating features
- 2 The composition, structure of the coating and varieties of metal roof tiles
- 3 What is the best metal tile for the roof: Rukki and other manufacturers
- 4 Performance characteristics of cold metal roofing
- 5 Features of the structure of a warm metal roof
- 6 Sheathing device as an important element of a metal roof
- 7 Fastening of additional elements of the roofing system
- 8 Useful tips for covering roofs with metal tiles
- 9 Creating a roofing cake for a warm metal roofing: installation instructions
- 10 Metal roofing installation technology: fixing counter battens and battens
- 11 Installation of metal tiles: step by step instructions "for dummies"
- 12 Installation of a roof drainage system made of metal tiles
- 13 Arrangement of safety elements when laying metal tiles
- 14 Installation of walk-through and ventilation elements of metal roofing
- 15 A detailed video of the installation of metal tiles when arranging a warm and cold roof
Metal roofing device: coating features
The metal tile is a cladding material consisting of galvanized sheet steel. The coating is made in the form of profiled metal sheets with a specific appearance, imitating the structure of natural tiles.

Scheme of the structure and device of the roof made of metal tiles
Profiling is carried out by imparting a trapezoidal or wavy shape to the sheets, thereby increasing the operational properties of the material.
The metal tile has a number of significant advantages, among which the low weight of the material can be distinguished, due to which an additional significant load is not created on the supporting structures of the building. Such a coating is characterized by high wear resistance, increased strength, resistance to mechanical stress and shock loads, fire resistance, long service life of 15-25 years, simple installation and good potential for the implementation of interesting design solutions.
However, the metal tile is not without its drawbacks. They can be avoided by observing the rules for planning and performing installation work. Metal roofing has low sound insulation. With strong gusts of wind and precipitation, an increased noise level is created.This can be avoided by arranging good sound insulation - for this purpose, a layer of heat-insulating material is used.
Condensation can accumulate in the interior of the roof. To exclude such an unfavorable factor, you should correctly think over the vapor barrier and roof ventilation system. The metal tile has one more drawback, which is associated with the overconsumption of material when installing the roof. The roof covering is produced in fixed dimensions, due to which the formation of unnecessary pieces of material is inevitable. Especially such overspending is noticeable when installing a roof of complex shape with many bends and corners.

The metal tile has a number of advantages, including a chic appearance
The composition, structure of the coating and varieties of metal roof tiles
The metal tile, the photo of which clearly displays the structure of the product, is presented in the form of a steel sheet with a thickness of 0.45-0.6 mm. It is coated on both sides with a protective layer of zinc or other special alloy. A protective coating is applied to the inner and outer surfaces of the product, which consists of a passivating, priming and decorative layer. The latter is a colored polymer coating that gives the product a certain color. Aluminum, steel, copper and zinc alloys are used for the manufacture of profile sheets.
Important! Copper metal tiles are characterized by high strength, wear resistance and durability.
The decorative coating option determines the texture, color, resistance to fading, resistance to mechanical damage and corrosion of the product. The polymer composition used is glossy and matte polyester, polyurethane coating, PVDF, plastisol.
Glossy polyester is an inexpensive but effective coating that is 30 microns thick. The material is characterized by high anti-corrosion performance, resistance to the negative effects of solar radiation. The service life of the product is no more than 15 years.

The metal tile has several different layers of coating on both sides
The matt polyester layer is 35-50 microns thick. The material is resistant to fading and mechanical stress that the roof perceives. Metal tiles can last about 15-20 years. The polymer polyurethane coating has a thickness of more than 50 microns. A roof with such a metal tile can be used for buildings located in different latitudes, since the coating can withstand the temperature range from -60 ° С to +100 ° С. This material is highly resistant to UV and corrosion. The service life is 35-40 years.
Thin PVDF polymer coating with a thickness of up to 30 microns is characterized by high resistance to mechanical and chemical influences. Subject to all the rules of the technology for installing metal tiles, such a roof can last up to 40 years.
Prostisol is a coating made on the basis of polyvinyl chloride, the thickness of which is up to 2 mm. Differs in high anti-corrosion properties and durability, which reaches 50 years. The finely dispersed structure of the embossed surface pattern gives the coating an attractive appearance, which can be seen in the photo of metal roofs.
Varieties of metal tiles, their characteristics
The metal tile has several varieties, which depends on the profile of the product and the shape of the cut.

Modular metal tiles are made of stamped sheets up to 1 m long and up to 1.2 m wide
The profile determines the shape of the used product stamping. Depending on this, there is a metal tile for the roof (the photos clearly display different profiles), Andalusia, Monterrey, Cascade, Modern, Banga, Deckorey, Elite, Finnara, Classic, Vintage.
Andalusia is a wave profile with mirror-symmetrical ups and downs.Monterrey is a symmetrical undulating profile with a steeper and shorter descent than an ascent. A cascade is a wavy profile with a trapezoidal cross-section. Made of polyester coated galvanized steel. The profile resembles a chocolate bar as shown in the roof photo. Modern metal tile is represented by an asymmetric wave profile, which is made in the form of flat edges.
Bang's product has a high wave reaching 660 mm. The Deckorey variant is the lowest profile, which gives the product a sophisticated appearance. Elite shingles differ from other options in the largest wave height, which looks best on roofs with large slopes.
Finner's profile is a new waveform, which makes it look similar to cement-sand or ceramic tiles. The Classic and Vintage profiles have an even coating with small sides, thanks to which the products fit together, forming a seamless surface.

Metal tiles may differ in appearance, which depends on the profile of the product and the shape of the cut
The form of cutting the material (this determines the convenience of laying metal tiles with your own hands) can be sheet, modular or piece. The first option is the most demanded and cheapest, represented by a canvas 0.5-8 m long and 1.18 m wide. It is used for single-slope or gable roofs of a large area. The price of installing metal tiles per m2 starts from 180 rubles.
Modular shingles are represented by short stamped sheets up to 1 m long and up to 1.2 m wide. The piece version looks like separate elements that repeat the shape of natural shingles.
What is the best metal tile for the roof: Rukki and other manufacturers
Before studying the instructions for installing metal tiles, you should familiarize yourself with the manufacturers of the material. The Finnish company Rukki is the market leader in the manufacture of quality roofing. The company offers various options for the profile of metal tiles. The products are characterized by high quality workmanship and noiselessness, which is achieved through the use of secret technology and improved equipment, durability, which is approximately 50 years, affordable cost, which is in the range of 280-600 rubles / m².
The roof covering is made from our own raw materials. Each batch of the product is subjected to strict quality control, which is carried out by the method of exposure to heavy precipitation, temperature extremes, salt fog and sulfur dioxide.

The Finnish company Rukki is the market leader in the production of high-quality roofing
The original Monterey metal tile is produced by Rannila Steel. The products are characterized by high technical and operational properties. Two Finnish firms, Poimukate and Takotta, have proven themselves well in the construction market, offering high-quality metal tiles in the middle price category. Swedish companies Areco and Mera System are among the oldest manufacturers of the most reliable and durable roofing. The price of installing a roof made of metal tiles starts from 800 rubles, which is associated with the high cost of the material.
Domestic manufacturers such as Interprofil, Metal Profile and Grand Line keep up with foreign brands. They offer a roof covering that meets the international standard at a lower cost, which comes with lower transportation costs.
Performance characteristics of cold metal roofing
The roof can be cold and warm, which determines the technology of laying metal tiles. The traditional option involves insulating only the inner surface of a non-residential floor or attic. The outer part of the roof is installed without a layer of thermal insulation.In this case, it is envisaged to create natural ventilation in the construction of the slopes, which excludes the occurrence of condensation during the temperature drop.
Before attaching metal tiles to the roof, you should study the features of its structure. The cold roof consists of two layers - waterproofing, which prevents condensation, and metal roofing. Between these materials are the counter-lattice and the lathing. Ventilation is performed at the point where the slopes meet, which is necessary for free air exchange, which ensures the evaporation of accumulated moisture in the internal space.

The cold roof consists of two layers - waterproofing and metal
A polyethylene film or PVC membrane is used for the waterproofing layer. The material should not be fully stretched. It should sag 25-30 mm to improve its conductivity and facilitate moisture drainage. The waterproofing is attached to the elements of the rafter system using a stapler by fixing it under the crate with self-tapping screws.
Option of a cold metal roof: installation of a vapor barrier
Unscrupulous roofers often recommend that the developer install a vapor barrier when installing a roof made of cold-type metal tiles. They explain this by the fact that this layer helps to reduce the amount of steam that settles on the sheets of roofing material, thereby increasing the life of the coating. However, this layer will only worsen the operational parameters of the roof.
The vapor barrier cannot be completely sealed. Vapors of humid air will certainly settle on the inner side of the roof covering, getting through loose joints as a result of fluctuations in the linear dimensions of the rafter system. In addition, the vapor barrier membrane itself is capable of passing moisture in small quantities. This layer does not exclude the possibility of condensation formation on the sheets of metal tiles, which entails negative consequences.
In the case of installing a vapor barrier membrane on a cold roof, the effectiveness of natural ventilation is significantly reduced. A counter-lattice with special vents can slightly improve the situation.

In the case of installing a vapor barrier membrane on a cold roof, the efficiency of natural ventilation is significantly reduced
The presence of this layer makes it difficult to visually audit the state of the wooden elements of the rafter system. The roof can have leaks for a long period that were not detected in time. As a result, the tree will start to rot, losing its original bearing qualities. The rafter structure will need complex repairs, requiring the replacement of entire sections, since various antiseptic impregnations will be ineffective in this situation.
Important! A vapor barrier membrane is an expensive material, which will entail a significant increase in the estimated cost of metal roofing.
Features of the structure of a warm metal roof
Before covering the roof with metal tiles, you should study the structural features of the warm design option. It is represented by a multi-layer roofing cake, which includes layers of steam, heat and waterproofing. This design allows you to equip a living space on the attic floor. A vapor barrier film is laid on the inside of the crate, protecting the insulation from fumes coming from the inside. The material is made on the basis of polypropylene, polyethylene or isospane and is attached with a stapler to the rafters.
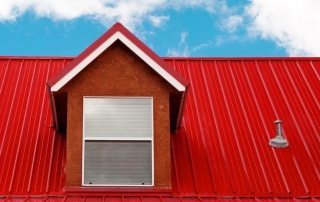
Important! When arranging a warm roof, it is necessary to provide for the installation of a dormer window into a metal tile.

A warm roof is represented by a multi-layer roofing cake, which includes layers of steam, heat and waterproofing
The thermal insulation material is located between the joists and occupies the entire space between the rafters. The thickness of the material is selected depending on the climatic conditions of the region and the technical characteristics of the building. Thermal insulation can be provided with foam, glass wool, basalt, expanded clay and extruded polystyrene foam. A waterproofing membrane is laid on top of this layer, which prevents condensation from entering the thermal insulation from the back of the metal tile.
Related article:
Roof for a private house. Types of roofs by construction
Types of roofs by construction. Roof coverings. Types of mansard roofs. Insulation of roofs. Photo gallery of beautiful designs.
A warm roof is able to minimize heat loss from the attic, improve the microclimate in it, and reduce the financial costs of maintaining residential premises. Such a design is expensive, difficult to install, requiring strict adherence to existing technologies.
Important! A poorly performed installation of a roof made of metal tiles will lead to the failure of the supporting parts of the rafter system, which will create large financial costs associated with repair work.
The construction of a warm roof should have such ordered layers: vapor barrier, lower lathing, insulation, waterproofing, counter-lathing, lathing and metal tiles. A gap must be provided between the layers to create natural ventilation, which is achieved by choosing the optimal material thickness. Insufficient thickness will lead to the formation of large voids, which will cause the formation of moisture, reduce the performance of the coating.

A warm roof is able to minimize heat loss from the attic space
Sheathing device as an important element of a metal roof
Before laying the metal tile, you should properly equip the base under it. The formation of the lathing is one of the most important stages in the installation of a metal roof. It is a kind of frame for the future roof. On the inside, a layer of waterproofing is attached to it, and on the outside - a metal tile. The performance of the entire roof structure will depend on the correctness of the work.
There are two options for lathing: solid and sparse. The first type of design involves the abutment of all boards close to each other. This technology will provide increased strength of the frame, but will increase material costs. In a sparse crate, all wooden elements are located at a certain distance from each other. This value is determined by the interval between the waves of the metal tile, since the valleys of the elements are the most durable sections of the profile.
Important! When installing metal tiles, a sparse crate is mainly used, which is associated with the sufficient strength of the facing material, which does not need additional strengthening of the frame.
For the installation of the lathing under the metal tile, a 50x50 mm bar is used, an edged board with a section of 32x100 mm and 50x100 mm. Along the eaves overhang in the lower part of the roof slope, two boards 50x100 mm are attached, which act as a base. Their height should correspond to the height of the counter-lattice.

When installing metal tiles, a sparse crate is mainly used
Before covering the roof with metal tiles, over the waterproofing layer, a counter-lattice is packed along the rafters, repeating their location, from the ridge to the bottom of the roof, which is the basis for the lathing. For this, bars of 50x50 mm are used. The distance between vertical elements is usually 60-90 cm.
On top of this structure, with a certain pitch, sheathing boards are horizontally mounted using a beam of 50x50 or 32x100 mm.Wooden elements should be treated with an antiseptic compound to protect the wood from rotting, mold and mildew formation.
At the location of the ridge, it is necessary to provide reinforcement of the lathing, which is done by attaching two boards on each side of the ridge strip. The lathing is also made under the valley, due to which an internal joint is formed between the two slopes. In the place of its placement, the crate is solid.
Fastening of additional elements of the roofing system
Before laying the metal tile, additional elements of the roofing system are equipped, which include various roof junctions fastened to each other. They are fixed to the mounted battens and provide a safer and more convenient roof operation. These include valleys, cornice, end and ridge strips, abutment.

For the installation of a roof made of metal tiles, you will need a number of additional elements of the roofing system
Endova is an internal joint formed by connected roof surfaces. The base for the valley is formed from a solid surface. Installation of lower and upper elements is provided. The lower ones, made of durable galvanized sheet steel, are fixed with self-tapping screws to the surface of the crate. This design in the form of an equilateral element with an internal angle of 135 degrees and curved edges helps to drain water that can penetrate under the roofing at the junctions of the slopes.
When installing the end strip of the metal tile, protection of the extreme elements of the coating from moisture penetration, from the accumulation of dust, foliage and debris in the interroof space is provided. It also prevents wind load damage to the material.
The top element has a decorative value for a metal roof. Endova hides the joint of metal tile sheets with the lower bar. This element is installed at the final stages of work.
Installation of a drip under the metal tile is necessary to protect the front boards of the sheathing from getting wet. It is installed complete with a gutter and holders for it. First, the holders are attached to the eaves board. Then a gutter for water drain is mounted, after which the eaves of the metal tile is installed.

Wind strips are attached to roofing screws with a rubber seal
Ridge strips are installed at the upper joints of the slopes. They hide the gap between the sheets of roofing material, providing protection against water penetration, and contribute to the natural ventilation of the roof space. Ridge strips can be round or flat. They are attached to roofing screws with a rubber seal.
Important! A seal should be placed under the ridge strips in order to reliably seal the joints.
Abutments are necessary to create a tight connection between the roof and walls and pipes. There are top and bottom planks. First, an apron is created from the lower planks, under which a tie is placed, which facilitates the movement of water to the outer cornice or into the valley. The upper elements are attached over the roof covering, performing a decorative function.
Useful tips for covering roofs with metal tiles
The more complex the structure of the rafter system, the more laborious the process of covering it will be. The result is a large amount of non-productive waste.

The minimum slope of the slopes is 14 degrees.
Before fixing the metal tile, it is necessary to check the dimensions of the crate. Along the axes, the distance between the slats should not exceed 35 cm, which is the standard value for most metal sheets. The first rail should be packed close, at a distance of about 20 cm. The dimensions are strictly observed. Each self-tapping screw is screwed exclusively under the wave, where the sheet of metal is adjacent to the rail.
The distance between the batten and the edge increases with distance from the edge, which increases the roof deflection. The minimum slope of the slopes is 14 degrees. The larger it is, the less load is created on the profile and the risk of its deflection decreases.
According to the installation instructions for Monterrey metal tiles and other profile options, it is necessary to cut the sheets using a portable circular saw with carbide teeth, manual or electric metal shears. Using a grinder to cut sheets is strictly prohibited. This is due to the fact that at the edges of the profile, the anticorrosive layer is significantly destroyed, which will lead to damage to the element in the near future.
Metal shavings after cutting should be carefully removed with a soft brush. It is recommended to cover the formed scratches on the profile with a special polymer compound, which is sold together with the metal tile.

The use of a grinder to cut sheets of metal tiles is strictly prohibited.
When installing metal tiles with your own hands, you should strictly follow the safety rules. You should not work without insurance and in windy weather. It is not recommended to lift sheets of metal with ropes. Scaffolding should be installed to facilitate movement around the building.
Creating a roofing cake for a warm metal roofing: installation instructions
Before covering the roof with metal tiles, for its warm version, you should arrange a roofing pie. The first step is the installation of a vapor barrier. The protective film is installed from the attic side. It is attached to the rafters with staples. The material is laid with an overlap of 10 cm. Butt joints must be glued with tape.
Useful advice! There are vapor barrier films with a ready-made adhesive strip protected by paper.
The vapor barrier material should be carefully mounted at the transition points, chimney joints and other engineering networks. The quality of the installed vapor protection determines the parameters of the heat supply of the interior, since with an increase in humidity, the thermal conductivity of many heaters decreases.

Before covering the roof with metal tiles, for its warm version, you should arrange a roofing pie
Insulation is placed in the inter-rafter space. Basalt wool is most commonly used. The optimum layer thickness is 10 cm. For buildings located in cold regions, the thickness of the insulation can be increased up to 25 cm. The material should be laid with offset joints to eliminate the possibility of cold bridges.
Condensation often forms on the seamy side of the metal tile. To eliminate the likelihood of its leakage, waterproofing is laid on the insulation, thanks to which it is possible to postpone the repair of the roof from the metal tile for several decades. The best option is a membrane that has good vapor permeability. It is capable of letting in steam that has got into the mineral wool, but does not allow condensate to return to the insulation.
The material is also used to prevent heat loss. Since mineral wool is characterized by a low density, air is able to blow through it and carry away heat.
The first step is to isolate the valley. It is necessary to lay the material along its entire length, starting from the top. Butt joints should be glued with construction tape from the same manufacturer as the membrane. Further, the material is laid in a horizontal order with an overlap of 10-15 cm and fixed with a construction stapler. The first segment must be laid parallel to the cornice strip with an overlap of 5-10 cm on it. Subsequent strips are sequentially mounted as you move to the ridge of the roof with an overlap of 10-15 cm.

Insulation needs to be laid in the space between the rafters, most often basalt wool is used
Important! The waterproofing membrane must be well stretched, its sagging in some places is not allowed.
Metal roofing installation technology: fixing counter battens and battens
According to the installation scheme of the metal tile, a counter-lattice is attached to the rafter legs. To create it, wooden blocks with a thickness of at least 5 cm are used, which will provide good ventilation. For the lathing, a beam with a thickness of at least 10 cm is used. Thanks to this margin, it will be possible to level out inaccuracies in the installation of the roof covering. The pitch of the lathing for metal tiles is selected based on the size of the profile wave. Basically, this value is 35 cm.
The next step is to install eaves with an overlap of 10 cm.They are fixed with self-tapping screws, which should be staggered with a step of 30 cm. ventilation.
In the inner corners of the roof, a solid lathing is installed, to which special elements are fixed in the form of metal valleys. After the completion of the laying and installation of metal tiles, these places are closed with decorative elements, thanks to which it is possible to hide uneven sections and improve the appearance of the roof.

The step of the lathing for metal tiles is selected based on the size of the profile wave
Next, overlapping abutment strips are mounted. All butt joints are treated with outdoor sealant. The lower products are fixed with self-tapping screws.
Installation of metal tiles: step by step instructions "for dummies"
How to properly cover the roof with metal tiles in the case of covering the entire slope with a metal sheet? The process of laying roofing material starts from the ridge. The first sheet is checked for placement relative to the end and overhang of the roof for metal tiles. The roofing device involves fastening the material with an overlap of 50 mm. It is temporarily fixed with a self-tapping screw at the ridge in its center. The second sheet is superimposed on the side and aligned with the first. The elements should be connected together.
Self-tapping screws with an EPDM gasket and a color head 4.8x28 mm for wooden lathing are used as fasteners for metal tiles. In the case of a metal frame for a profile, the size of the fastener is 4.8x20 mm.
If it seems that the profiles do not fit together, you must immediately raise one sheet above the other and, slightly tilting it, move it from the bottom up. The fold is placed behind the fold. The elements are fixed with screws under each transverse insert on top of the wave. Thus, 3-4 sheets are stacked, fastened together. The entire block is aligned along the line of the cornice with subsequent attachment to the crate.

The process of laying roofing material starts from the ridge
According to the step-by-step instructions, the installation of metal tiles can be carried out in any direction. If the roof is mounted from left to right, then the installation is performed with an overlap of the previous sheet, if in the opposite direction - with an overlap on the previous ones.
Important! Every three connected profiles are checked for parallelism with respect to the eaves.
The elements are attached to the crate with self-tapping screws, which are screwed into the deflection of the wave, where the product fits snugly against it. At the lowest point, the fastening should be carried out through the wave above the step. Along the edge of each slope, self-tapping screws must be screwed into each wave. The average cost of installing metal tiles is 180 rubles / m².
Laying metal tiles step by step for long slope roofs
How to properly cover the roof with metal tiles with a long slope that exceeds the size of the sheet? In this case, the joining of products immediately occurs along the length. Here it is important to set the profile sheets exactly according to the level.Any error will be visible from the ground, which cannot be hidden in the future.

According to the step-by-step instructions, the installation of metal tiles can be carried out in any direction
How to fix metal tiles correctly? First, one sheet of the first row is mounted, which is aligned along the cornice and end. The second element is superimposed on it with an overlap and is temporarily fixed with a self-tapping screw in the center of the sheet at the ridge. The joint at the top and bottom is fixed with screws. Then the third sheet is laid over the first, forming a beech L. Here you should pay attention to the fact that the elements are connected strictly in the provided places. They are fixed together with short self-tapping screws.
In the upper part, a fastener with a sealing rubber is screwed on without tightly tightening. Then the self-tapping screw is fixed in the center on the middle sheet, which allows you to move all three profiles at the same time. The roof is thus installed with great precision in relation to the cornice.
To simplify the installation of the first sheets, you can pull the rope along the level. In this case, measure the width of the slopes. The discrepancy between the values along the extreme planes should not exceed 2 mm.
Helpful advice! Before the final fixation of the metal tile sheets, it is recommended to lay a few more elements along the length of the first row, which will increase the accuracy of the adjustment and eliminate the likelihood of unpleasant errors.

If the roof slope is adjacent to the wall, the wall profile must be seated on a sealant
Each square. m of roofing material should be fixed with 6-8 self-tapping screws. Installation is carried out through the wave, due to which the subsequent rows of self-tapping screws move in a checkerboard pattern. The starting price of work per m2 of metal tile installation in this case is 250 rubles.
Fastening of sheets of metal tile should take place in strictly provided places above the top point of the profile. A profile shift of 1-2 cm can become critical, since self-tapping screws will be unable to withstand the coating, which will lead to negative consequences.
Next, the end plate is fixed to the end board with an overlap of up to 10 cm from bottom to top. The final stage is the fastening of the ridge strip, which can be attached directly to the sheets or mounted on perforated holders. A hole should be left at the ridge for natural ventilation. The gap must be closed with a mesh made of non-woven material. Then the arrangement of the roof drainage system is carried out.
Installation of a roof drainage system made of metal tiles
During the roof of the roof, metal tiles provide for the arrangement of a reliable drainage system, which includes a gutter, holders, plugs, an outlet funnel, connectors, a spider, a connecting pipe with an elbow, a drain with a holder and a tee, a funnel, an overflow limiter.

The spider is installed in the funnel of the downpipe and protects the system from leaves and debris
Each downpipe has a 10 m gutter. At the points of their attachment, a V-shaped hole 10 cm wide is cut out, where the funnel is inserted. It is fixed 10 cm from the edge of the gutter. The holders are installed before the installation of the eaves every 50 cm, providing a gutter slope of 5 mm. Plugs are fixed on both sides.
The gutter support brackets should not be attached to the first batten, as the metal strip will press against the profiled sheet of the roofing material, causing it to deform. Over time, this can cause damage to the thin steel as a result of roof vibrations. Special recesses must be made under the brackets. Their upper sections should not protrude above the surface of the sheathing elements.
The front edges of the outlet funnels must be brought under the bent outer edge of the gutter and fixed with a carved flange. When attaching the gutters, they are overlapped by 3 cm and fixed with connectors with a lock and rubber gaskets. The spider is installed in the funnel of the downpipe and protects the system from the ingress of leaves and debris.
Helpful advice! The spider is recommended to be cleaned twice a year.

The holders are installed before the installation of the eaves every 50 cm
Two elbows and a connecting pipe are used to move the funnel to the downpipe. The pipe holders are installed every meter on the wall. In its lower part, a knee is attached to drain the water, taking it 30 cm to the side. The tee is used in the case of using one drain for two funnels. An overflow restrictor is installed in a place where water constantly flows. It is placed on the gutter or in its corner.
Arrangement of safety elements when laying metal tiles
Metal roofing involves the arrangement of additional elements for safe maintenance and operation. These include snow guards, walkways, fences and ladders.
In order to exclude uncontrolled descent of snow masses from the roof of the building and possible injury to people who are near the building, snow holders are installed on metal tiles. The instruction provides for their linear arrangement after some distance or staggered. Elements can be represented by strips of different formats or tubes connected to each other. Snow retainers are installed over the entire roof area, above the eaves.
Important! Installation of snow holders on metal tiles is mandatory above the entrance to the house, dormers, each level of a multi-tiered roof.

The safety of the roof covering from deformation is designed to ensure transition bridges, stairs and fences
Moving over the surface of the roofing material can deform it. The safety of the coating is designed to ensure transition bridges, stairs and fences. The set for such elements includes supporting parts, brackets, seals, wall flanges and handrails, which are used to fasten products to the roof. In this case, it is necessary to create a good sealing of the joints.
To get to the top, stairs are installed using wall and roof brackets. They are mounted in the place of the wave deflection, where a solid crate is made. The top of the ladder is secured with screws. The top protrusion of the element should be against the edge of the eaves.
The metal elements of the roof railing are fixed through the lower wave zone using the sheathing supports. Then they are compressed with rubber seals. Walkways, which are used to safely walk on the roof, are attached in the same way as railings.
Installation of walk-through and ventilation elements of metal roofing
Ventilation and pass-through elements are necessary for the convenience of mounting antennas, air ducts and other components. The cost of their installation must be included in the price of installing metal tiles.

Places of installation of ventilation and passage elements require sealing
For good air exchange in each span of the rafters, ventilation outlets should be equipped. However, if an uninsulated cold triangle is located under the roof, one element will be enough for every 60 sq. m roof. Holes are made in the metal tile, into which ventilation outlets are inserted by fixing them with self-tapping screws. The joints must be treated with a sealant.
For the installation of the sewer outlet, a hole is made in the metal tile, which is necessary for the installation of the passage element. It is attached to the metal tile with self-tapping screws.The sewer outlet is inserted into the bushing after the installation of waterproofing, sealing layer and sealing of the connection.
For tight fastening to the roofing of the areas where electrical cables, antennas and sandwich type chimneys are connected, special antenna outputs are used. Their rubber tops should be 20% smaller than the diameter of the passing cable. The base of the antenna outlet should be shaped like a roofing material profile. The joint is treated with a sealant, and the element is screwed to the metal tile with self-tapping screws.
Metal roofs are distinguished by high technical and operational qualities. However, in order to achieve the declared characteristics of the roofing, the technology and principles of installation of metal tiles should be observed.