A cellar is an important element of any suburban area, it is indispensable for storing vegetables, fruits and preservation. The article contains information on how to build a cellar in the country with your own hands: a step-by-step description will help to take into account a lot of nuances, starting from the correct choice of place and ending with the installation of waterproofing and electrical wiring... The external arrangement of the building is also of great importance, and the construction of shelving and boxes will help to efficiently use the space.

The process of erecting the walls of a red brick cellar
Content
- 1 Varieties and features of cellars
- 2 The nuances of arranging a cellar with your own hands with a high level of groundwater
- 3 Recommendations for building a cellar with your own hands: how to do it as efficiently as possible
- 4 Do-it-yourself cellar in the country: a step-by-step guide for construction
- 4.1 Arrangement of the pit
- 4.2 Construction of the foundation
- 4.3 Walling
- 4.4 DIY installation of the cellar ceiling
- 4.5 Types and features of floor installation in the cellar
- 4.6 Design and installation of ventilation systems
- 4.7 Installation of stairs and doors
- 4.8 Manhole manufacturing
- 4.9 Wiring and lighting
- 4.10 Installation of waterproofing in the cellar
- 4.11 Types of materials used for internal waterproofing
- 4.12 Waterproofing installation procedure
- 5 DIY installation of shelves in the cellar: photo and instructions
Varieties and features of cellars
Do not confuse a cellar and a basement. The construction of a cellar in the country with your own hands can be reduced to a simple digging of a hole and its minimal arrangement. The choice of the type of construction depends on many parameters, for example, on its intended purpose, on the climatic conditions of the region, financial capabilities, etc. Also, when choosing the type and materials for building a cellar in the country with your own hands, you need to take into account its location.
It is easier to build a detached building than, for example, to build a cellar under the house, but this option will require more materials, and therefore finance. It will be cheaper to make storage under a residential building or outbuilding, but this option is limited in space.

Arrangement of the cellar will allow you to preserve conservation and other products for a long time
One of the most popular options is the glacier cellar. It perfectly copes with the function of long-term storage of products even in the hot season and is especially in demand in the southern regions. It is rather difficult and expensive to build this type of cellar in a private house with your own hands, but the result is distinguished by high performance characteristics, durability and reliability.
Another good option for this building is a two-section storage. As a rule, this type is used when it is necessary to avoid mixing the smells of various vegetables and fruits, which are simultaneously stored in the cellar.Building such a storage facility requires less materials than a glacier.
A separate type of cellar is wine. It is used to store wine products, has its own design features and nuances that must be taken into account in order to carry out the correct construction of the cellar. As a rule, such storage can store not only wine, but also various preserves.

The wine cellar has design features that must be taken into account even at the stage of construction planning
The nuances of arranging a cellar with your own hands with a high level of groundwater
When choosing a location for a storage facility, it is very important to take into account factors such as total soil moisture and groundwater level. The lower it is, the easier it will be to build a structure, and also less often repairs are needed. If we are talking about a freestanding building, then you should choose the highest place on your site. It is best to determine the groundwater level when it is at its maximum, that is, in spring or autumn. If there is a well or a well on the site, then you can determine the maximum elevation by them, otherwise you will have to drill the well separately.
The construction of the cellar will be somewhat more difficult if the groundwater is close. How to do it as efficiently as possible? First of all, it is necessary to pay great attention to the waterproofing of the structure. Also, with high soil moisture, for better waterproofing of the cellar from groundwater, it is worth using building materials characterized by increased resistance to water. In this case, you should not use wood or plywood, but rather give preference to concrete and brick.

Diagram of a separately located cellar: 1 - foundation; 2 - steps; 3 - protective fence; 4 - walls; 5 - ceiling vault; 6 - ventilation; 7 - waterproofing; 8 - filled soil
Useful advice! You can also check the groundwater level according to folk signs. To do this, leave a piece of wool and a chicken egg at the construction site, and cover them with a clay pot on top. If there is dew on both the wool and the egg in the morning, then the groundwater is close, and if only on the wool it is far away.
Recommendations for building a cellar with your own hands: how to do it as efficiently as possible
Regardless of what type of construction you chose or what materials you are going to use, there are a number of general recommendations that you should follow when building a cellar with your own hands step by step:
- if you are going to use wooden elements, then they must be pretreated with a special impregnation in order to protect them from the harmful effects of moisture;
- the construction of the cellar is best started in the summer, then the groundwater level is at the bottom. In this case, the soil will be the driest, and the risk of flooding the structure is minimal;
- to ensure efficient storage of food, it is very important to consider a ventilation system;
- if you want the structure to maintain the desired temperature, it is recommended to make two doors separated by a vestibule when building a cellar with your own hands;

To build a really good cellar, you need to carefully study the features of materials and types of structures.
- special attention should also be paid to thermal insulation, then the optimal temperature in the cellar will be ensured at any time of the year;
- the choice of tools and materials for construction is very important, so it is worthwhile to familiarize yourself in advance with the advantages and disadvantages of various types. The construction itself must be carried out in a clearly recommended order.
Features of the use of various materials
Most often, materials such as bricks or concrete blocks are used in construction. They best tolerate high humidity and low temperatures, and are also characterized by durability, reliability and relatively low cost.When building a brick cellar with your own hands, it is worth considering the features of the operational characteristics of each of the varieties of this material:
- cinder block or foamed brick is characterized by increased fragility, therefore, these varieties are not recommended for use in the construction of underground storage;
- silicate brick is more durable, but reacts very poorly to high humidity. This means that a building made of it cannot boast a long service life;

The ideal material for the construction of cellar walls is red brick.
- red brick is ideal for a cellar in a private house. How to make a building out of this material as efficient as possible, you can learn from numerous step-by-step instructions from specialists.
If you decide to use concrete blocks in the construction, then you will definitely need specialized construction equipment, since they are characterized by high weight. The cellar of them will last a long time and keep the temperature well.
Also, when building a cellar in a house with your own hands, you can use a brick that has already been in use, if its condition allows it. And in the event that you are just going to sheathe the earthen hole with wooden boards, they must be carefully treated with antiseptics to prevent rotting.
Note! The use of metal-reinforced concrete slabs is also possible. But in this case, it will be quite difficult to maintain the desired temperature, so this material should not be used for the building in which you are going to store food.

Diagram of a semi-buried brick cellar
Do-it-yourself cellar in the country: a step-by-step guide for construction
Strict adherence to the sequence of actions is the key to the correct cellar. How to make the construction as efficient as possible with a minimum of time and effort? For this, installation work must be performed in a specific order.
Arrangement of the pit
The sod is removed from the selected area, after which the land is leveled and the marking is performed. In many do-it-yourself photos of the cellar, you can see that specialized construction equipment is often used to equip the pit, but if this is not possible, then you can use shovels and spades. The advantage of working with a hand tool is that it preserves the soil structure. If the soil in the selected area is loose, then the walls of the pit should be sloped to avoid crumbling.

DIY cellar construction. Step 1: digging a hole
The dimensions of the cellar depend solely on your needs, but remember that the size of the pit should be 0.5 m larger than the size of the structure itself. In the process of how you build a cellar with your own hands, the fertile soil you dug can be distributed over the summer cottage. The evenness of the bottom after the end of the work must be measured with a level and corrected, if necessary.
Construction of the foundation
Although this stage can be dispensed with (just filling the bottom of the pit with rubble or filling it with bitumen), the arrangement of the foundation will increase the level of waterproofing of the cellar from groundwater. How to make the foundation as effective as possible, but not very expensive? To do this, you can use a reinforcing frame, on top of which a concrete mixture is poured. The recommended foundation height is about 40 cm. Installation of the foundation is a prerequisite when building a cellar in the country with your own hands, if the groundwater is close. How to make the foundation correctly - thematic videos on the Internet will tell you.

DIY cellar construction. Step 2: arrangement of the foundation
Walling
If you use a brick to build a cellar under the house with your own hands, then you will need a number of specialized tools.These include a trowel, a construction cord, a bricklayer's hammer, a building level, and a mortar bucket. For greater efficiency of work, you should use the help of another person.
As a mortar connecting the bricks, you can use a mixture of clay and sand or cement. When building an underground or above-ground cellar with your own hands, laying should start from the corners, and the first row is laid without using mortar in order to more accurately plan the position of the wall. The bricks of the next rows must be sunk into the mortar until the thickness of the seam is approximately 12 mm.

DIY cellar construction. Step 3: building the walls
Useful advice! Be sure to use a building level and a plumb line when laying walls. With the help of the first, it is checked how evenly the brick is laid, and with the help of the second, the correctness of the angles.
DIY installation of the cellar ceiling
When building a ceiling, it is best to use wooden planks. If the structure is being built under the house, then beams can be used as an overlap, and the ceiling of the ground cellar in the country house is made step by step from PKZh slabs or slate. In this case, the surface can be flat or gable.
The thermal insulation of the ceiling is done according to the same principle as the thermal insulation of a conventional roof - the gap between the wooden beams and the roofing material is filled with a layer of thermal insulation.

DIY cellar construction. Step 4: installation of the floor
Types and features of floor installation in the cellar
There are many different options for arranging the floor in the cellar, which one is better depends on your preferences, the purpose of the building, the characteristics of the soil and other factors. You should also familiarize yourself with the specifics of each method in advance, this will help you quickly and efficiently build a cellar with your own hands. Both video and photo instructions can greatly facilitate the installation process.
Earthen floor - the simplest and cheapest option. There is a misconception that the correct floor in the cellar should only be earthen, but this is not the case. Even well-compacted soil will not protect the room from dampness and mold.
If you nevertheless decide to make a ground floor in the cellar, then the base must be carefully leveled and tamped, after which a layer of gravel about 10 cm thick is filled in. The advantage of this option is the zero installation cost, but there are much more disadvantages. These include a high risk of flooding the premises and a high likelihood that metal elements will rust and wood elements will rot.

Cellar with loose sand floor
Concrete floor - a good option to protect the premises from high-lying groundwater. A concrete screed can act not only as a floor covering, but also as a base for the installation of other materials.
For the construction of a concrete floor, it is very important to level the surface, after which a cushion of rubble and sand 15-20 cm thick is mounted. The sand must be thoroughly moistened and tamped, and poured with bitumen on top. In order for the concrete base to be as strong as possible, a metal grate can be installed on top of the bitumen layer. After that, you can start pouring concrete.
You can install a waterproofing layer both on a sand cushion and on top of concrete. In the second case, another concrete layer must be poured from above.
Clay floor - a reliable, but very laborious option in terms of installation. It requires a lot of high quality material, so it is rarely used. Clay is considered one of the most sustainable materials. It is laid on a base of crushed stone 10-15 cm thick, which can be impregnated with bitumen. Under the clay, it is worth installing a layer of waterproofing made of roofing material or other material, and cracks that may form after drying are sealed with a clay-lime mixture.

The floor in the cellar, built with his own hands, is equipped with concrete
Brick covering - strong, durable and attractive in appearance. In addition, the material is quite cheap and easy to install. The brick floor is laid on a cushion of fine crushed stone or gravel, a clay mortar is poured on top. The bricks are slightly recessed into the solution close to each other. Also, cement mortar can be hammered into the joints between the bricks with a stiff brush.
Wooden floor - used in above-ground versions of the cellar or where groundwater is located very deep. Before installation, the tree must be treated with special impregnations to extend its service life. Wooden boards are mounted on top of logs made of timber, which, in turn, are laid on a base of crushed stone and clay. It is best to screw the boards with self-tapping screws, but you can also just nail it down.
Note! For each of the materials, you will need a separate set of tools, the acquisition of which is better to attend to in advance.

An example of a ventilation device: 1 - for the cellar under the house; 2 - for a free-standing cellar
Design and installation of ventilation systems
If you are building an above-ground structure, then the flow of air into the cellar can be carried out naturally through small holes. For an underground structure, ventilation must be supply and exhaust. The outlet of the chimney should be located near the ceiling and the suction pipe near the floor. In many photos of the cellar in the country house, you can see with your own hands that the ventilation outlets are equipped with special curtains, this allows you to more accurately control the temperature in the room.
Installation of stairs and doors
If the cellar is being built under the house or, if necessary, to save space, it is worth making an almost vertical staircase to the cellar with your own hands. How to make it as safe as possible for descent? Handrails are recommended. Do-it-yourself photos of the stairs to the cellar show that it can be built from wooden planks fixed directly in the ground, as well as from bricks or other materials.
Doors are mounted in ground versions of construction, in other cases a hatch is used. Making a hatch in a cellar with your own hands is quite simple.

Diagram of a staircase for a cellar
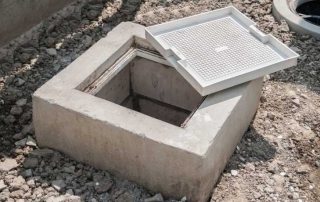
Manhole manufacturing
If the cellar is located under a house or outbuilding, then a hatch is used as an entrance partition. You can buy a cellar hatch, or you can make it yourself. The second option will allow you to get a design that exactly matches your needs. Self-assembly hatch includes the following steps:
- a place is chosen for the future entrance. It is very important that access to it is as simple as possible and not cluttered with shelves, drawers and other items;
- the dimensions of the hatch are determined. It all depends on your needs, but its parameters should not be less than 75x75 cm. In order for the room to be airtight, the side edges of the hatch must be sheathed with a seal;
- a hatch cover for the cellar is made. How to make it light and durable? For this, it is best to use wooden boards impregnated with linseed oil. They are interconnected by slats, and a sheet of plywood is nailed on one side of the cover. If we are talking about a cellar in a residential building, then the hatch cover can be sheathed on top with the same floor covering as the floor around it. It should be borne in mind that if it is planned to equip a hatch for a cellar under a tile, its structure must be made of sufficiently strong materials that can withstand all ceramics. If you prefer to use steel, then for the cover you will need a sheet with a thickness of at least 3 mm, which is welded onto a metal frame;

Diagram of the device hatch for the cellar
- the handle is attached. The best option would be a special hidden or folding design.If the cellar is located in a non-residential area or there is a need to save money, then you can use a regular door handle;
- hinges are screwed. These can be regular door hinges or automobile hinges with springs. The latter option will make it easier to open the lid and fix it in any position.
There are many answers to the question of how to make a hatch in a cellar with your own hands, so it is worth choosing the option that is most suitable in your particular case.
Wiring and lighting
Due to the fact that the design of the cellar provides for high humidity, the wiring in it must be reliably insulated. The best option for wiring is copper wires with a double layer of insulation. Light bulbs should be placed in the driest places and additionally equipped with protective caps. It is strictly forbidden to make sockets when building a cellar. How to make the wiring as safe as possible, you can watch the training videos from specialists.

Bulbs in the cellar must be placed in dry places and must be equipped with caps
Installation of waterproofing in the cellar
As already mentioned, insulation from moisture is a very important point in the construction of a cellar in the country with your own hands. How to make waterproofing the most effective - there are many options, and the choice of the optimal one depends on the moisture level of the soil and the structural features of the building.
Waterproofing can be external or internal. The outer one is done even at the construction stage, while the walls are sheathed with insulating materials from the outside, and gutters, drainage wells and other structures are also mounted. Internal insulation is done after the cellar is built. In this case, before using insulating materials, groundwater should be diverted, otherwise the work will be ineffective.
Types of materials used for internal waterproofing
If you made a cellar in the country with your own hands from waterproof concrete, then you are unlikely to need additional sheathing with insulating material. But for a brick structure, you can use the following waterproofing options:
- mastic or bitumen - used when the water table is below floor level. The solution is heated and applied in a thin layer to the walls, as a result of which a reliable waterproof film is formed;

Membrane type waterproofing material
- penetrating waterproofing - the most expensive, but also the most effective option. It is good because it increases not only the level of resistance of walls to moisture, but also their frost resistance. Also, penetrating waterproofing reliably closes all cracks and micropores, is characterized by a long service life and is quickly installed;
- cement-based polymer mortar - is one of the most reliable and easy-to-apply waterproofing materials. It fits snugly to the walls and reliably protects them from mechanical damage;
- membrane-type moisture insulation - consists of various polymers, among which bitumen-based liquid rubber is very popular.
Note! It is very important to have effective ventilation for reliable waterproofing of the cellar in the country with your own hands. How to build a ventilation system so that excess moisture does not condense in the storage? The installation of the supply and exhaust system is best suited for this.

Diagram of the device for thermal and waterproofing of the cellar
Waterproofing installation procedure
Numerous photos of a cellar in a private house show that waterproofing can be hidden under decorative wall panels. This is not a prerequisite, but only affects the appearance of the walls. The nuances of installing a waterproofing layer depend on the type of material selected.
Do-it-yourself waterproofing using bitumen or mastic for the walls of the cellar under the house, as a rule, will not be difficult. For this, the walls must first be plastered, and the waterproofing itself is best applied in two layers. Before the final drying of the coating, it is recommended to sprinkle it with fine dry sand.
Before installing penetrating moisture insulation, the surface of the walls must be thoroughly cleaned of dirt and dust, and then moistened with water. After applying a layer of insulation for several days, it must also be constantly moistened. Concrete walls are brushed with a wire brush before installing the penetrating waterproofing.

One of the most effective moisture protection options is penetrating waterproofing
To apply liquid rubber, the walls must be leveled and cleaned. After that, the surface is primed and a waterproofing material is applied to it with a brush, spatula or roller. Finishing materials can be mounted directly onto the liquid rubber layer after it has dried. In the photo of wine cellars, for example, it can be seen that the walls are sheathed with wood panels.
The cement-polymer mixture is applied to well-damp walls with a notched trowel or brush. It is best to do this in several layers.
DIY installation of shelves in the cellar: photo and instructions
Shelves and racks are integral elements of any cellar and basement. There are several types of cellar racks, which you can buy in specialized stores, but it is much easier and more economical to make them yourself. The most popular options are as follows:
- wooden shelving is one of the most common answers to the question of what to make a shelf in a cellar. The material is environmentally friendly and easy to use, and for shelving it is best to use a beam with a section of 100x100 mm and boards with a thickness of 3-4 cm. The installation scheme is very simple - racks are made from a beam, in which nests are cut to fix the shelves. In order for the shelves made of wood to last longer, they are impregnated with special compounds;

Mounting dimensions of a wooden cellar rack
- concrete shelving is a good option if you want to know how to make your cellar shelves as durable and moisture resistant as possible. To create concrete shelves, you can use reinforced concrete slabs or niches in the walls, which are poured with a concrete screed;
- steel corner shelves - are used in rooms with low humidity levels, otherwise structures can very quickly begin to rust. In order to make a shelf in the cellar for cans, as a rule, a welding machine is used, but you can do with simple self-tapping screws. First, frames are made from metal rails, then shelves are attached to them;
- plastic shelving is one of the most economical and simple options, which is distinguished by its attractive appearance and resistance to moisture. However, plastic does not tolerate low temperatures quite well, so it cannot boast of durability.
Useful advice! When wondering how to make a shelf in a cellar with your own hands, and what material to choose for this, take into account the level of humidity in the room, as well as the average weight of cans and boxes that will be stored on the shelves. Concrete perfectly withstands even a very heavy load, but plastic cannot boast of this.

There are wooden shelves along the walls of the cellar
Boxes for potatoes can be made from the same materials in the cellar. As a rule, they are equipped with removable covers, which are installed if necessary. Regardless of what material you choose, in the warm season, it is recommended to take shelves and drawers outside to dry. This will help to avoid the growth of mold and the growth of pathogens.
When the construction and interior arrangement of the cellar is completed, you can think about the exterior decoration of the ground structure.Its version depends solely on your preferences - you can simply fill an earthen hill, or you can decorate it with turf or ornamental grass, turning it into an element of landscape design. Use video and photo instructions in the process of building a cellar with your own hands, which will help to take into account all the nuances and equip a practical and functional room.