home/Construction/Do-it-yourself blind area: step-by-step instructions and tips for construction
Do-it-yourself blind area: step-by-step instructions and tips for construction
The most reliable way to protect the foundation of a house is a blind area with your own hands: step-by-step instructions for building this structure are so simple that you can easily do without the help of qualified specialists. By following simple and straightforward recommendations, you can build capital protection for the foundation of your own house at minimal cost and thereby prevent damage to the base from surface waters.
The blind area around the house can be done with your own hands, even without much experience in construction
Do-it-yourself blind area: step-by-step instructions for the initial stage of construction
At the initial stage of construction, you should decide on the choice of the blind area and the main parameters that are responsible for the quality and reliability of the structure.Private houses and cottages are not insured against erosion of the foundation by surface waters, therefore it is recommended to apply additional protective measures to strengthen the foundation of the building.
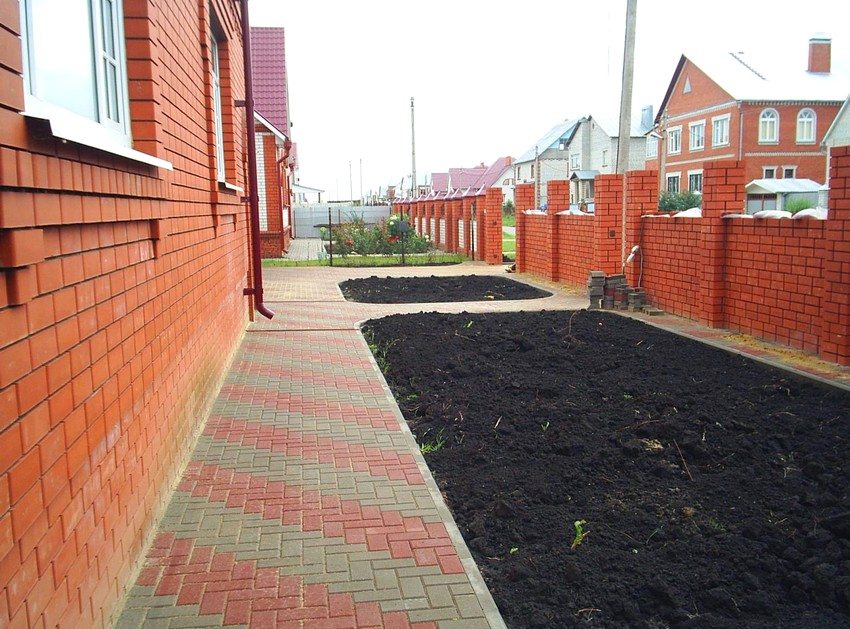
The blind area around the country house not only protects the foundation of the building, but can also serve as paths
Note! The construction of a concrete blind area around the house, which has an integral coating, gives an almost 100% guarantee of protection against moisture. No other material has this capability. Otherwise, for the sake of additional reinforcement, it will be necessary to equip a multi-tiered structure of the "pie", which in itself is difficult and will entail significant costs.
The base of the building is influenced by various natural factors:
low temperatures;
excess moisture;
damage to mechanical properties due to soil swelling.
The stability of the entire building depends on the state in which the foundation part of the cottage is located, so the protection must be thorough and reliable. It is this function that is the main one for the blind area, the protective properties of which extend to the basement of the house.
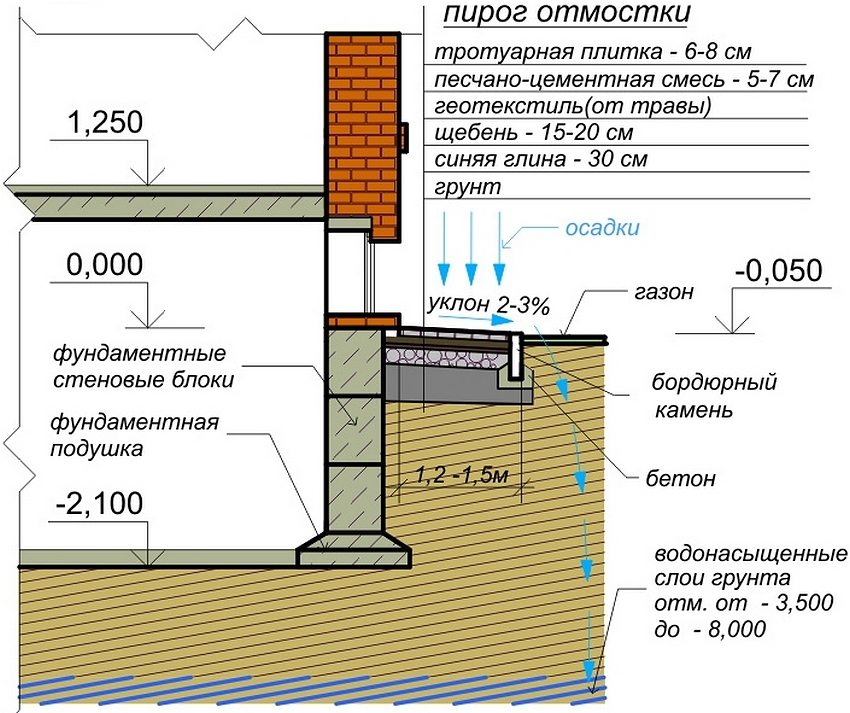
Scheme of the blind area around the house with a top layer of rubble
Photo of the blind area around the house and its purpose
The construction of such a structure as a blind area is designed to minimize the negative impact of natural factors on the foundation of the structure. Of course, it is impossible to completely shield it, but you can achieve the following:
divert rain (as well as melt and flood) water from the basement of the house. With a short-term presence of moisture, there will be no significant harm, however, long periods of liquid stagnation can disrupt the integrity of this part of the building. Due to the constant exposure to moisture, the concrete is crumbled, the reinforcement part of the base is exposed and damaged by corrosion. As a result, the rigidity of the frame part of the structure is significantly reduced;
suspend soil displacement. Soil is a mobile and capricious substance that affects any building. Depending on the type of foundation part, as well as the terrain chosen for placing the cottage, the following problems may be observed: shifts in soil layers, subsidence or, conversely, swelling of the soil surface, change in the height of the water horizon. The blind area will reduce the stress on the building caused by these changes;
The blind area around a private house is built of concrete and tiled
maintain the temperature indicators of the foundation and prevent a significant drop in this value in the winter. The construction of an insulated blind area around the house helps in solving this problem, since during the cold period special requirements are put forward for the foundation part hidden under the ground (it must be stable);
Helpful advice! Insulation work related to the blind area is performed during the formation of the main platform and its filling.
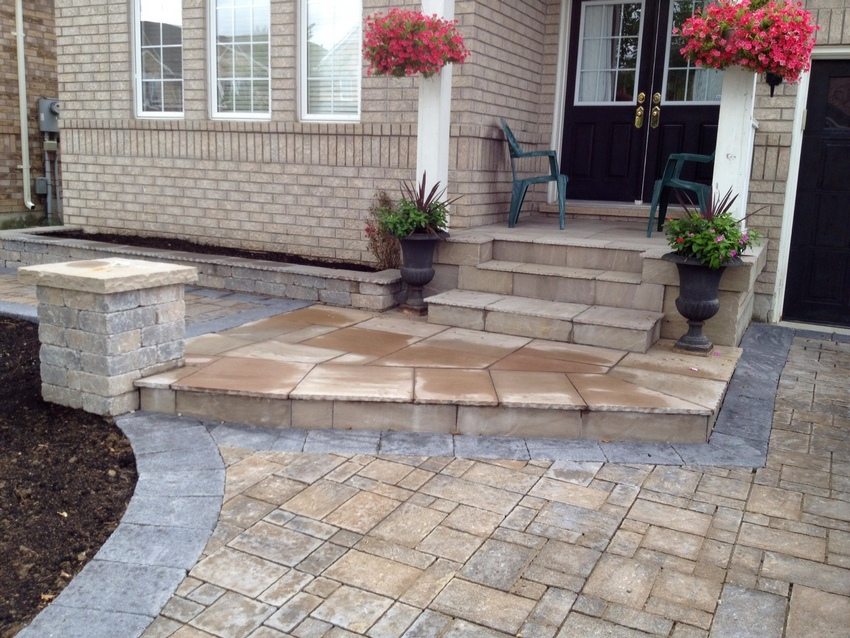
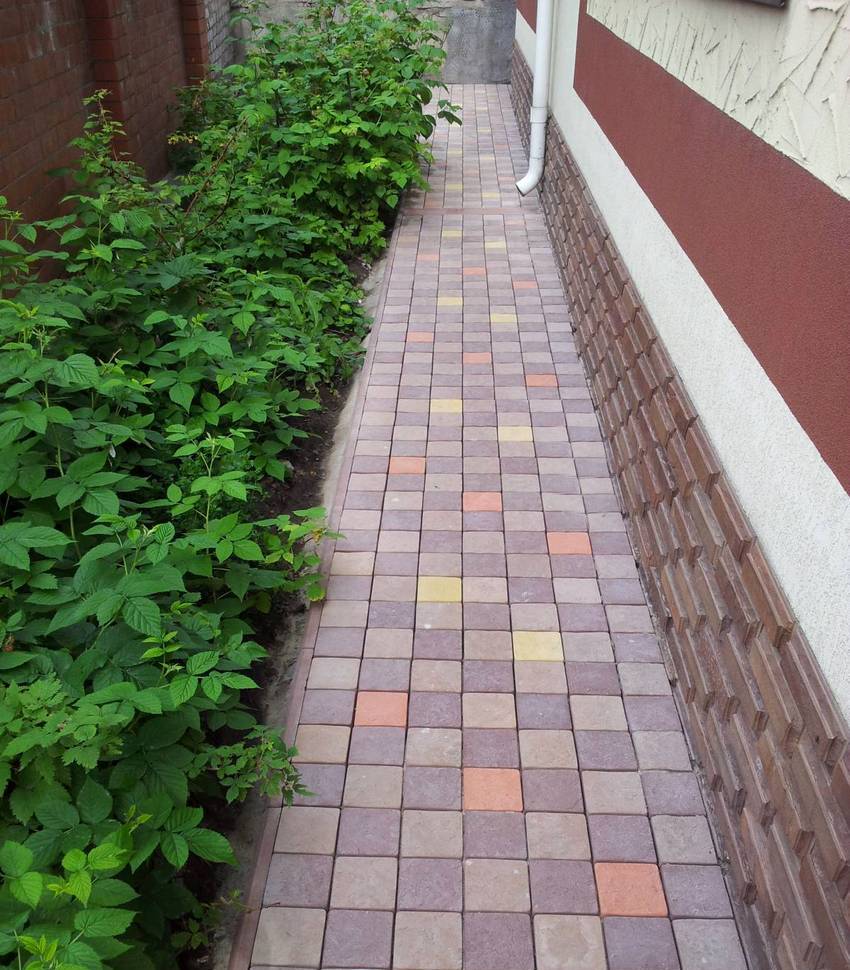
improve the appearance of the cottage. The blind area can play the role of a frame that makes the facade of the building complete and harmonious. This area is faced with siding for the basement, decorative stone, paving slabs.
The paving slabs are in harmony with the design of the building itself
How to determine the width of the blind area around the house and other parameters
All the main parameters used for the construction of the blind area are regulated by a number of relevant SNiPs. These data make it possible to carry out technologically correct and durable structures.
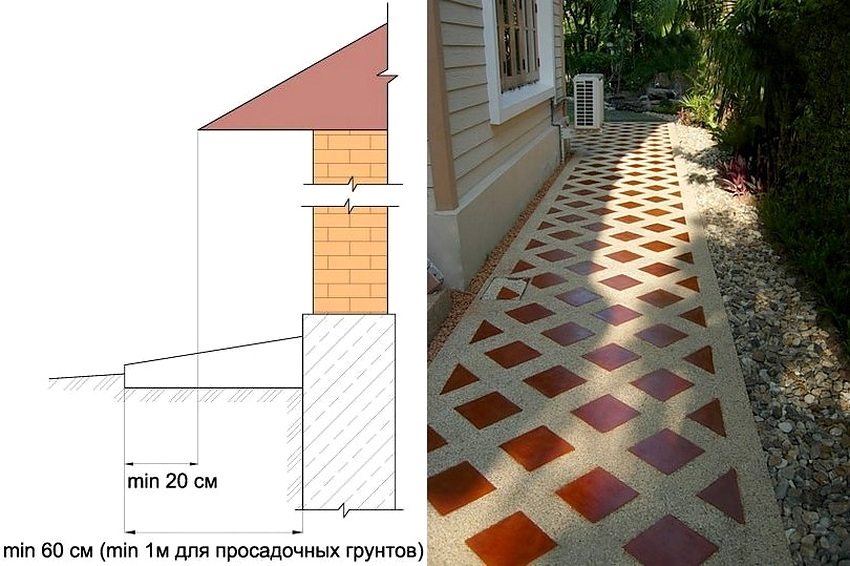
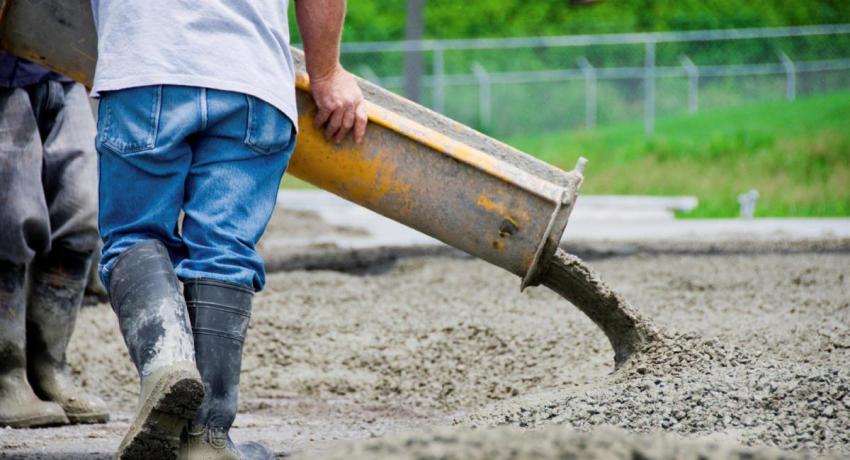
If we talk about a concrete product, then its width should exceed the end point of the protruding overhang of the roofing material by 20 cm. If there is a drainage system, these parameters should also be taken into account and included in the calculations. The final indicator of the width is influenced by the characteristics of the soil, its type. The generally accepted value of the width for the blind area is considered to be 100 cm.A monolithic concrete surface will not only provide freedom of movement along the wall of the house, but will also function as a walkway.
The final indicators of the width and depth of the blind area are influenced by the characteristics of the soil: its features and type
The level of penetration (the depth of placement of the blind area relative to the ground) is calculated based on the level of soil freezing in winter. Most often, this indicator is requested from the information department of the local architecture board or is set from a table. The blind area must have the ability to move with the ground, otherwise all its functions will be reduced to only one - water drainage.
Note!Communication systems placed in the soil have a direct impact on the depth of its freezing.
The minimum permissible value for the thickness of the concrete blind area around the house is 7-10 cm (surface layer). If the building project includes a garage, this figure should be increased to 15 cm so that the structure can withstand high weight loads.
Diagram of a blind area around a concrete house
Protection is required for the entire perimeter of the building, so the length of the blind area depends on the length of the perimeter. The installation area of the concrete porch can be skipped, since it is itself a reinforcing structure.
Blind area around the house: how to fill the structure correctly, additional parameters
The maximum allowable slope of the surface is in the range of 1-10 cm / m. In other words, it is 1-10%. In this case, the angle of inclination should be directed strictly from the foundation. Such a large gap is due to the fact that the slope angle directly depends on the type of soil, as well as the amount of precipitation typical for the region. The most commonly used slope is 2-3 cm / m (i.e. 2-3 °). If you take more, during frost and icing, the blind area will not be able to be used as a track.
Step by step instructions for building a concrete blind area around the house. Step 1: marking and preparation of the territory. Step 2: digging a trench, isolating the foundation with roofing material
The level of the blind area above the ground (height from the soil level) must pass at a height of at least 5 cm. Due to this, moisture will not accumulate at the edges of the structure, destroy it. Damage is especially likely in winter, when water hardens and expands, causing breaks in the concrete.
The minimum height of the basement part is 50 cm (if you undertake the construction of a rigid type structure made of concrete) and 30 cm for a soft blind area.
As for the curb, this part has a decorative purpose, so the need to install it is dictated solely by the possibilities of your budget and personal preferences.
Note! If a blackberry, raspberry, sycamore or poplar grows next to the blind area, their root system can destroy the structure. In such conditions, the installation of the curb is required.
Step by step instructions for building a concrete blind area around the house. Step 3: backfilling with clay in layers of 10-15 cm with layer-by-layer compaction (practiced when working with unfavorable soil). Step 4: installation of the formwork, backfilling a layer of rubble 10-12 cm
Blind area around the house: construction device and preparation for work
The construction of a concrete blind area is based on the formation of a reinforced belt along the perimeter of a residential building.
The design itself has only two main elements:
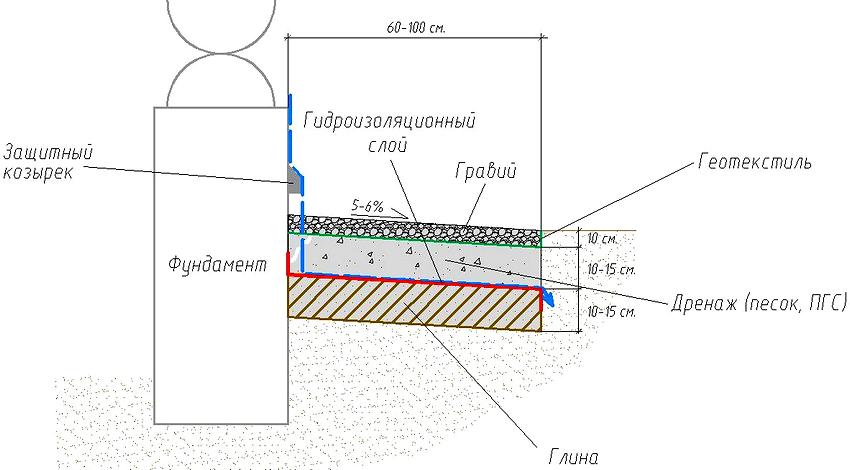
Subbase - formed on the basis of materials with a high level of hygroscopicity, due to which the penetration of water to the foundation of the building is blocked or slowed down. It is best to use for these purposes sand or clay, geotextiles, and fine crushed stone is also suitable. It is allowed to use several of the listed materials at once.
Decorative coating - used exclusively for decoration.
Creating a blind area around the house with your own hands: types of structures, tools
The scheme for creating a blind area has much in common with the construction of the foundation part:
ditch formation;
production of a shock-absorbing cushion consisting of crushed stone and sand interlayers;
Step by step instructions for building a concrete blind area around the house. Step 5: laying the film. Step 6: laying the reinforcement
installation of reinforcing rods to create a frame for concrete;
fill;
finishing.
There are several types of blind area, which differ among themselves in the following ways:
service life;
design features;
materials used for construction.
Based on the above features, 3 types of products are distinguished:
tough;
soft;
semi-rigid.
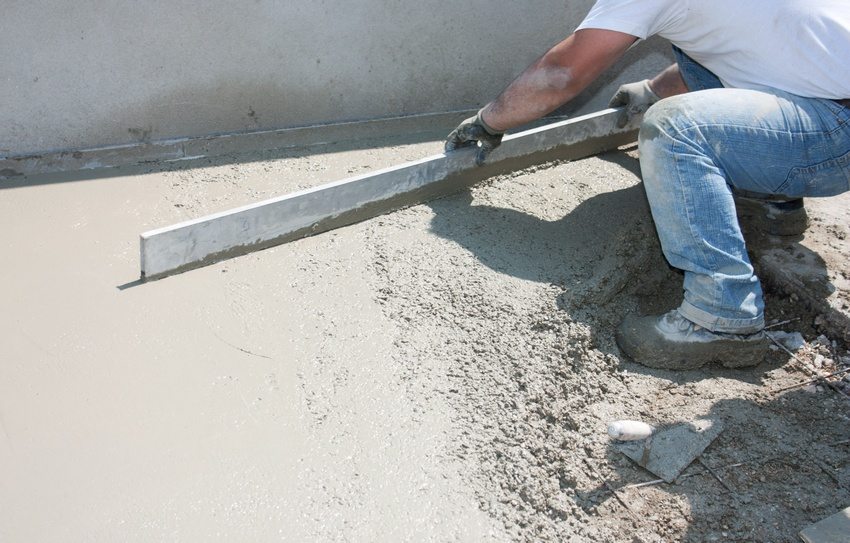
Step by step instructions for building a concrete blind area around the house. Step 7: pouring concrete. Step 8: leveling the concrete surface
Each of these blind areas has its own characteristics, capabilities and construction technology.
To carry out the work, you should arm yourself:
Construction mixer - if you do not have such a tool in your arsenal, you can always rent it (without this tool it is impossible to knead the entire volume, and batch mixing of the solution will lead to delamination).
Tools for earthworks - crowbar, pickaxe, shovel.
Auxiliary tools - spatulas, trowel, building level, paint brushes.
Containers for batch preparation.
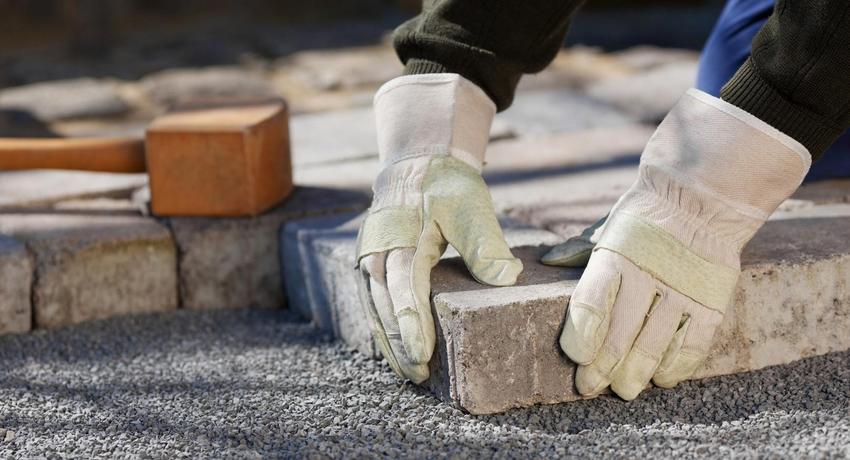
The process of building a blind area from paving slabs
Features of the blind area around the house with your own hands made of concrete (rigid structure)
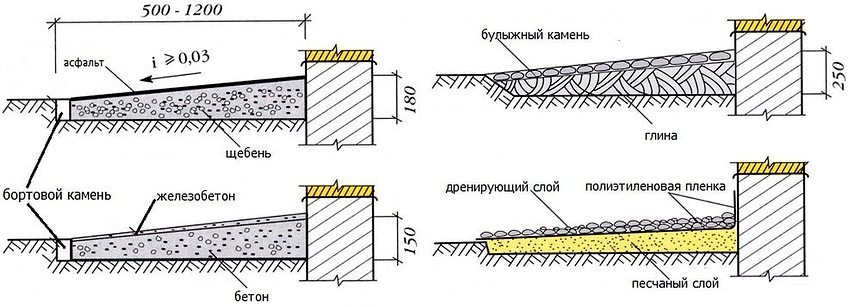
This group of structures represents monolithic concrete-based products, coatings made using cement fill, as well as asphalted blind area options.
Helpful advice! If it is planned to build a structure with subsequent insulation, only a rigid type of system is suitable for these purposes. It is impractical and ineffective to insulate semi-rigid and soft options for the blind area.
Monolithic structures can last almost as long as the building itself around which they are organized. But the construction of such a system has several significant drawbacks.
Firstly, this process is quite laborious and requires some effort, as well as time. Secondly, construction costs are high. This problem also affects blind areas with asphalt pavement, which cannot be organized without tar. The use of this binder only pays off if large-scale asphalt paving works are carried out. This is not advisable within the household.
For the construction of a blind area with insulation, only a rigid type of structure is suitable
The decorative characteristics of a monolithic system can also be attributed to its disadvantages, since the appearance of an asphalt or concrete site cannot be called beautiful.
Features of the blind area around the house from paving slabs (semi-rigid structure)
In semi-rigid systems, the sub-base is a multi-layer cushion. The upper part of the structure is formed from paving stones or paving slabs. In addition to these materials, other types of coatings can be used:
It takes much less money and effort to fill a semi-rigid type of blind area around the house in comparison with monolithic structures. The construction technology in this case is quite simple, however, it cannot be used on heaving soils that can disrupt the integrity of the system.
Diagram of the device of the blind area around the house from paving slabs
Otherwise, semi-rigid blind areas are considered the best option for all the most important indicators:
external characteristics;
cost;
quality.
Helpful advice! If there are paved paths from paving slabs on the site, use the same type of material to organize the blind area.This will allow for a uniform design in the exterior of the entire yard.
Advantages of semi-rigid systems:
Long service life - provided that all the requirements of the construction technology are met, the structure can serve for 20-30 years.
There are no restrictions on climatic conditions - the only exceptions are zones with permafrost.
High level of maintainability.
Low construction costs.
Subject to the construction technology, the blind area of tiles can last more than 20 years.
Features of a soft blind area around the house
For the construction of a soft type system, a multi-layer cushion is formed, which is covered from above with an interlayer of crushed stone. This type of blind area requires the least amount of money and effort, which cannot affect the service life. The average is only 7 years.
On the other hand, this type of construction can be used in all climatic zones. However, there are no significant restrictions on the type of soil. As for the repair work, this process in this case is quite simple.
In fact, the use of a soft system is advisable only as a temporary measure, for example, if you are limited in money, labor resources, or simply do not have free time. The need to replace the structure every 5-7 years is the main disadvantage of the soft blind area.
Diagram of the device of various types of blind area around the house
Making blind area around the house: the right choice of materials
To arrange a blind area around the house with your own hands, you will need the following materials:
components for the preparation of concrete mortar. If you are not well versed in this matter, you can purchase a ready-made version of the mixture in dry form. The quality of concrete can be in the range of 100-1000. This indicator is called a brand - it reflects the amount of cement contained in the solution. Besides, concrete has such characteristics as strength. It is reflected by the material class. Modern mixtures can have a class in the range B3.5-B8. If we take class B15 as an example, then 1 m3 of concrete pouring with dimensional parameters of 15x15x15 cm is able to withstand a pressure of 15 MPa. Optimum quality of cement for work: class B15, grade M 200;
Helpful advice! All work should be completed before the start of frost, so that there is time for full drying and hardening.
sand - necessary to form the bottom layer of the pillow. It is recommended to use quarry or river sand in the form of large particles without impurities, as they can damage geotextiles;
Crushed stone for the construction of the blind area must be clean and without unnecessary impurities
crushed stone with a granule size of 1-2 cm;
geotextile or natural clay - used in the construction of a hydraulic lock.
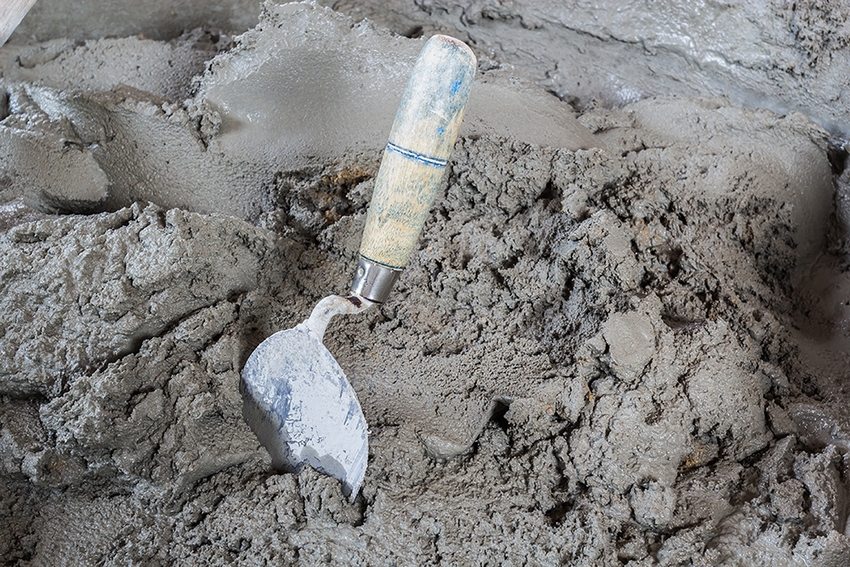
Do-it-yourself solution for the blind area around the house: how to fill the structure correctly
To create a solution with your own hands, you should prepare all the necessary components in advance.
As we found out earlier, the grade of concrete is determined by the grade of cement, as well as by its amount in the components of the solution (% content). For the manufacture of the blind area, it is recommended to take Portland cement M 400. It must be fresh, since every month of delay is fraught with the loss of 5% of its useful properties for the material.
It is quite easy to check how fresh the cement is. To do this, you need to take a handful of material and firmly clench your hand into a fist. Cement with an expiration date will wrinkle into a lump, while a crumbly texture will indicate freshness. The fresher the material and the higher its brand, the better the solution will be.
To obtain a better solution, additional additives are needed, for example, liquid glass
The sand must be sifted and clean. It is better if it is thoroughly washed from impurities of clay, soil, etc.The optimal size of crushed stone fractions for solution preparation is 0.5-1 cm. Water at room temperature is required.
Additional additives are required to obtain a quality solution. They increase the frost resistance of concrete. Most often, liquid glass is used for these purposes.
Note!In addition to basic tools (containers, mixers, buckets, shovels, measuring devices), you need to take care of the presence of a vibration plate or ramming log.
Blind area around the house: how to make a pouring solution yourself (proportions)
The quality of the filling, its strength and durability depend on the proportions of the main components of the concrete solution. The amount of materials is determined by weight only.
Calculation of the proportions for the solution:
Components
Consumption (for 1 m²)
Consumption (per 1 m³)
Crushed stone (granules 0.5-1 cm)
120 kg
1200 kg
Cement (M 500)
32 kg
320 kg
Water
19 l
190 l
Sand
80 Kg
800 Kg
Superplasticizer (C-3, additive)
240 g
2.4 l
The concrete mix has special requirements for the amount of liquid. Excess water can dilute the mortar and reduce the strength of the concrete, since the cement flour is gradually discharged into the upper layer. As a result, the density of the components will be unevenly distributed.
The most commonly used ratio of water to cement is 1: 2. If you want to get the most accurate value, you should check it against the table of water-cement ratio for concrete mortar (W / C).
The introduction of the components into the solution is also carried out in accordance with a strict sequence:
Cement is poured into the concrete mixer (it is allowed to use another container if you use a construction mixer for mixing).
Water is poured and the solution is stirred until a cement milk is formed.
Sand is poured in portions as the mixing proceeds.
Crushed stone is added.
The process of preparing concrete mortar
Helpful advice! Make an interval of 5 minutes before serving each subsequent component. Thanks to this, you can achieve high-quality mixing of the mixture.
Making a pillow for the blind area around the house correctly
The pillow, which performs the function of the underlayment, has the same construction pattern regardless of which type of blind area is chosen. An exception is the process of making a blind area around the house with your own hands from concrete with a monolithic type of construction. It will require a different technology.
The main components of the pillow are:
sand;
clay;
priming.
If you prefer to organize a soft-type system around the house, a layer of rubble is poured on top. For semi-rigid structures, an additional layer of rubble and sand will need to be poured over the formed pillow. Only then can you start laying paving stones or paving slabs.
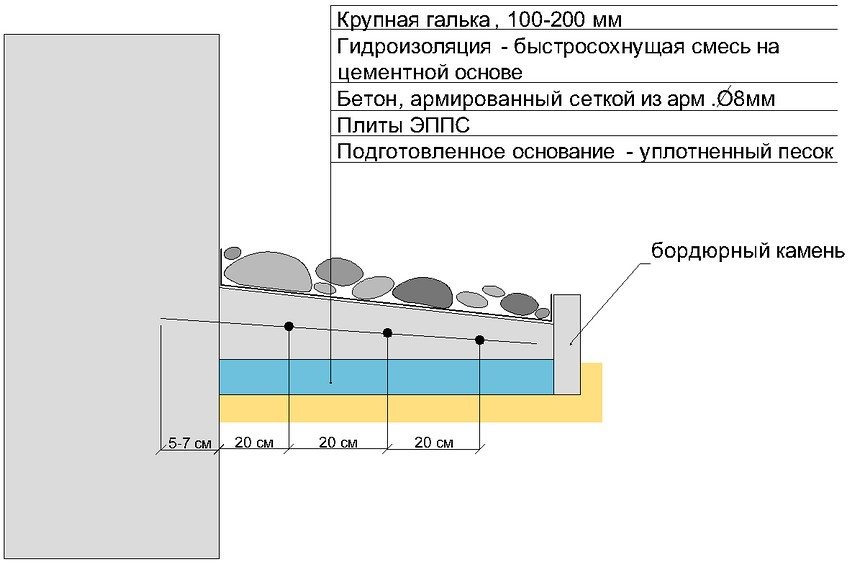
Diagram of the device of a concrete blind area with a top layer of large pebbles
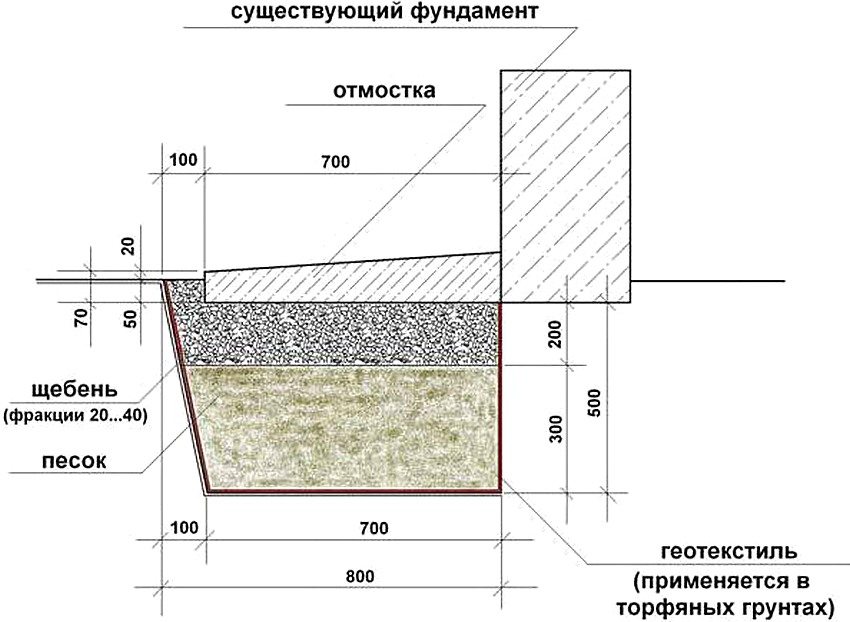
Before pouring a blind area with a rigid platform around the house, you should equip a sand and gravel pillow:
fill up sand;
fill in rubble;
carry out the installation of insulation;
perform the reinforcement procedure and other types of work.
Do-it-yourself blind area around the house: we prepare the construction zone
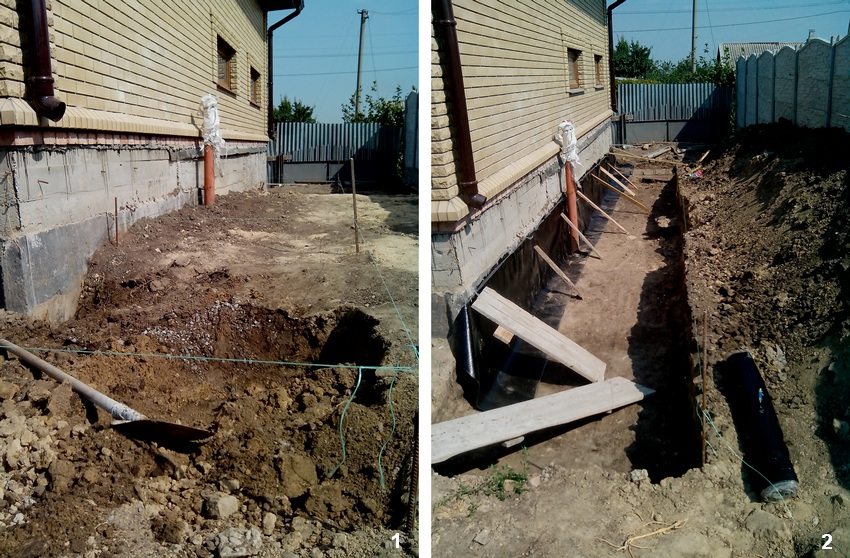
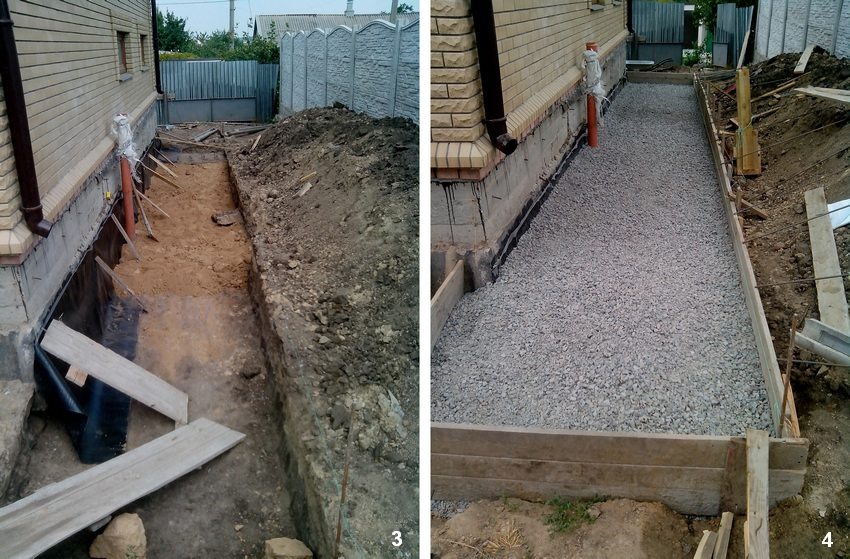
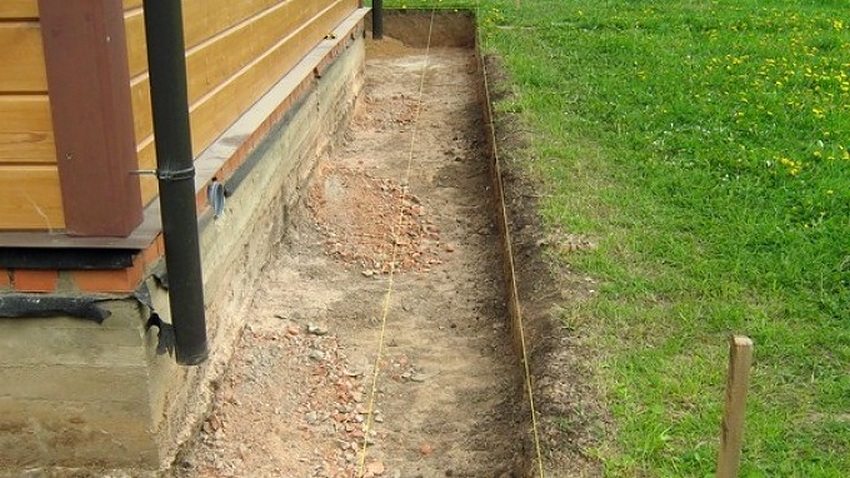
First, you should outline the perimeter of the blind area by forming a trench. Its depth directly depends on the type of soil. The minimum indicator is 0.15-0.2 m. Construction work on heaving types of soil is accompanied by special requirements. In this case, the depth of the trench increases to 0.3 m.
Helpful advice! Pre-made markings will greatly facilitate the work.
Marking will facilitate subsequent work on the installation of the blind area
An easy way to markup:
Metal rods are driven into the soil at the corners. Alternatively, you can use wooden pegs.
Intermediate pegs are placed around the perimeter.
All the pegs are connected by pulling on the mooring cord or any other rope. This line will be used as a guide and markup.
At this stage of work, you can create a gap that separates the structure of the blind area from the foundation of the building. For these purposes, it is recommended to use a polyurethane-based sealant and damper tape.
Next, the required slope of the system is set. This is done based on the type of design you choose. To achieve a certain slope, you need to dig a trench so that there is a different depth at the slope points.
The process of building a blind area around the house: digging a trench
The bottom of the formed trench must be carefully tamped using the most common log. To do this, it is installed vertically, rises and falls down with an effort so that the soil at the bottom is compacted.
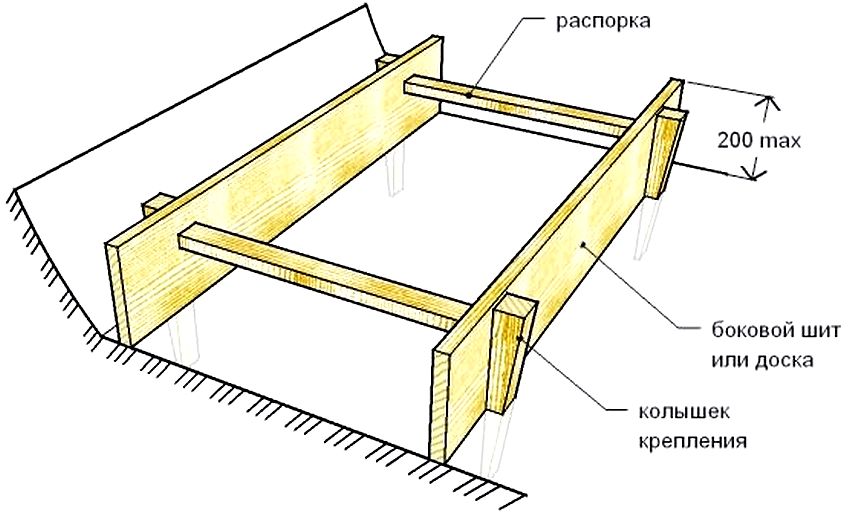
Building a blind area around the house: how to properly install the formwork
For work, you will need boards, the thickness of which is 30-40 mm. The height is selected taking into account the parameters of the future structure. To make your work easier, you can mark the height of future pillow layers on the material in advance. At the corners, the structure can be pulled together and strengthened with corners. This is done from the outside. The use of bolts is recommended as they are the easiest to remove when dismantling the formwork. The optimum fastener diameter is 10 mm.
Helpful advice! If the formwork structure is not dismantled in the future, all wooden parts should be treated with an antiseptic before installing it. It will not hurt to wrap the formwork with insulating material, for example, roofing material. This will protect the wood from decay processes and increase the service life of the blind area.
Scheme of the formwork for the blind area
In order to ensure the stability of the boards of the formwork structure, you can use inclined supports or install blocks, bricks. In the process of work, an expansion joint will be required. This seam should run not only at the junction of the building walls with the blind area, but also across the system. If you ignore this requirement, over time, natural displacement of the soil, provoked by temperature extremes, will lead to cracks in the structure.
Arrangement of transverse seams is carried out at a certain interval. A distance of 2 m will be sufficient. To form the required gaps, you can use boards that are no more than 20 mm thick.
If a system is planned that does not involve casting, you can do without the installation of a formwork structure.
The formwork can be dismantled at the end of the work or remain in the structure
Blind area at home: how to make a sand-crushed stone pillow
The formed trench is filled with a sandy layer. The thickness of the sand layer depends on the total depth of the trench - the optimal parameter is 100-150 mm. For these purposes, it is recommended to use fine river sand. This layer will play the role of waterproofing.
After that, the sand should be carefully tamped in the same way as it was done earlier when forming the bottom of the trench. To achieve a high compaction, the interlayer can be moistened with water.
Note!The required thickness (100-150 mm) of the sand layer is obtained not after backfilling, but after the compaction has been completed. Therefore, it is necessary to fill in the material with a small margin in order to achieve this result.
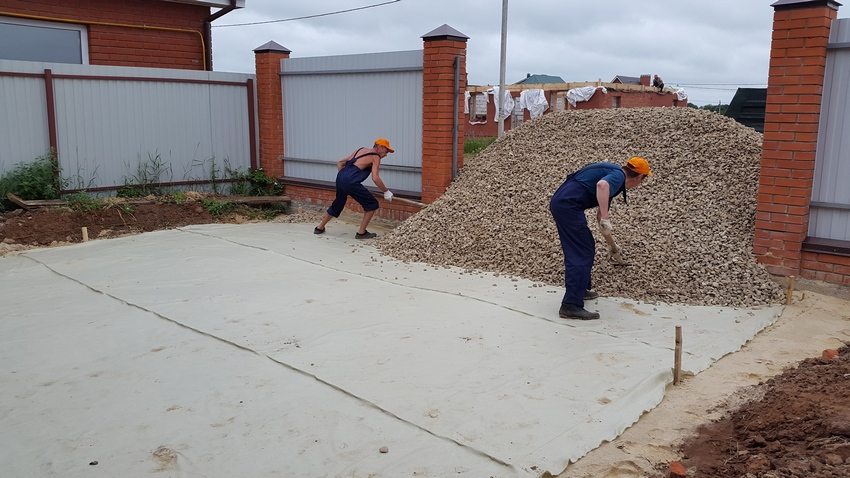
On top of the sand, an embankment with a thickness of 50-100 mm is formed from crushed stone. It is better if material with different particle sizes is used, due to which maximum filling of voids and high density of the pillow will be ensured.Crushed stone can be replaced with other types of materials, for example, brick fighting or gravel. This interlayer is designed to drain water that penetrates through the sand.
The process of creating a crushed-sand cushion. Step 1: pour sand in a layer of 10 cm with pouring and tamping, along the wall of the house put roofing material with a height from the base of the trench to the supposed top of the blind area (expansion joint)
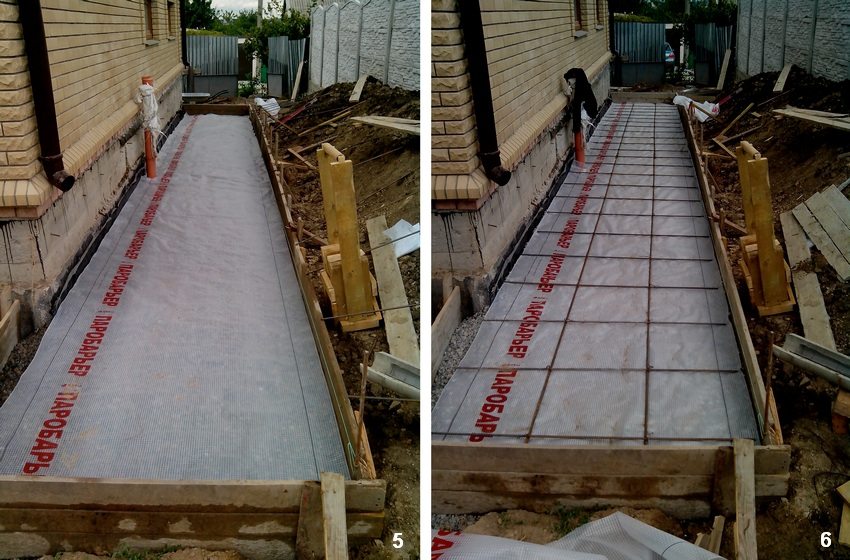
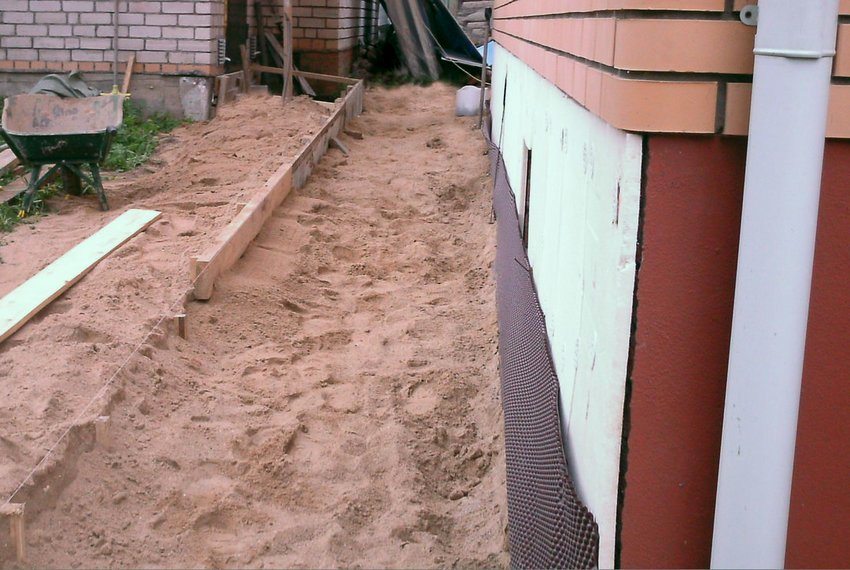
If in the construction area there is groundwater in close proximity to the surface, geotextiles should be placed between the sand and crushed stone layer to provide additional waterproofing protection. In this case, it is worth laying the material with a small margin so that the edges go onto the walls of the formwork structure.
In the process of forming a cushion of rubble and sand, do not forget about observing the angle of inclination, if any. This completes the work on arranging the pillow. The further procedure depends on the type of the selected structure.
Using the recommendations, you can find out how the blind area is made around the house: a video on how to fill in and form the structure correctly will help you with this.
The process of creating a crushed-sand cushion. Step 2: put geotextiles on the compacted sand, cover with crushed stone with a fraction of 20-40 mm and a layer thickness of 10 cm with thrombosis vibrating plate
Construction of a concrete blind area around the house: the price of work, recommendations
The concrete construction of the blind area is suitable for cottage owners who prefer capital products with long service life. The cost of the blind area around the house is quite high compared to other system options. However, the costs in this case are fully justified by the long service life, high strength and reliability of the blind area.
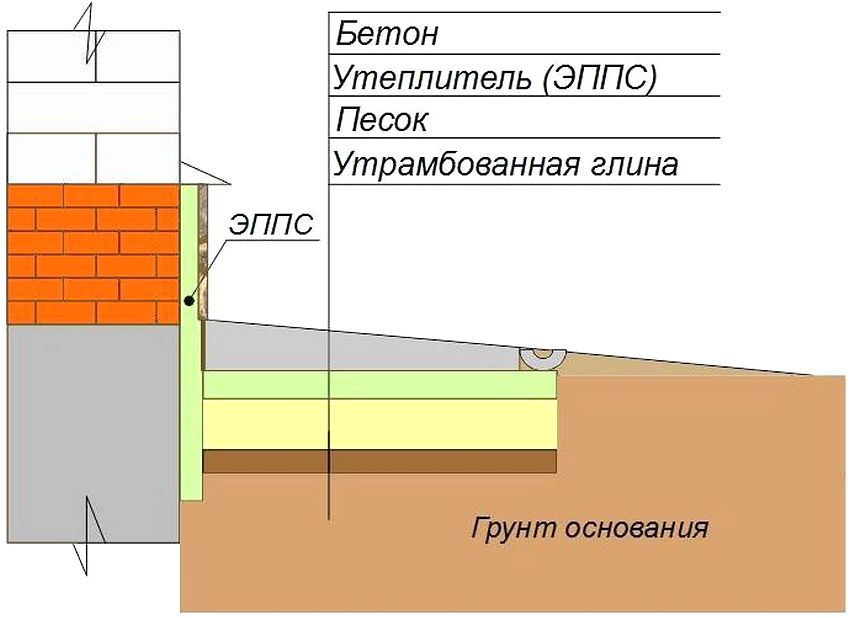
An excellent option would be a reinforced concrete system with insulation. Thanks to the layer of heat-insulating material, the operational and technical characteristics of the basement and foundation parts of the house and the entire building are increased.
Note!The stage of laying the insulation can be excluded from the technology, otherwise using the recommendations for construction without changes. But such a decision will affect the quality of the resulting structure, because thermal insulation for the blind area is extremely important.
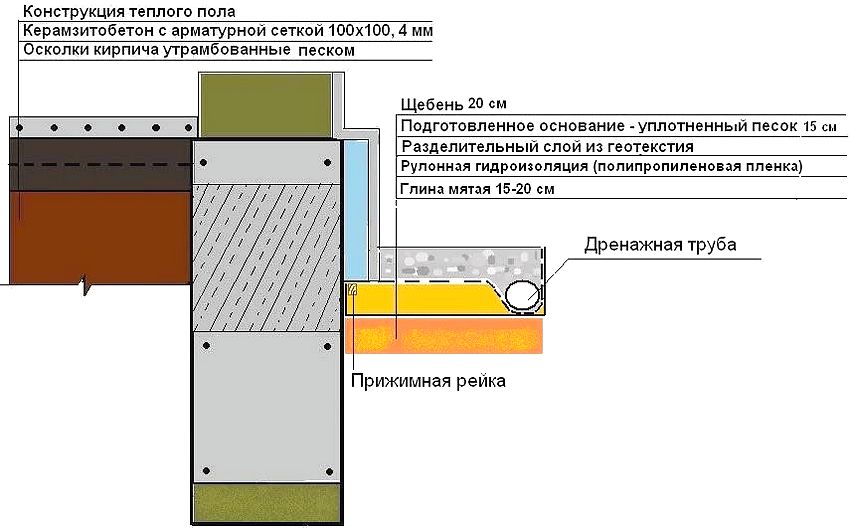
Diagram of the device of a concrete blind area with insulation
The optimal width of the system with insulation should correspond to the depth of soil freezing or exceed this value. The price of a blind area around the house, which cannot be done without significant financial investments, according to experts, in this case will be too high. In addition, the system will take up a lot of usable space. Therefore, it is worth limiting yourself to 0.7-0.9 m.
Concrete blind area around the house: how much does it cost to make a structure
The construction of a structure around the house can be done independently or you can hire workers specializing in the construction of a blind area for this purpose. If you are not confident in your own knowledge and powers, it would be most reasonable to entrust the work to professionals. In this case, the expense item will contain not only the cost of purchasing materials, but also the payment for the services of craftsmen.
Services for the construction of a blind area around the house (price per square meter):
Name of service
Cost of work, rubles / m²
Dismantling the old structure
65
Marking and soil preparation (soil removal to a depth of 0.6 m)
300
Construction of a hydraulic lock (clay)
100
Installation of insulating material (geotextile, film)
40
Cushion formation (sand layer 0.5 cm + tamping)
80
Forming a pillow (crushed stone layer 10 cm)
80
Installing a rainwater receiver
250
Pipeline installation (m. P.)
50
Formation of a blind area from the finished mixture
300
Blind area formation + concrete mix
650
The average cost of construction (services of craftsmen) costs about 1300 rubles.If we talk about the price, making a blind area around the house of concrete with your own hands is much cheaper than hiring qualified specialists for these purposes, since in this case financial investments are required only for the purchase of materials.
DIY construction of an insulated blind area: step by step instructions
Various materials can be used as insulation for the blind area. For concrete structures, it is recommended to use extruded polystyrene foam or foam. The technology in this case will change a little, since it will not be possible to remove the wooden formwork. The insulation is glued to the boards using a specialized adhesive for expanded polystyrene.
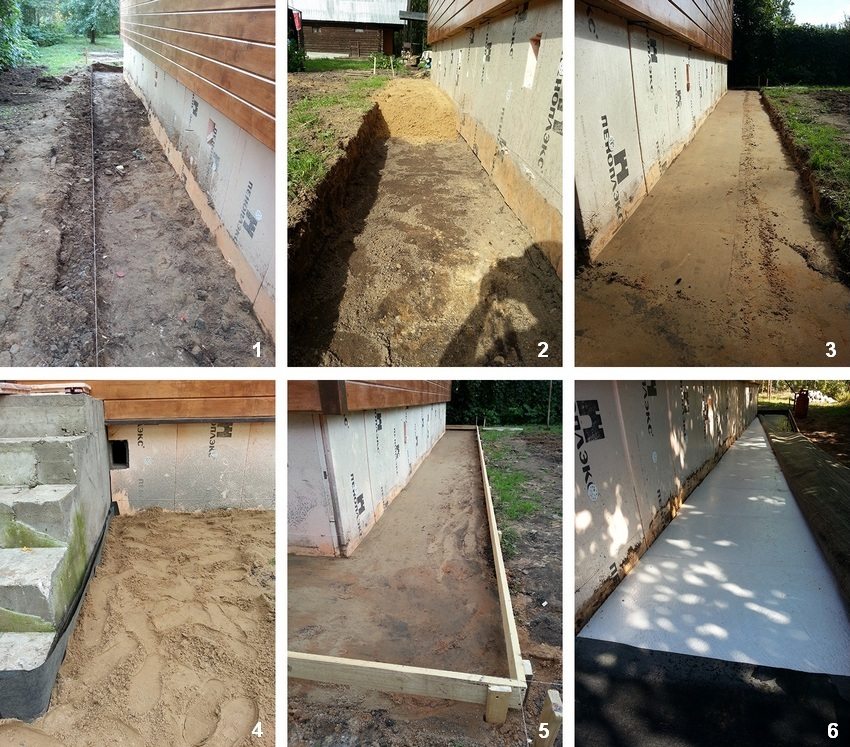
Step-by-step instructions for the construction of an insulated blind area: 1 - marking, preparation of a trench; 2 - creating a sand cushion; 3 - sand tamping; 4 - laying roofing material along the foundation; 5 - installation of formwork; 6 - laying insulation (penoplex)
Helpful advice! Alternatively, slate that has been pre-wrapped with plastic wrap can be used. It should be buried in the ground along the line of the blind area. Even if after construction there are visible parts of the formwork, it can be easily masked. It is much more difficult to hide wood.
Having completed the installation of the side thermal insulation plates, it is necessary to form a pillow according to the technology that was considered earlier.
Making a concrete blind area around the house with your own hands: installing insulation
In this case, the technology of two-layer thermal insulation will be used using extruded polystyrene foam and expanded polystyrene.
This is done in the following order:
Installation of a foam layer (during installation, the plates should be laid very tightly, temporarily fixing their position with bricks).
Removing the protruding parts of the foam after it has completely dried (use a sharp knife for this purpose).
Installation of extruded polystyrene foam plates on top of polystyrene foam.
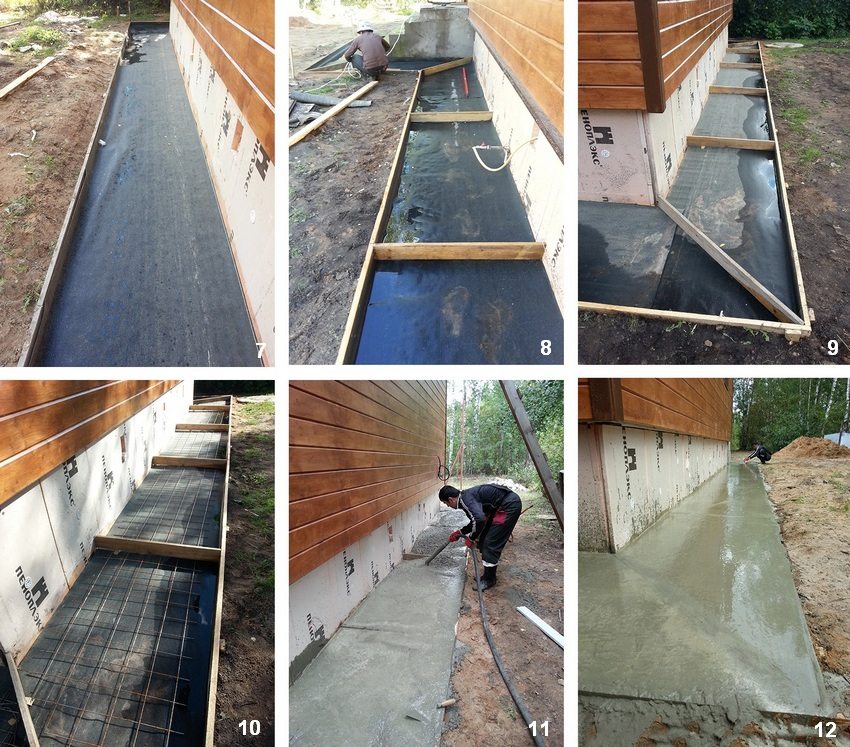
Step-by-step instructions for the construction of an insulated blind area: 7 - laying a layer of geotextile or roofing material; 8 - dividing the perimeter into sectors no more than 2 m long, installing jumpers taking into account the slope; 9 - setting jumpers at the corners at 45% relative to the outer corners for convergence of slopes on different sides of the blind area; 10 - laying the reinforcement; 11 - pouring with concrete; 12 - leveling the concrete surface with a rule or a regular board
There are grooves on the end zones of the expanded polystyrene plates, which exclude the possibility of cracks between the elements after laying. Installation is carried out in such a way that the seams of the upper layer do not coincide with the seams of the lower foam layer. For cutting the material, you can use a regular knife with a sharp blade.
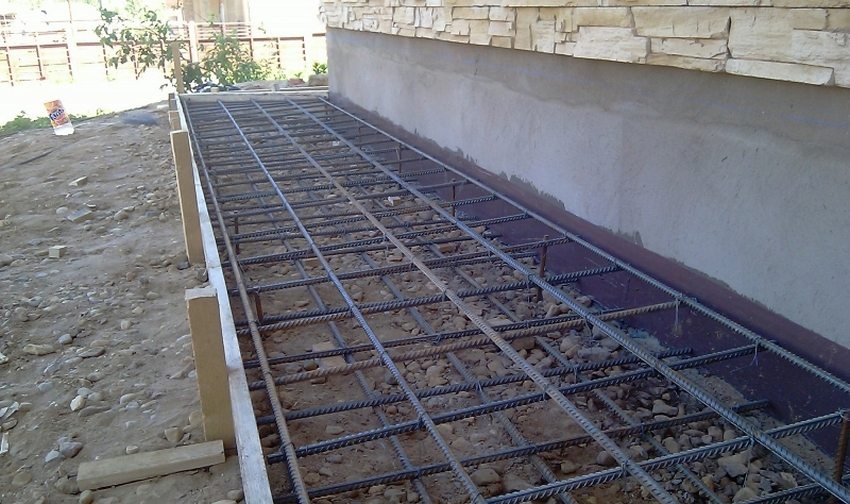
Concrete blind area around a house: how to make reinforcement
The next step is reinforcement. A ready-made mesh can be used as the main material. It can be made independently, using reinforcement with a thickness of 0.8-1 cm. For this, a mesh with a mesh size of 15x15 cm is formed from the bars. Fixation is performed in the intersection zones of the reinforcement. Stores sell specialized retainers to make this process easier.
Helpful advice!In order to save money, knitting wire can be used instead of clips.
The mesh is laid on the base with a slight indentation. To do this, you can use the support clips. Instead of clamps, it is allowed to use other materials, for example, stones, brick breaks, etc.
The mesh for reinforcement can be made independently or you can purchase a ready-made version
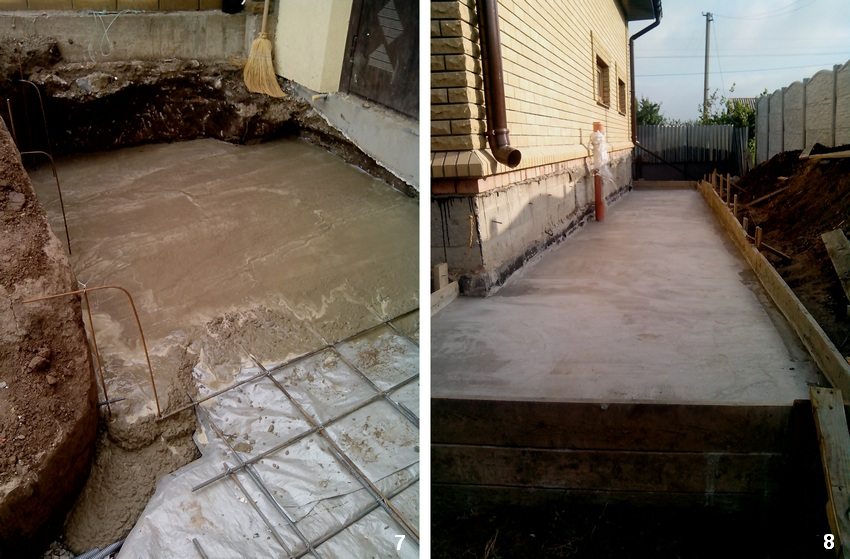
The foundation part is poured with an indent of 5 cm. But in this case, such an indent will significantly affect the height of the structure, so a gap of 0.5-1 cm should be left.
Blind area around the house: video how to fill the structure and protect it
With the preparation of concrete for pouring, the construction of a blind area around the house begins, how to correctly make the mixture has already been described earlier. For a reinforced concrete structure, you will need M 400 grade (minimum). The cement should be mixed with sand and gravel in a ratio of 1: 3: 4, respectively. The amount of liquid is selected in such a way that the result is a mass of normal density. The solution must be plastic and homogeneous.
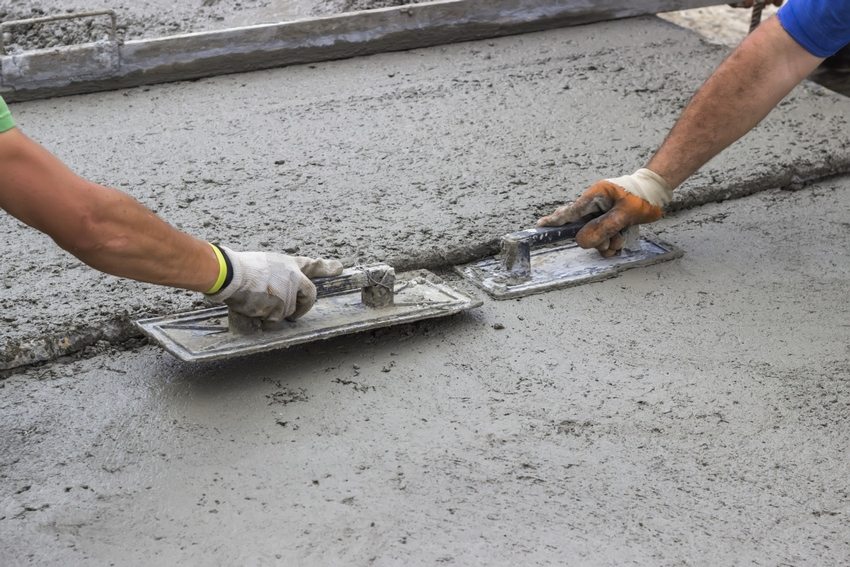
The prepared solution is poured onto the base. It must be spread over the surface with a mop or any other suitable tool, for example, a rule. The side walls of the formwork can be used as beacons.
Concrete surface leveling process
After the pouring is done, the concrete must be pierced in several places in order to free the exit for excess air. Use a reinforcing bar for this purpose. Then these holes should be sealed with a mixture and the surface should be covered with a thin layer of cement (dry powder). According to the technology requirements, the pouring should be allowed to dry for at least 28 days.
The design needs protection from the effects of atmospheric precipitation. The blind area must be covered with polyethylene film.
Helpful advice! To improve the quality of the concrete system, it is recommended to lift the polyethylene and wet the concrete with a little water every two days.
Now you know how to do the blind area around the house with your own hands, a video - a review of the technology will help you understand this issue in more detail:
Blind area around the house: how to make a soft structure
To arrange a soft blind area around the house with your own hands, you need to organize a trench and fill up a layer of sand. Do not forget to set the required slope of the embankment.
Next, a waterproofing material is laid on the sand. Roofing material is the most popular material used for these purposes, but rubemast, despite its cost, has a longer service life.
For a formwork with a width of 0.8 m, cutting of the material will be required, because rubemast is sold in rolls with a width of 1 m.If you do not want to cut it, you can simply bend the excess parts and stick them with molten bitumen to the wall.
Diagram of a soft type blind area with a top layer of gravel
On the waterproofing layer, you need to make an embankment (10 cm) of sand and gravel (these materials are mixed in equal proportions). It must be tamped and leveled, while observing the required angle of inclination.
The soft blind area needs an additional layer of rubble. Crushed stone (3-5 cm) is poured over the mixture and compacted. Thanks to this additional layer, the blind area will not be subject to subsidence during operation. Finally, you can mask the boards of the formwork with decorative borders.
You can use additional information on the construction of a blind area around the house. The video how to make each layer in a visual way reflects all the features of this process:
Arrangement of a blind area from paving slabs with your own hands: step by step instructions
The construction of a blind area from paving slabs and paving stones is carried out in the same way. The choice of topcoat depends entirely on your budget and preferences.
Note!When using paving stones as a topcoat, there are some restrictions: the foundation must be waterproofed.
Paving stones have only one significant drawback - the price of tiles for the blind area around the house is much lower than that of this material.
Average prices for paving stones:
Name, dimensional parameters
Number of elements in 1 m²
Cost, rub. / M²
Gray
Red
Brown
Blue
Green
The black
Rectangle (190/90/57)
58,5
360
430
430
510
540
430
Wave (220/110/60)
39
400
460
460
660
560
460
Coil (198/163/70)
35
420
460
460
690
590
460
Flower (110/110/60)
78
440
460
460
660
560
460
Shell (188/173/70)
30
420
460
460
690
590
460
Brick (200/100/70)
50
410
460
460
690
560
460
Monomakh's hat (brick + 2 pentagons)
8/16
430
460
460
690
590
460
Pentagon (280/240/70)
20
430
460
460
660
590
460
After analyzing the data from the table, you can see that the cost of purchasing paving stones or tiles for a blind area around the house largely depends on the dimensional parameters, shape and color of the material.
Blind area around the house: video how to make a structure, paving technology
For the blind area, a sand-crushed stone pillow is formed from the tile in the same way as described earlier. Only in this case it will be necessary to make an additional layer of sand (8-10 cm) on top of it.
When constructing a blind area from paving slabs, it is necessary to create a sand or sand-crushed stone cushion
The paving technology is simple enough that this procedure can be done independently. Tile installation can be started from any angle that you find convenient. As you pave, you should move away from you. In the process, it is recommended to use the brickwork method.
Note!The layout of the elements can be any. You can come up with it or use ready-made options, of which there are many on the network.
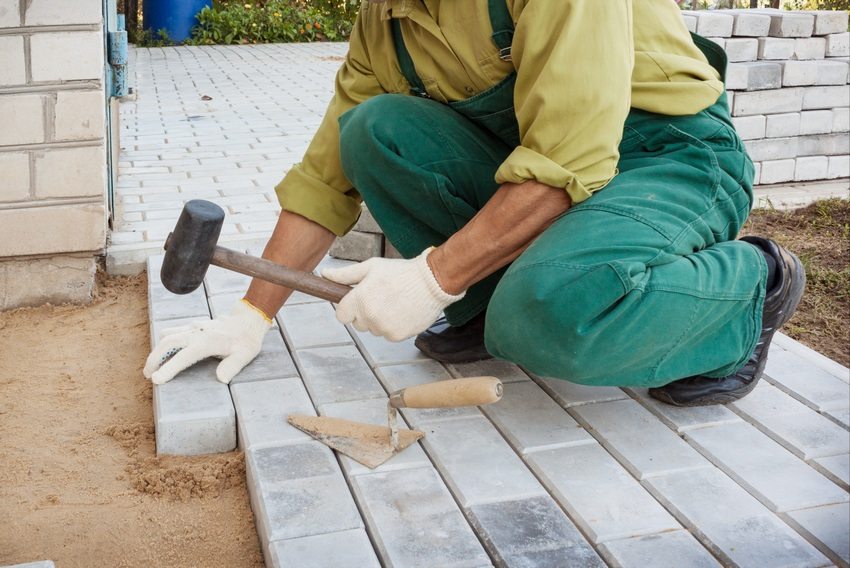
In order for the tile to fit snugly to the base, it is better to use a special tool - a rubber mallet.
Tile installation scheme using a mallet:
lay tiles on the base surface;
When paving tiles or paving stones, it is better to use a special tool - a rubber mallet
a wooden plank should be placed on top of the tile;
with the help of a mallet, it is necessary to gently and carefully press on the tile, tapping the tool on the board.
Remember to use a building level to check your tile flooring. Not only the tile itself, but all the rows should be evenly spaced in relation to each other. In some cases, you may experience material subsidence. This problem is solved by pouring sand under the corresponding elements of the coating. The protruding areas can be replaced with a mallet.
When paving, it is very important to observe the required slope of the blind area. The entire surface of the system is tiled. To cut the material to the desired size, it is recommended to use a grinder.
Blind area around the house: how to repair a concrete system with your own hands
During operation, the concrete blind area can be destroyed. But if you do the repair of the blind area around the house with your own hands, you can not only extend the service life of this structure, but also significantly save on paying for the services of the craftsmen.
The most common problems are:
the occurrence of cracks;
delamination of the surface;
crumbling.
The cost of repairing the blind area around the house, done with your own hands, depends on several factors. First of all, the cost of the work depends on the degree of neglect of the structure, as well as the method that was chosen to repair the damage. The type of material and its quantity are also important.
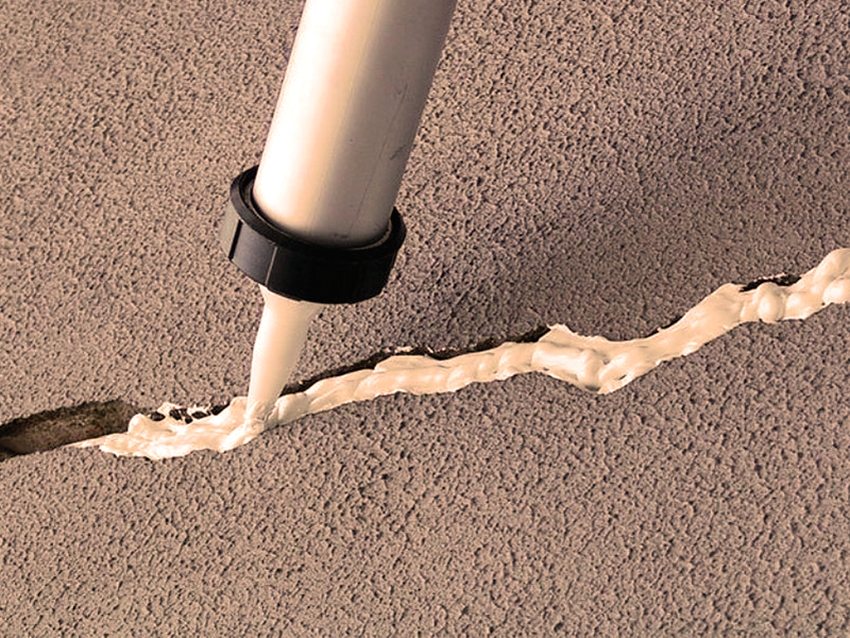
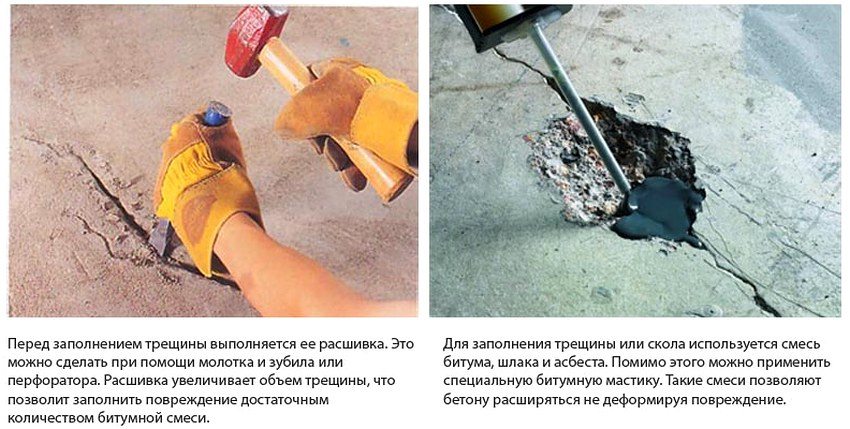
Elimination of cracks in the blind area with sealant
DIY methods for eliminating cracks in the blind area
Cracks in the blind area are of a different nature. Such damage can be classified as crevices, concrete breaks or crevices. It depends on the depth of the damage. Methods for dealing with cracks in each case will be appropriate to the depth and severity of the damage.
Helpful advice!All work to eliminate cracks in the blind area must be performed in the off-season (autumn / spring).
Table of methods for repairing the blind area and the necessary materials:
Damage depth
Elimination method
Repair materials
1 mm
"Self-healing"
small cracks are not dangerous for the structure, they disappear by themselves while walking on the blind area
1-3 mm
"Cement paste"
the cracks are filled with a solution consisting of cement and water in proportions 1: 1
3-30 mm
pouring with concrete; hydraulic seal formation; use of sealants
pouring with concrete requires preliminary expansion of cracks to a conical shape and application of a primer (Ceresit ST-17); to form a seal, you will need Lugato 5 Mortel putty; ISOSEAL P-40, TEKTOR 103 are suitable for sealing cracks with a sealant
more than 30 mm
concrete pouring
damages of this size are considered structural splits and are repaired only by pouring concrete
How to eliminate delamination and crumbling
The second most common problem is delamination. Experts call this process delamination or dusting of concrete.
There are several prerequisites for delamination to appear:
Uneven hardening of concrete mortar (occurs in spring when pouring concrete on a cold base).
The structure is too thick.
Exceeding the norm of air content in the solution.
Exceeding the proportion of rubble in the concrete solution.
Detailed instructions for repairing the blind area
If the surface of the blind area crumbles or delaminates, the structure should be treated with a "cement paste". To eliminate this problem, it is allowed to use compositions with liquid glass. The main components of the solution are water, cement, liquid glass in equal proportions.
Damage elimination scheme:
Analysis of the situation, determination of the boundaries of damage.
Cutting out part of the concrete.
Processing of the edge zone with a primer.
Application of the solution to the damaged area.
Covering the solution with a film.
The area of the repair performed should be kept under the film until the solution is completely dry.
Note! If the damage is not eliminated in time, subsequently it will be necessary to dismantle the blind area and form a new structure. Therefore, it is recommended to carry out all repair work on time
Blind area around a private house, made of paving stones
Additional protective measures
There are several ways to protect the concrete blind area from premature destruction:
cladding with natural stone or installation of a tile covering.
Regardless of which type of construction you choose (rigid, semi-rigid or soft system), it is recommended to install a storm drain next to the blind area. With the help of this element, it is possible to exclude the siltation of the personal plot by draining the flowing water to a suitable place for this.