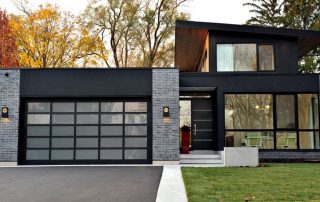
Due to a number of advantages, frame and modular houses confidently lead in the rating of prefabricated structures, suitable not only for summer cottage use, but also for permanent residence. Lightweight, not requiring a massive foundation, with high thermal protection, such structures are in no way inferior to houses made of bricks or blocks. In addition, there is always the opportunity to build a frame house with your own hands. Step by step instructions will help you understand the main stages of construction.

A competent project is a guarantee of comfortable living conditions in a frame house
Content
- 1 DIY frame house. Step-by-step construction instructions
- 1.1 Preparation and marking of a site for construction
- 1.2 Video: DIY frame houses, step by step instructions
- 1.3 Laying the foundation of a frame house: instructions
- 1.4 Tying the foundation of a frame house: step by step instructions
- 1.5 DIY frame house flooring: step by step instructions
- 1.6 The device of the walls of the frame house
- 1.7 Installation of internal partitions and ceiling
- 1.8 Roof device
- 1.9 Do-it-yourself frame house insulation device: step-by-step instructions
- 2 The main advantages of frame houses
DIY frame house. Step-by-step construction instructions
The most affordable and fastest construction technology is the construction of a frame house for permanent residence. Therefore, frame houses are so popular all over the world. Do-it-yourself construction of a 6x6 frame house, starting from the foundation and ending with finishing work, can be completed by a team of three people within two months.
Construction begins with the development of a competent project. You can build a frame house with your own hands, but it is better to entrust the project to professional designers. It should reflect the structural, architectural and construction, engineering sections and schemes of the frame house. It will be easy to implement engineering ideas with your own hands, strictly following all the instructions.

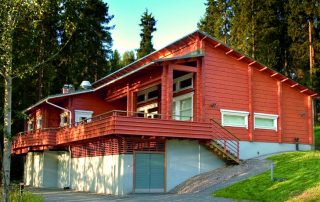
Frame structures are becoming increasingly popular in the field of house construction
Photos of frame houses, projects which are developed by design organizations, clearly demonstrate the level of professionalism of designers. The network offers many videos on how to build frame houses with your own hands.
Preparation and marking of a site for construction
Starting to build a frame house with your own hands, they begin to prepare a site for construction. For high-quality marking, the site is freed from trees, bushes, grass, stones and debris. If the site contains a slope or unevenness in its relief, it is recommended to level it. All elevations are cut to the required level, soil is poured into the depressions.

Layout of the site for the foundation
Starting the construction of a frame house with their own hands from scratch, they make markings for the foundation.To transfer data from the project to nature, it is necessary to mark the external dimensions of the house with the help of wooden pegs, as well as outline the internal walls. All marking angles must be strictly maintained, since the future of the building depends on this.
How is a frame house built with your own hands? To get acquainted with the construction technology, it is recommended to watch a video lesson.
Video: DIY frame houses, step by step instructions
Laying the foundation of a frame house: instructions
The process of phased construction of a frame house with your own hands begins with the foundation. Given the lightness of the structure being built, there is no need to lay a massive foundation under it. For the foundation of a frame house with their own hands, they use a columnar, tape (shallow, prefabricated, monolithic), pile and other types of lightweight foundations.
In our case, we will take a columnar foundation as a basis. This is a system of pillars installed in the corners of the future house, at the intersection of partitions and at other bearing points. The pillars are located around the perimeter at a distance of 2-2.5 m from each other. For this, first, a shallow pit and a sand cushion are arranged. When the pit is ready, check the correctness of the marking using the diagonal method.

3D-scheme of arrangement of a columnar foundation
With the help of a drilling rig (motor-drill) or a shovel, holes are dug for a columnar foundation. Formwork is installed, waterproofing is laid and pillars of brick are arranged. For waterproofing, you can use roofing material or film.
If the pillars will be constructed of concrete or cement, reinforcement should be used. It can be equipped by strengthening the pillars on all sides with 12 mm diameter iron bars. The reinforcement rods should protrude 15 cm above the post - this will ensure the subsequent bundle of the posts with the grillage. Reinforcement is performed horizontally and vertically. Horizontal wire jumpers (a wire with a diameter of 6 mm is suitable) are placed at a distance of 20 cm.

Column foundation with concrete grillage
The grillage frame is made of rods tied with steel wire. Formwork is assembled from the boards, the dimensions of which must correspond to the parameters of the trench. Next, they start pouring a concrete solution, which is kneaded independently or a ready-made mixture is obtained. Concreting is carried out in stages, each time compacting the mixture. At the end of the work, 50 cm long pins are inserted into the foundation, onto which the skeleton of a wooden frame house will be attached.
You can get acquainted with the work on the construction of the foundation from the video "How to build a frame house with your own hands."
Tying the foundation of a frame house: step by step instructions
After the work on the foundation is completed, it takes at least a week for the concrete to set properly. Next, they equip the waterproofing of the foundation made of roofing material or waterproofing, laying it in two layers. The harness is made from a bar with a section of 150x150 cm.
Helpful advice! When choosing a bar for the lower strapping take into account the distance between supports of a columnar foundation. The larger it is, the thicker the timber should be. This will help prevent sagging.
Prepared bar laid on the foundation around the perimeter, control the length of the walls, checking the data with the project. If the length of the timber is not enough for laying on one side of the perimeter, it is necessary to dock them together. The beam is cut and joined so that the joining points fall on the foundation pillars. Docking is done by cutting out the locks at the ends of the bar (the overlap is 30 cm). In the corners, the bars are connected according to the same principle.

A frame house can be built in two months
Next, the timber is attached to the foundation by means of studs or bolts. Holes are drilled in the timber and in the foundation heads. The protruding attachment points deepen as possible.The joints are fixed with nails. The strapping of the foundation under the internal partitions is performed in the same way. For reliability, it is recommended to reinforce the joints with metal corners.
You can clearly get acquainted with the implementation of the foundation strapping from the video "Do-it-yourself frame houses".
DIY frame house flooring: step by step instructions
Installation of the floor begins with fixing the log to the beams of the finished harness. A timber with a section of 10x20 cm is used as a lag.A board can also act in this role, but then for rigidity it will be necessary to install two boards together, fastened together. The frequency of the location of the lags is calculated taking into account the dimensions of the insulation plates, which should fit tightly between the lags. For example, if mineral wool with a sheet of 61 mm wide is used for insulation, the step for the lag is set to 60 cm.
For fastening the lags, nails and fastening corners are used. The logs are not stacked flush with the timber, but retreating from the edge of the timber about 5 cm, where the boards will then be attached, closing the gap between the logs. When all the logs are mounted, one or two transverse boards are nailed between them to give the structure rigidity.

Scheme of arranging the floor of a frame house
The next step is to install a membrane waterproofing material on the floor battens, which covers the entire surface of the floor frame. Insulation plates are placed on top of the membranes. The insulation is positioned so that the junction line of the slabs of the previous layer is closed by the middle of the slab of the next layer.
Helpful advice! For high-quality vapor and waterproofing, it is recommended to lay the corresponding material with an overlap in order to avoid moisture or steam penetration.
A vapor barrier film is laid on top of the insulation and only after that the floor is covered osb-plates... In addition to boards, you can use plywood or board.

The lathing of the wooden frame of the house on pile foundation
Numerous photos of a frame house with your own hands with a phased fixation of work will help you to understand the installation in detail.
The device of the walls of the frame house
Do-it-yourself installation of the walls of a wooden frame house is carried out by assembling the frame structure. It can be wooden or metal. Oak is most often used for timber frame, but other types of wood can be used. The frame is assembled according to the construction scheme of a frame house. With your own hands, a wall span is first assembled on the floor, and then the finished wall element is mounted to the floor.

Arrangement of the floor and walls of a frame house
At this stage, it is important to correctly make all measurements and calculations of the length and height of future walls. The distance between the posts is taken based on the width of the insulation plates so that they clearly fit between the posts. In the case of using mineral wool as a heater, the step is made 1-2 cm less than the width of the material. All vertical posts are nailed to the upper and lower frame members. For reliability, you can also use mounting angles.
When calculating the length of each wall, it is necessary to take into account that each span should be less by the thickness of the rack of the next span. Sometimes the length of the timber is not enough to cover the entire wall. In this case, the wall span is formed from several parts, which are subsequently connected to each other. A multi-piece wall span is easier to install if the job is done by one person.

Structural elements of the wall of a frame house
To make the structure of the wall frame more rigid, jumpers are installed between the vertical posts. They, as a rule, are fastened in a checkerboard pattern: in one space from above, in another - from below. The lintels can be attached both to the installed frame and when the structure is still on the floor. Window and door openings in the wall frames are arranged according to the project.
When all the spans of the walls are ready, they begin to assemble them.The first span is mounted to the floor, and props are installed outside. So all the walls are assembled in turn, connecting them together with nails. When joining parts of the walls of one span, make sure that the bottom and top of the structure coincide. To fix the vertical level of the wall, jibs (diagonally nailed boards) are used.

Installation of walls of a frame house
Helpful advice! To control the verticality of the racks and the correct angles, use a long level or a plumb line and a construction square.
To get acquainted in detail with how a frame house is made with your own hands, use photo and video materials on this topic.
Installation of internal partitions and ceiling
When the external walls are mounted, proceed to the installation of internal partitions. The principle of assembly of internal walls is no different from the assembly of the main walls, except that their thickness may be slightly less. As for the thermal insulation layer, here it is used as sound insulation. In addition, the construction of such walls does not provide for vapor and waterproofing.

Reliable fixation of the frame elements will ensure the strength of the entire structure of the house
Next, the entire structure is strapped along the upper edge. This will contribute to the rigidity of the entire assembled structure and high-quality fixation of all corners. The upper harness is made of boards, which are nailed from above along the entire length of the outer and inner walls. An important point here is that the joining lines of the wall parts are covered with a solid board by at least 30 cm.
After that, the surface of all walls from the outside or inside is sewn up with osb-plates. This will give the final rigidity to the entire wall frame structure.

Scheme of arrangement of the attic in a frame house
The ceiling is mounted on the upper trim bar. For this, grooves are made in the timber, into which the ceiling beams are inserted, additionally securing them with nails. In the place where the internal partitions pass, support bars are mounted, which are connected to the lower and upper strapping. A ceiling panel made of grooved boards is nailed down.
The vapor barrier layer is laid on top of the shield, and overlapped with ceiling beams. Next, the thermal insulation material (mineral wool, polystyrene, expanded clay) is laid out flush with the beams. A layer of insulation is covered with a waterproofing film and a shield of boards is laid in the direction transverse to the beams. Next, the floor is assembled, as on the lower floor.

Ceiling arrangement using hydro and vapor barrier, as well as using mineral wool as insulation and sound insulator
As additional help, use a photo of the stages of building a frame house with your own hands.
Roof device
The roof is installed at the stage when all the walls are built and secured. The required slope and the number of roof slopes are determined. The most common is the gable roof. To increase the usable area, some houses are equipped with a veranda. The project of a frame house with a veranda can provide for two types of roof structures: above the house - a gable, above the veranda - single slope... These types of roofs are also used for a frame house with an attic and a veranda. For one-story frame houses with a flat roof, only single-slope design.

The gable structure is a popular solution for arranging the roof of a frame house
The rafters are selected with such a cross section so that insulation can be laid between them. For a sample, take two boards 6 m long and connect them into an L-shaped structure, raise them to the roof, support them on a strapping beam so that the overhangs are 35-50 cm.The resulting structure is fixed with a crossbar and used as a model for rafters. They are mounted at a distance of 70 cm from each other.
The connection of the rafters in the ridge is carried out according to the "half-paw" method.The first are the rafters on the gables, and then a thread is pulled between them, at the level of which the remaining intermediate rafters are mounted. Next, they arrange a crate: thinned or solid.
Helpful advice! Whatever the lathing, its installation in the area of the ridge should be carried out without a gap.

The frame of the house is sheathed with OSB-plates from the outside
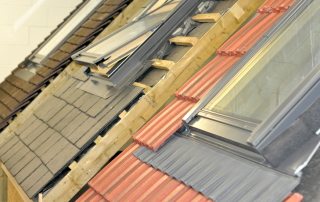
For roofing, you can use metal tiles or corrugated sheets. This material is easy to install, lightweight and affordable. In addition, such a roof will always have an attractive appearance.
You can learn more about the methodology for constructing a roof by finding the video "How a frame house is built" on the Internet.
Do-it-yourself frame house insulation device: step-by-step instructions
To know how to properly insulate a frame house, you need to focus on the seasonality of living in the house. If permanent residence is planned in it, then the heat-insulating layer must have a thickness of at least 5 cm. To arrange the insulation of a frame house with their own hands, use expanded polystyrene, foam or mineral wool.

The distance between the frame posts should be slightly less than the width of the insulation
On the outside, OSB slabs are covered with a waterproofing membrane. After that, a lattice of slats for ventilation in a frame house is packed. With your own hands, the necessary layer of insulation is laid on the inside between the vertical posts. Each subsequent layer of heat insulator should overlap the joints of the previous layer. To avoid moisture ingress from inside the room, a film is stuffed over the insulation vapor barrier and sheathe the walls with sheets of osb-plates.
Related article:
Insulation for the walls of the house outside for siding: choose the material and method of installation. The choice of the type of insulation. Features of materials, their advantages and disadvantages. The main stages of installation.
Next, the exterior of the house is finished. It can be plaster, wall cladding with a wagon board or siding... The most suitable for finishing is vinyl siding, since it is easy to install and is able to protect walls from external atmospheric phenomena for a long time.

Siding cladding is a good solution for finishing a frame house
The main advantages of frame houses
The construction of frame houses (reviews confirm this) solve the problem of getting comfortable and budget housing. The advantages of this technology:
- the most affordable construction technology;
- the ability to use lightweight types of foundation;
- fast construction speed;
- rather low thermal conductivity of the structure allows you to reduce heating costs;
- low heat capacity allows you to quickly warm up the house to a comfortable temperature in case of inconsistent use of housing;
- excellent sound insulation;
- the possibility of placing communications inside the walls, which has a positive effect on the aesthetic component of the premises;

Example of arranging a frame house - sectional view
- the absence of shrinkage makes it possible to start finishing work immediately after the construction of the house and move into it in the shortest possible time;
- use of environmentally friendly materials in construction;
- high seismic resistance (up to 9 points);
- no need to heat the house in winter in case of seasonal residence;
- there is no need to use special construction equipment;
- the absence of wet construction cycles makes it possible to carry out work regardless of the air temperature and the presence of water;
- quick dismantling if necessary.

Frame house finished with modern building materials
All these advantages contribute to the increasing popularity of frame technologies among the methods of construction of residential buildings.In addition, such technologies allow owners of small-sized houses to equip a frame extension to the house with their own hands to increase the living area. Such structures are economical and, when properly constructed, provide conditions for a comfortable stay. They are minimal in cost and can be added to any type of home.