Heating prices are rising, forcing private homeowners to look for ways to save money. A good way out of the situation is to insulate the walls with penoplex. The technology of work is not particularly complex. You can cope with it with the most minimal skills in the construction business.

House insulation with penoplex
Content
General information about penoplex
The second name of the material is extruded polystyrene foam. It is obtained by foaming the foam and forcing it through an extruder. When gas evaporates from the finished mass, many small, evenly spaced voids will remain in it. The result is a lightweight and durable material that is 95% air. A package of eight 100 mm boards weighs about 15 kg.
There are several types of penoplex. Moreover, the name of the material directly indicates the scope of its application. For the insulation of concrete and brick walls, "Penoplex Wall" is taken. Note that a 100 mm thick slab has the same heat capacity as a one-and-a-half brick. Penoplex is also resistant to alkalis and acids, so it can be plastered and painted with water-based solutions.

Penoplex Stena is used to insulate concrete and brick walls.
Preparatory work
First, you need to scrape off the old peeling paint, wallpaper, putty from the wall - everything that does not hold well. If the old coating is firmly adhered to the surface and has not lost its strength, it can be left. Align all the bumps and depressions with a putty, otherwise the plates will not adhere well, and then they will break from pressing. The permissible error is no more than 1.5 cm per linear meter.
Helpful advice! If internal wall insulation with foam is carried out, technology process requires impregnation of surfaces with an antifungal agent of deep penetration. If the sheets are sewn on the outside, then the bottom of the wall is treated with a fungicide, where moss grows from dampness.

Penoplex is a lightweight and durable material that is 95% air
Unplastered walls must be primed. All metal structures that will be covered with insulation are painted or covered with an anti-corrosion compound. Before starting work, the brackets are hammered for fastening drainage systems, satellite dishes, junction boxes, cable channels, air conditioners. Smooth foam plates are rolled with a needle roller.
Materials for mounting plates
A separate question is how to glue the penoplex. Many people use polyurethane foam. It is convenient - there is no need to dilute the adhesive, spread the sheet, and withstand a certain time. What kind of "mounting" is suitable for wall insulation with foam-plastic?

When choosing an adhesive, it is important to make sure that its composition is suitable for installing foam
The technology must be both reliable and safe:
- the presence of toluene in the foam is unacceptable. This substance destroys both penoplex and human health;
- if the area insulation large, it is better to use professional foam, and to it - a mounting gun;
- the best adhesion will be given by one-component polyurethane foam.
This method is also good in that you can foam all the irregularities and gaps that are inevitable when cutting slabs. The joints are closed with ordinary tape. The only drawback is that the price of foam will increase the cost of insulation many times over.

Ventilated facade construction using extruded polystyrene foam
Dry adhesive mixtures are much cheaper. They are divided into groups according to the type of binder component:
- cement or gypsum (mineral) - Ceresit, Sarmat, Teplokley;
- polyurethane - Titanium for foam, Isomelfi;
- waterproofing - bituminous mastic, Uniflex;
- on mixed polymers - Emficol, Moment.
The mixture is packed in bags of 5-50 kg. A ten-kilogram bag is enough for lining 10-15 sq. m walls, depending on the composition of the glue.
Attention! Unused glue must not be diluted and mixed again or added to a fresh batch. Its properties are irretrievably lost.

For better adhesion, smooth foam boards are rolled with a needle roller
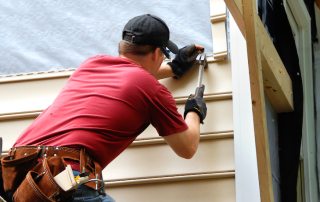
Wall insulation with foam. Cladding technology
Sometimes a profile frame is installed before gluing the boards to the outer walls. This is justified if, in the future, the finishing material (drywall, siding, false beam, block house). The lathing is usually made of aluminum elements.
Related article:
|
Where the climate permits, you can fill a wooden bar. But in temperate latitudes, the range of day and night temperatures is too wide, and there is enough precipitation. The wooden structure will swell and dry out, moving the sheets from their place. In any case, the depth of the frame should correspond to the thickness of the foam.

Insulation of the facade with penoplex with a metal frame for installation of facade panels
Installation of plates
If it is decided to do without the crate, then you still need to nail (or put) a flat bar from below, adjusting its position in level. The rail will serve as a support for the first row, plus keep the glued plates from slipping. Next, the walls are insulated with penoplex, the technology of which provides for a certain sequence:
We begin to glue the boards from the lower, most illuminated corner. On the ends of the sheets there are grooves for hermetic fastening. Before spreading the glue, it is necessary to check whether the lock matches the groove of the previous sheet. We adjust the ends of the cut fragments as accurately as possible.

Methods for applying glue to foam sheets
We coat the slab around the perimeter with glue, add a few thick strokes in the middle. If, according to the instructions, the mixture is recommended to be kept until light setting, then this should be done.
We press the penoplex to the wall with rotational movements, distributing the adhesive. We hold for 20-30 seconds. Remove excess glue.
Helpful advice! The accuracy of the installation of each slab is checked by the building level. Slots in the joints and random defects can be immediately sealed with scraps of foam, adjusting them to size.

Wall cladding technology using foam
We lay the sheets of insulation with a bandage (in a checkerboard pattern).
We also need incomplete slabs. In difficult places (between openings, near sockets) we apply a whole sheet to the wall. With a pencil, mark the cutting lines. Penoplex is cut with a hacksaw with a fine tooth.
In the openings, we glue the insulation with an overlap on the edge of the slope. Closing slopes fitted fragments, carefully cut off the excess foam. We fasten the abutment profile to the door and window frames and glue the penoplex tightly.

The abutment profile is screwed to the window frames and the penoplex is glued close
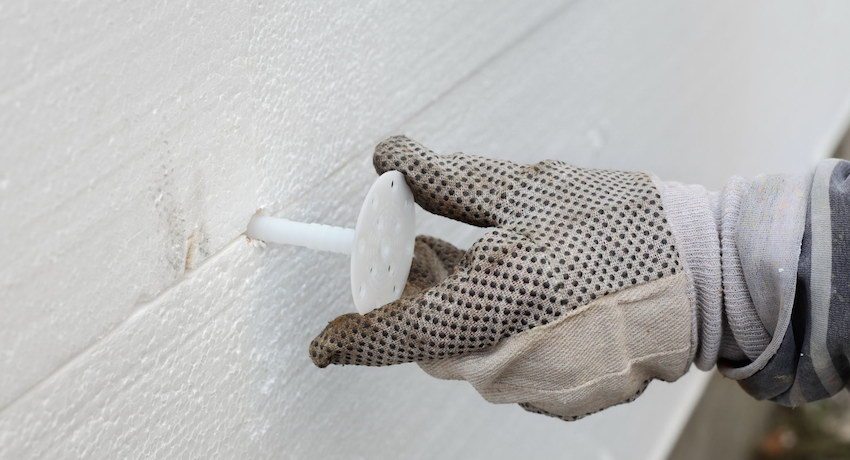
Fastening the insulation to the nails
The glue takes several days to set. After making sure that the penoplex adheres well to the wall, we strengthen the fastening of the insulation with disc nails (umbrellas). Better to take plastic nails and dowels. They are cheaper than metal ones and do not conduct cold.
The length of the fungi is calculated as follows. We add 1 cm of glue and 4-5 cm of the wall to the thickness of the foam. For example, for a 50 mm slab, you need to take nails 11 cm long.

Methods for attaching foam sheets
We drill holes in the corners and in the middle of each sheet with a puncher. Drill in the corners in such a way that the nail head captures the edges of the adjacent slab. The depth of the nest should exceed the length of the umbrella by 2 cm.
We insert plastic dowels into the finished holes, knock them in, then hammer in the nails.
If joints have formed during the fastening process, fill them with foam.

Fungus nails for the installation of insulation
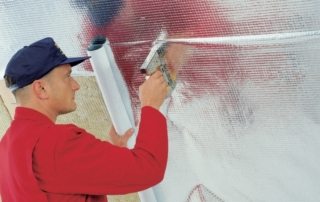
Penoplex reinforcement with mesh
After the walls are insulated with foam, the construction technology provides for surface reinforcement. This is necessary to strengthen the heat-insulating layer, as well as for better adhesion of the plaster mortar to the insulation. The order of work is as follows:
- we cut the fiberglass (metal is possible) mesh into fragments of 1 sq. m;
- we apply a 2-3 mm thick layer of glue to the insulation area;
- we put on a mesh and level the adhesive, sinking it. If there is not enough glue, add until the mesh is completely hidden under it. Leave the edges of the fiberglass for several centimeters not glued;
- we coat the adjacent area, going with a spatula to the edges of the previous one. We attach a new piece of mesh, overlapping the joints. After the mortar has set, the joints will be invisible.

Reinforcement of insulation with fiberglass plaster mesh
Finishing
As soon as the reinforcing layer is dry, it must be rubbed with an abrasive float. Then two or three leveling layers of the adhesive mixture are applied, each of them being dried within 24 hours. The dry surface can be primed and plastered.
Finally. The result of wall cladding with foam is noticeable immediately. It becomes warm and dry in housing, and heating costs are reduced. If you additionally insulate the floor, roof and foundation with foam, the house will be truly energy efficient.