In a cold climate, do-it-yourself wall insulation with foam plastic becomes an urgent need with limited financial resources. In this case, the savings are realized, both through the use of relatively inexpensive foam plastic, and due to the lack of payment for the work of the construction team.

Polyfoam is an economical material for home insulation
Content
Description of the material: its advantages and disadvantages
Polyfoam is a well-known insulation material for a long time. Because it is made of expanded polystyrene foam, it contains billions of air-filled cells. They create an excellent heat-shielding effect due to the low thermal conductivity of the air mixture. This insulation has been used for insulation for a long time. change houses and trailers that are used as temporary housing in the northern regions. Houses are built from sandwich panels using Canadian technology. Polyfoam, used as insulation in these structures, allows walls to be no more than 15 - 20 cm thick, which does not in the least reduce their ability to retain heat.

Thermal insulation of the house by facing of facade panels based on foam
The use of foam plastic for covering ceiling ceilings, floor insulation, as well as walls in various residential buildings. Do-it-yourself wall insulation with foam plastic is especially popular outside the building. This insulation fits well any type of wall. It is quite cheap and convenient for installation, as it has the form of rectangular plates of various thicknesses from 5 to 15 cm. In this case, you can choose plates of different densities.
Helpful advice! When choosing a foam, it is necessary to find a balance between density and thermal conductivity. The fact is that the denser the foam, the higher its thermal conductivity, which means that in order to achieve the normal effect, it is necessary to thicken the foam layer.

An example of arranging a ventilated facade using foam
The structure of this soft material is such that it can be cut with a conventional sharp knife. This is another plus of this insulation. However, it is not without its drawbacks. The cellular structure of the foam has a very weak bond, and therefore small particles are quite easy to separate. For this simple reason, it easily crumbles when insulating walls with foam plastic with your own hands. Videos of this process are filled with moments when the slabs break even with a slight pressure on them. Handle the styrofoam with care and care.
The second drawback of this material is its poor sound insulation qualities. Therefore, if you decide to sheathe the walls with them to protect from noisy neighbors, then the effect will be minimal. Better to choose another material. The third disadvantage is the fact that mice and rats like to gnaw foam.They are able to destroy the slab in a matter of weeks or make moves in it. Therefore, if in your area the situation with rodents is far from favorable, you need to use insulation that mice do not like.

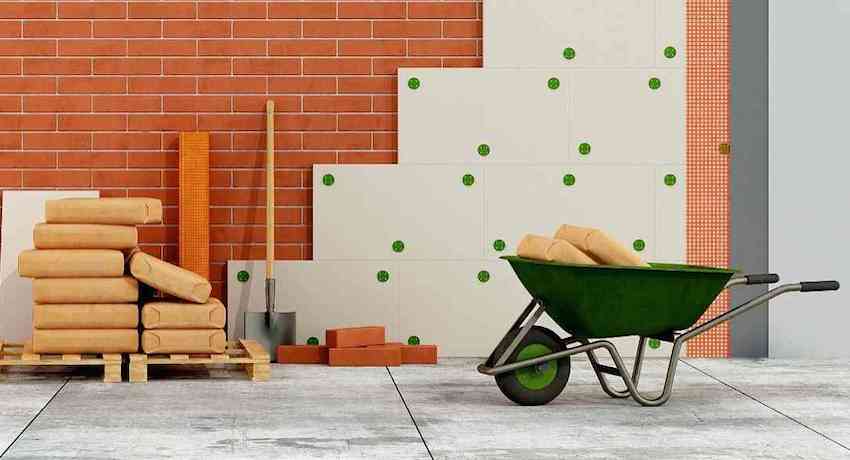
System "wet facade" with the use of foam
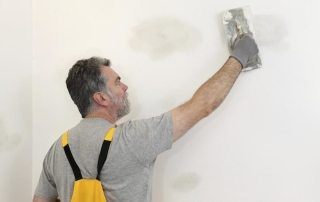
Do-it-yourself wall insulation with foam plastic
The material is equally well suited for covering horizontal and vertical surfaces as insideand outside the room... In recent years, the interior walls have been insulated with this material less and less often, since it was replaced by penoplex, which is better suited for this. However, if you nevertheless decide to insulate the walls inside the apartment with polystyrene, then it is necessary that the thickness of the sheets be 5 - 7 cm. This will significantly reduce the area of the rooms. It is much more correct to insulate the walls with foam plastic with your own hands outside.

For the installation of foam plates, a special adhesive mixture is used
You must first prepare the materials and tools necessary in the process of its implementation:
- foam boards of sufficient thickness. For middle latitudes, 10 cm is suitable. If the slabs are thinner, then there should be 2 times more of them, since they will have to be laid in two layers. In this case, it is necessary to glue the second layer only when the glue after the first dries completely. Calculations of the need are made by the area of the walls, from which the area of all openings is subtracted;
- mineral wool slabs, which are necessary for sheathing the perimeter of windows and doors. They are assumed to be the same thickness as the foam. This measure is necessary to ensure that fire safety regulations are observed. The density of mineral wool slabs should always be the highest. The calculation of the need is done depending on the number of windows and doors. Plates fill the surface of the walls around the openings by about 30 cm;

Styrofoam sheets are stacked in a checkerboard pattern so that the joints of the next row do not coincide with the previous one
- for insulating walls with foam with your own hands, you will need reinforcement mesh for plastering;
- wall primer. Its amount strongly depends on the structure of the walls to be processed. If it is smooth, you can use the instructions on the bank to determine the need. For a porous structure, add another 20 - 30%.
- special glue that is used for outdoor work. It looks like a dry mix, which must be prepared according to the instructions on the package;
- perforated galvanized steel starting corner. It is needed to install the bottom row of foam plates;
- perforator with a drill Ø10 mm, its length is equal to the thickness of the foam and another 8 cm;
- mixer for mixing glue; construction liquid level; sharp knife.

Installation of sheet polystyrene is easy to do yourself
These are all the tools and materials that are needed to insulate walls with foam with their own hands. A video of finishing openings with mineral wool can be found on the network and viewed in detail.
Wall insulation technology with foam outside
The time of work on wall insulation with foam plastic with your own hands should be calculated so as to have time to cover the foam sheets with plaster or other topcoat even before it begins to turn yellow under the influence of sunlight. This process is very harmful to the material, as it seriously damages its structure and reduces the heat-shielding properties. Work begins with the preparation of the walls. Old paint and plaster are removed from them. Cracks are putty, and the protrusions are cut off. After that, the walls are well treated with a primer. If necessary, do this 2 - 3 times.

The communication holes in the foam can be easily cut with a sharp knife
Helpful advice! To find out how well the primer layer is applied, you need to run your hand over the dried wall. Nothing should appear on it, no sand or other inclusions.
Before the beginning insulation, it is necessary to fasten the starting bar to the base.It is installed along the horizon with a building level. This rail looks like a shelf and is fastened with screws or dowels. It is needed so that the foam is held and does not slide down. In some cases, you can avoid using this element, but only when the height of the building does not exceed one floor, and the first layer of foam is glued and has already dried.

The starting bar is set strictly horizontally and must correspond to the thickness of the foam sheet
Further, do-it-yourself wall insulation with foam plastic begins from the bottom. The very first sheet is smeared with glue at several points and around the perimeter, after which it is placed with an edge on the starting bar and glued. The second and subsequent sheets are adjusted to the first, making sure that the distances between them do not exceed 2 - 3 mm.
Helpful advice! The gaps formed between the foam parts can be filled with a thin stream of polyurethane foam. This can be done only after the glue has completely dried in order to avoid displacement of the sheets from the expansion of the foam.

For a tighter attachment, the foam plates are fixed on plastic mushrooms-dowels with wide caps
We must not forget about the mineral wool slabs, which are used when insulating walls with foam outside with our own hands. The video provides an opportunity to see how to make fireproofing around openings correctly.
Related article:
|
The subsequent rows of foam plates must be made so that the masonry resembles brick. In the case when a second layer is required, then make it in such a way that no slit coincides with both layers. For a tighter fixing, the plates can be fixed on plastic mushrooms - dowels with large caps. To do this, drill 10 mm holes in the wall and slabs of 6 pieces. for 1 m². These dowels are driven into them with a hammer.

Before applying the plaster, a reinforcing mesh is glued to the foam
You can start plastering only after the glue has completely dried. To do this, a reinforcing mesh is glued over the foam plates. Then only apply a layer of any plaster for painting or decorative plaster compositions. The technology of wall insulation with foam plastic looks similar from the outside under the ventilated facade. Only in this case guides are used, between which the foam is glued.
You need to see for yourself in order to finally understand the process of insulating walls with foam outside with your own hands. There are a lot of videos of such work on the network. A facade correctly insulated with foam will not create problems with freezing for many years.