To build interior drywall partitions in your house or apartment with your own hands, a step-by-step instruction of this process will absolutely not hurt. This is true, for example, if there are children of different sexes in a family. To build a solid brick wall, permission from the relevant authorities is necessary, and it will be too expensive. In addition, the easiest and cheapest way is to build an interior plasterboard partition with your own hands. Photos of such structures give a good idea of their aesthetic and practical qualities.

Mount the partition from drywall it's not difficult at all with your own hands
Content
What materials and tools will be needed to make a plasterboard interior partition
In order to build a partition, we first need to make a rigid frame. To make it, you will need a 75 mm galvanized profile with additional elements and wooden blocks. They will be needed to make the frame stronger in some places. We will sheathe the frame with sheets of plasterboard with a thickness of 12.5 mm of a standard size using self-tapping screws.

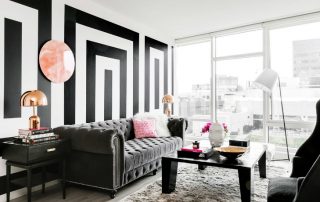
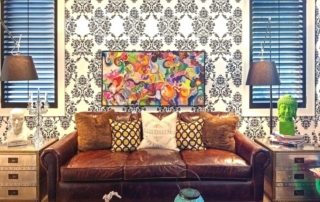
Plasterboard partitions in the interior
Between the sheets of gypsum board we will place a sound-proof material when creating with our own hands interior partitions from drywall. A photo of such a "pie" can be found and examined in detail.
In addition to materials for the production of work, we need to acquire the following tool:
- cordless screwdriver or a small drill with a suitable attachment;
- small manual building level (bubble or hydro level);
- measuring 5 - 10 meter tape;
- plumb line, for aligning the guides of vertical profiles.

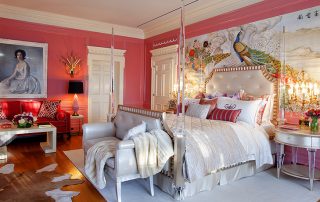
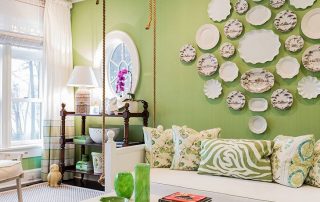
With the help of a partition, the room can be divided into functional zones
Helpful advice! if you have laser self-leveling levelthen the speed and quality of your work will be greatly improved. It allows you to better beat the vertical and horizontal levels.
Having prepared the necessary tools and materials, you can proceed directly to the construction of a drywall partition with your own hands. A video of this process will help you better understand the entire technology and sequence of the device.

GKL interior partition with a doorway
Do-it-yourself plasterboard interior partitions, step-by-step instructions with explanations and useful tips
The process of installing a plasterboard partition consists of several stages: installation of a frame from guide profiles, installation of a doorway, filling the frame with plasterboard sheets, finishing work. Let's consider these steps in order.

Room before and after the construction of the partition
Installation of the base for the partition frame
Before installing the frame, it is necessary to mark the floor and ceiling in the required place using a level.
- use self-tapping screws to fasten the guide profile along the line on the floor;
- into the lower profile near the walls we insert vertical guides, which we attach to the walls with dowels strictly vertically. The step between the fasteners should be no more than 30 - 50 cm.At the joints of the profiles, we use ordinary self-tapping screws to fasten them together or cutter;

Step 1: cutting the profile and gluing its back wall with sealing tape
- we carry out the installation of the ceiling profile under constant control using a plumb line. As a result, by fixing four profiles, we get a rectangular frame - the basis for the future, hand-made, drywall partitions. The video of the construction of the frame best illustrates the subtleties of this process.

Step 2: horizontal fastening of the profiles to the floor
Formation of doorway elements
Our partition will have an ordinary swing door, so a place must be provided in the frame for installing the door block. The walls must be rigid to support the load.

Step 3: fix the profiles to the walls and ceiling
Helpful advice! To increase the rigidity, you need to take dry and straight wooden bars, which should go inside the profile. They will significantly strengthen the doorway, which will help secure the door block securely and rigidly.
We form the doorway in the following sequence:
- cut the galvanized rack-mount profile in height, supply it with a wooden bar, which we insert inside;
- we insert ready-made structures with bars inside the guide profiles on the floor and ceiling, so that the width at the bottom and at the top of the doorway coincides;

Step 4: vertical installation of profiles in 60 cm increments
- using any level, we carefully control the verticality of the installation of door pillars and fix them with 35 mm galvanized self-tapping screws. Compliance with the level is especially important when constructing interior partitions made of plasterboard with your own hands. Nobody likes photos of ugly designs;
- cut from a piece of the rack profile a segment equal to the width of the doorway for the manufacture of a crossbeam. We also insert a bar into it and set it to the required height strictly horizontally;

Step 5: cross-shaped fastening of the profiles to each other for the construction of the opening
- on the back of the racks and the crossbeam, prepare small holes for the nail. To do this, you will need a drill with an appropriate drill bit. The bars are drilled to a depth of 50 mm, which will be almost half of the nail;
- with nails 120-150 mm, you need to fasten the wooden structures that are inserted inside the profiles. To do this, we hammer the nails very carefully with an ordinary hammer;
- we finish the installation of the crossbar after screwing in the screws from the side on both sides.
Related article:
Types of profiles for drywall: dimensions and price
What determines the quality and durability of interior decoration. Characteristics of metal-profile products.
Having completely built the doorway, we begin to install the remaining vertical posts.

Step 6: shaping the doorway
Installation of vertical racks
We continue to build a plasterboard partition with our own hands. The step-by-step instructions for installing vertical profiles will be as follows:
- the places of installation of the rack profile are marked along the width of the drywall sheet, which in the standard is equal to 120 cm.Thus, there will be 3 racks per sheet, installed vertically after 60 cm;

Step 7: finished frame made of metal profiles
- since it is better to place whole plasterboard sheets from the middle to the edges in order to hide the scraps in the most inconspicuous places, then the racks must be installed from the doorway towards the walls;
- we check each vertical profile with a level and fasten it to the guide with ordinary self-tapping screws.

Step 8: sheathing one of the sides of the frame with gypsum board sheets and laying soundproofing material
Installation of horizontal bars and wiring
To increase the rigidity of the entire structure, it is necessary to connect all vertical guides with horizontal jumpers. This can be done in 70 - 80 cm increments.
- pieces with a length of 65 cm are made from the rack profile, the edges of which are cut off so that they can be fixed to the vertical racks;
- when the frame is assembled, we lay electrical wires inside it. For this, the profile manufacturer has provided special holes in their products;

Step 9: sheathing with drywall sheets of the second side of the frame
- electrical wiring is laid inside plasterboard partitions in a special corrugated non-combustible insulation.
On this, the installation of a frame for a drywall partition with your own hands can be considered completed. Step-by-step instructions for attaching drywall sheets to the frame are presented below.

Step 10: inside the wall is mounted wiring
Installation of gypsum board sheets on the frame
Before you start installing the sheets, you need to know how to cut them if necessary:
- if there are no special devices for cutting gypsum board, then you can use a regular profile with a drywall knife;
- in order to cut the sheet along the desired line, it is necessary to put a piece of the profile on it and cut through the gypsum layer as deep as possible with repeated knife movements. After that, it is simply enough to break the sheet along this notch. The cut edges are processed with a special plane for drywall. If it is not there, then you can do this with a knife, if you remove the chamfer from the end at 45 degrees;

Step 11: pinout outlets and switches
Helpful advice! In those places where it is planned to nail shelves, hooks, niches, and similar objects, it is necessary to install wooden mortgages from bars in advance. Subsequently, these measures will greatly facilitate the fastening of furniture.
- we fasten the gypsum board to the guides with the help of self-tapping screws at a step of 15-20 cm. The self-tapping screws must be immersed into the sheet body by 1 mm, but we must try not to break through the cardboard;
- when installing sheets, we are guided by vertical guides to maintain the level;

Step 12: grout the joints between the drywall sheets
- when installing a drywall sheet, you need to provide a certain gap from below. To do this, we install the same stands. Do-it-yourself drywall partitions, video editing of which are very numerous, tend to settle over time. The gap is needed so that the sheets do not deform;
- we produce soundproofing of partitions using mineral wool or isover, which is placed between the sheets.

Step 13: finishing the installation of the partition and moving on to finishing
To create drywall partitions with your own hands, step-by-step instructions will be very useful. Since a properly constructed structure will be rigid, stable and attractive in appearance.