Almost everyone knows that wall plastering is an effective way to eliminate defects and uneven surfaces. But when it is necessary to do the work yourself for the first time, many questions often arise related to the technology of applying the solution to various surfaces. Consider how a beginner to plaster walls with his own hands: videos, photos and expert recommendations.

It is not difficult to learn how to plaster walls on your own, it will also help to save on hiring specialists, since such services are not cheap
Content
- 1 How to plaster walls correctly: features of technology and material selection
- 1.1 How to plaster a brick wall with your own hands
- 1.2 How to plaster walls: video instructions for working with a concrete surface
- 1.3 How to plaster the walls in the bathroom: the advantages and disadvantages of various options
- 1.4 How to plaster walls with your own hands: features of working with foam concrete
- 2 How to plaster walls for a beginner with your own hands: video instruction
- 2.1 How to plaster a brick wall: features of surface preparation
- 2.2 Features of surface preparation of a concrete wall
- 2.3 Features of the preparation of a wooden surface
- 2.4 How to plaster walls with your own hands: video instructions for setting beacons
- 2.5 Rules for applying plaster to the surface
- 2.6 How to prepare a plaster solution with your own hands
- 2.7 How to mix the solution yourself: rules and recommendations
- 3 How to putty walls with your own hands: video for a beginner
How to plaster walls correctly: features of technology and material selection
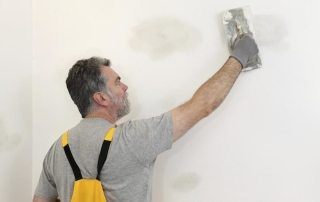
Before you start plastering the surface, it is necessary to accurately represent all the features and nuances of this process. In this case, there will be no insurmountable obstacles for the novice master, and the result of the work will be close to professional.

Test on a small section of the wall to identify possible errors
In addition to theoretical knowledge in this area, it is important to acquire basic practical skills that will help in future work. It is best to practice in a small, least visible area first. This will give you the opportunity to test your own capabilities and identify typical errors that occur in the process.
Plastering experience will be useful to any apartment or private house owner who prefers to make repairs on his own. Plaster is often used to level the surface that the walls of almost all old houses need.
It is important to choose the right plaster mix, taking into account the characteristics and material from which the wall is built. It is also worth considering the type of surface and features of the environment. This largely depends on whether the work will be carried out outside or inside the building. Consider the features of the technology for each type of surface.
How to plaster a brick wall with your own hands
In order to properly plaster a brick wall, it is better to use a mixture that was made on the basis of cement. Sometimes lime is included in the composition, which gives the mixture additional plasticity. This allows the use of plaster in rooms with high humidity. Or in the case when work is carried out outside the building.

For applying the first layer of plaster, you can use mixtures with a larger fraction
The procedure for applying plaster to a brick wall is carried out taking into account the following recommendations:
- the layer of the mixture, which is applied to the brick wall, should not be more than 30 mm. At the same time, it is important to know that if the layer thickness is more than 20 mm, it is imperative to use a netting mesh as a base. This will hold the layer of the mixture in place and make it more secure, preventing the coating from falling off the wall over time. Both external and internal walls of the building can be plastered in this way;
- in order to ultimately meet the requirements of the coating, it is necessary to correctly mix all the ingredients, observing the following proportions: add ¾ part of the sand to 1 part of the cement, having previously cleaned and sieved it. After that, water is added and all the components are mixed until the solution becomes plastic, while maintaining its density;
- another option is a cement-lime mixture. To prepare it, you will need 1 part of cement, as well as 5/7 parts of sand and ½ part of lime dough. In this case, you first need to mix the cement and sand, and then add to them lime, previously diluted in water to the consistency of milk.
Useful advice! If, as a result of preparing the plaster, according to all recommendations, the mixture is still too thick, a small amount of water may be added.

The finished plaster mixture should have the consistency of thick sour cream
One of the most difficult cases is the need to plaster over facing bricks. Its surface is too smooth and this significantly impairs the adhesion properties of the plaster. In some cases, the use of a reinforcing mesh may not be effective and the plaster crumbles in pieces or simply rolls over the surface. For such difficult surfaces, there is an affordable solution in the form of special primers.
In such cases, you can seek advice from a professional builder. He will help you choose the best option for the primer mix and the appropriate reinforcing mesh, taking into account all the surface features.
Although many people prefer to do everything on their own by watching the training video. For beginners, plastering walls may seem too difficult, however, the necessary skill is formed quickly, and after a few hours of training it will be much easier to apply the mixture evenly and beautifully.
Note! A video on how to plaster drywall walls with his own hands can be very useful for a beginner. This process has its own nuances and, if necessary, should be considered on an individual basis.

At first, the process of plastering walls may seem complicated, but with practice the technique improves.
How to plaster walls: video instructions for working with a concrete surface
Working with a concrete surface has its own nuances. If the surface is smooth, preliminary preparation and application of a primer is required, to which quartz inclusions are added. This allows you to make the wall rough and provide the necessary adhesion of the surface to the plaster. To enhance the adhesion of the mixture and the wall, at the stage of mixing, it is recommended to add gypsum powder to the solution.
What is the best way to plaster the walls inside the house when it comes to concrete surfaces? For this purpose, a gypsum-lime mortar is suitable, which can be prepared using the following components: 1 part gypsum and ¾ part lime. First of all, gypsum is mixed with water. This should be done very quickly to prevent thickening of the mixture. Then add the mortar and again the whole thing is quickly mixed until smooth.
A complex preparation process is not required if the concrete wall is initially rough. In this case, it will be enough to use the traditional technology of applying plaster.
Useful advice! Experts say that regardless of the type of concrete wall to be plastered, it will be useful to first apply a layer of deep penetration primer.

The last stage is the application of the last layer of fine-grained plaster, which gives the walls a finished look
How to plaster the walls in the bathroom: the advantages and disadvantages of various options
The answer to the question of how to plaster the walls in the bathroom under the tiles requires special attention. Difficult operating conditions, characterized by high humidity and constant temperature drops, can adversely affect the condition of the coating.
There are two options to choose how to plaster the walls in the bathtub: cement and gypsum composition. The first option provides excellent waterproofing, which is an undeniable advantage in high humidity conditions. In addition, the material is vapor-tight and extremely durable.
But the use of gypsum plaster for finishing the bathroom has some nuances that have to be taken into account. This primarily concerns the thickness of the layer. It should not exceed 20 mm. And before you start laying the tiles, be sure to treat the surface with a primer.
Thus, in the bathroom it is better to plaster the walls with cement mortar. The material is easily applied with your own hands, and its characteristics show that the coating will last for many years and will be a good base for tiles.

For bathroom walls, a cement-based plaster mix is better.
Separately, it is worth considering the question of how a beginner to plaster the ceiling with his own hands. Video tutorials demonstrate all the complexities and subtleties of this task, so the owner can only follow the recommendations to get a good result.
How to plaster walls with your own hands: features of working with foam concrete
One of the main conditions for working with foam concrete is the use of a reinforcing mesh. In this case, it is permissible to use both gypsum and cement mortar. The main thing is to qualitatively prepare the surface by treating it with a special impregnating primer that can penetrate deep into the surface. But sometimes you still need to use additional measures, for example, fixing a special reinforcing fiberglass mesh called "serpyanka".
A responsible approach to the choice of materials for plastering walls determines the service life of the coating, as well as the level of comfort during work. In specialized stores, you can find ready-made mixtures for all types of surfaces. Therefore, if you do not want to mess around with mixing the components yourself, you can simply purchase a ready-made version. It is enough to simply dilute such a product with water, after which it will be ready for use. Moreover, the recommendations of the manufacturers will make it possible to understand what is the best way to plaster the walls in this or that case.

Wall decoration scheme using insulation and plaster
Important! Given the variety of dry building mixtures, it is very easy to get confused in them and not quite what you need to get.Therefore, it is recommended to carefully read all instructions and recommendations provided by the product manufacturer.
How to plaster walls for a beginner with your own hands: video instruction
First, it is necessary to carry out preparatory work aimed at cleaning the surface from various kinds of dirt and removing old finishing materials. This step is important as it determines how well the plaster will hold in the future.
In order to ensure reliable adhesion, it is necessary to thoroughly clean the wall, removing everything that may be between its base and the plaster. The cleaning method is selected taking into account the characteristics of the material of which the wall is composed. All cracks identified during the preparatory stage must be eliminated in order to prevent further cracking of the plaster.

Preparing the wall for applying the plaster mixture
Cracks in the wall can be repaired in various ways, each of which is suitable for a particular size of damage. Small cracks that penetrate deep into the wall will need to expand to reach the narrowest part.
Once the base is found, it is cleaned to remove dust and dirt. Then apply a generous amount of primer with a brush. When everything is completely dry, the crack can be repaired with a putty prepared on the basis of gypsum or cement. Using a spatula, try to align the patch with the wall surface as best as possible.
A shallow, narrow crack may well be sealed with a sealant or silicone compound. Usually, a special nozzle with a thin nose is included with the tube, which allows you to easily carry out such operations, directing it deep into the crack.
If you need to repair a really extensive damage, then for this purpose, you can use polyurethane foam. Usually one coat of primer is applied and then the space is filled.
Useful advice! If in the process of work, excess foam protrudes above the level of the wall, then they can be easily removed by cutting off with a sharp knife.
How to plaster a brick wall: features of surface preparation
The best way to plaster brick walls inside the house is a moot point. However, regardless of the choice, a good surface preparation procedure must be followed.

Plastering a brick wall using lighthouses
Often you have to deal with the fact that there is already a layer of old plaster on the surface of a brick wall. In this case, it is necessary to get rid of it qualitatively. To do this, you can use water and a sponge, wet the surface several times and wait until the water is absorbed. This procedure will greatly facilitate the task.
After that, using a spatula, the thickness of the working surface of which is at least 1.5-2 mm, as well as a hammer, the old plaster is knocked off. To do this accurately and at the same time effectively, you first need to carefully tap one of the sections of the wall with a hammer. As a result of this procedure, cracks will appear, which will allow the trowel to pick up the coating. If necessary, the handle of the trowel can also be tapped with a hammer to make it easier to remove the old coating.
Related article:
Why do you need a grid for facade walls?
The main types of mesh, principles of selection, areas of application, methods of plastering, application options, tips and tricks.
After removing the layer of old plaster, you need to walk over the surface with an iron brush or sander. After that, it is worth starting to deepen the joints between the bricks. This will allow for better adhesion between the plaster and the wall. It will be enough to deepen them by 5-7 mm.
The final stage of preparing a brick wall is cleaning the surface with a soft brush and a damp cloth. Then all that remains is to apply a layer of deep penetration primer.Moreover, it is better to do this in two layers, after allowing the first layer to dry before applying the second.
Before applying plaster to a brick wall, it must be primed
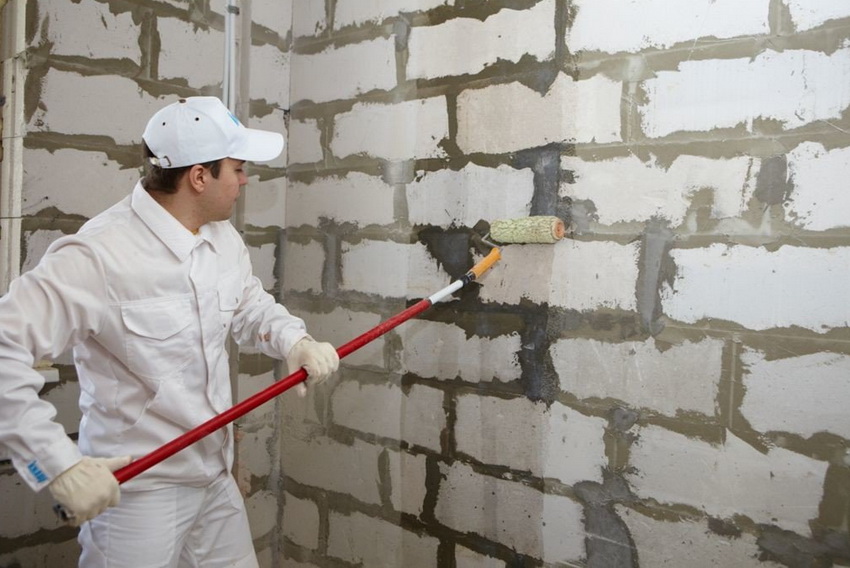
Features of surface preparation of a concrete wall
Compared to a brick wall, a concrete wall is much easier to clean. However, due to the smoother texture, it will be more difficult to apply the plaster in such a way that it adheres.
In order to remove the whitewash layer from the concrete surface, it is necessary to thoroughly moisten the sponge with water and wipe the wall. Then, using an iron brush, clean off the unnecessary layer and wipe the surface thoroughly again.
Another way is to apply a thick layer of paste over the whitewash. Once completely dry, using an ordinary spatula, the entire top layer can be easily cleaned.
After finishing cleaning, you can proceed to applying shallow notches on the surface. This measure will provide adhesion. Despite the fact that their application will require a lot of effort and time, this process is very important and determines the result of the work, so this stage should not be neglected.

Applying plaster to the netting
Some people prefer to use a simpler method that does not require the application of notches - a primer and the addition of quartz sand, followed by plastering the walls with a cement-sand mortar. Due to the fine fraction, it is held on the surface, creating adhesion between the plaster and the wall. However, this method is not always effective, and in order to make sure of its effectiveness, it is recommended to first test on a small section of the wall.
Useful advice! Determining how effective quartz sand will be will allow a simple test: a primer with sand is applied to the surface and left to dry completely. Then you need to run your hand along the wall. If the sand begins to crumble from the touch, then you will have to attend to the creation of notches on the surface.
Features of the preparation of a wooden surface
The process of cleaning a wooden surface is the simplest of all the tasks considered. In this case, it is enough to knock on the wall with a hammer, and the plaster will simply crumble to the floor. It is recommended to lay a plastic wrap in advance to avoid contamination and make cleaning easier.

Preparing a wooden wall before plastering
To fix the plaster on a wooden surface, you will need to fill in special wooden slats. People call them shingles. Using ordinary nails, they are stuffed along the entire wall, guided diagonally. This allows you to create not only an excellent basis for laying the finishing material, but at the same time solves the problem of the need to create beacons that are required to level the wall surface.
If, after removing a layer of old plaster, a shingle is found under it, it must be knocked down and a new one made. Wooden elements quickly deteriorate, succumbing to decay, insects and the influence of time. In addition, old shingles are often a source of unpleasant odors.
It is important not to forget about the need to apply protection to all wooden surfaces and elements. An antiseptic is necessary to prevent the growth of fungi, mold, and harmful insects in the wood. The composition is applied to each element and to the wall before filling the shingles, and then again after the installation is completed. This allows for the highest level of protection.

Lime-based plaster
There are times when, instead of wooden slats, a metal netting is used for the lathing. This is also an acceptable option, however, its thickness should be at least 3 mm, and the fastening should be carried out not to the wall surface itself, but to slats specially prepared for this.
How to plaster walls with your own hands: video instructions for setting beacons
Since one of the main goals of plaster is to level the available surface as much as possible, landmarks will be required, which are also called beacons. To understand how to plaster walls on lighthouses, you need to understand how and why they are exposed. This is done using a building level in order to be able to make the surface as smooth as possible in the future.
Usually, metal guides are used for this purpose, the fastening of which is carried out using a gypsum solution. This method is good in that the gypsum dries quickly and does not allow the profile to move, keeping it in a given position. You need to place such beacons at a distance of about 1.5 m from each other.

Drawing of the layout of the room with beacons
Useful advice! If the existing level is too short and its length is not enough, in order to check the evenness of the fixing of the beacons, you can use a long bar. It is placed against one of the guides until the solution is completely dry and a level is applied to its center.
As an example, you can see the instructions on how to plaster walls with your own hands without lighthouses. The video will clearly demonstrate other options for surface leveling.
Rules for applying plaster to the surface
Plastering the surface consists of three stages, in each of which a layer of mortar is applied. Each of them is different and fits according to a special technology that best suits its purpose. The first layer is the thickest. It pounces on the wall and actually serves as a draft, on top of which more even and smooth layers will be laid in the future.
The first layer is applied with a trowel or simply by hand. It is only important to remember that in case of contact of the solution with the skin, you must take care of protection in the form of rubber gloves. The thickness of the first layer depends on the base: for a brick or concrete wall, 5 mm will be enough, but for a wooden one, a layer of about 8-9 mm will be required, taking into account the lathing.

A special mesh between the wall and the plaster layer ensures the best adhesion of the mixture to the wall surface
The second coat should be applied more neatly, but it is still not a finishing coat. It is applied with a wide spatula or trowel, bringing the solution to a pasty consistency. The thickness of the middle layer should be about 7-8 mm.
The finishing layer is prepared with the addition of fine-grained sand, which does not contain large inclusions. In consistency, the solution should resemble sour cream in order to lie flat and smooth out all the irregularities that remained after applying the first two layers.
For beginners in this matter, the purchase of ready-made mixtures for each layer, which is in any hardware store, will help eliminate the risk of error. Their formulations almost always promote good adhesion and provide a durable and reliable coating.
It is also worth watching the video on how to plaster the corners of the walls beforehand. Sure, a flat surface is easier to work with, but aligning corners can take some skill, especially given how imperfect the original data can be.

Ways to reinforce corners before plastering
How to prepare a plaster solution with your own hands
Despite the opportunity to save yourself the hassle and purchase ready-made compounds, many people prefer to try to do everything on their own and prepare the plaster for each layer with their own hands. Consider a few of the most popular recipes that are widely used and have already gained trust:
- Cement mortar, in which 3 parts of sand must be added to 1 part of cement.
- A lime-based solution in which 3 parts of sand are added to 1 part of lime.
- Cement-limestone: 5 parts of sand accounts for 1 part of lime and 1 part of cement.
- Lime composition with the addition of gypsum: 1 part of dry gypsum is added to 3 parts of lime, mixed to a pasty state.
Important! The resulting solution should be plastic and easily "disperse" over the applied surface, but at the same time it should not flow down.

The ready-made plaster mixture should be plastic and easily lay down on the surface
Before proceeding to mixing the solution according to the selected recipe, it is useful to know that the prepared amount should be used within an hour, since in the future the plaster tends to lose some of its qualities, for example, plasticity. In addition, such "expired" material does not adhere well to the surface.
Particular attention should be paid to a solution prepared with the addition of gypsum, since this component significantly reduces the shelf life of the plaster before being applied to the wall. This solution should be applied immediately, immediately after preparation. In addition, the thickness of the layer will affect the drying time: a thin layer will dry almost instantly.
In order to avoid mistakes and not spoil the portion of the finished mixture, you need to carefully study the instructions, and only then proceed to adding water, since the setting and drying periods can be different.

The prepared mixture is best used immediately, as over time, its properties deteriorate due to drying
How to mix the solution yourself: rules and recommendations
To mix a high-quality mixture yourself, you must adhere to the following procedure:
- Pour water into a container intended for mixing the solution. Then, according to the instructions, pour 6-8 trowels of the finished mixture and mix everything thoroughly using a construction mixer;
- the rest of the mixture is added gradually and in the process of thorough mixing, which avoids the formation of lumps and gives the plaster plasticity and uniformity;
- then it is advisable to wait 2-3 minutes and stir the solution again. At this stage, you can determine if there is a need to add water or dry mix to make the plaster thicker or, conversely, thinner.
Once again, it is worth noting that one batch should consist of as much material that can be used here and now. The recommendation looks like this:
- for a solution containing gypsum, the shelf life is limited to 25-30 minutes;
- if a cement base was used, then this period will be 40-60 minutes.

The secret of a good plaster mix lies in the correct proportions of all components.
Wanting to give the surface a complete look, many people prefer to apply a layer of putty on top, which makes the surface perfectly smooth and serves as an excellent base for painting. The video on how to putty walls with your own hands tells in detail about all the nuances of this process and allows you to effectively complete the finishing work to level the surface.
How to putty walls with your own hands: video for a beginner
How to properly plaster walls with cement mortar or a mixture that includes gypsum, you can find out by watching a training video. The video on how to plaster walls correctly tells in detail about the preparation and conduct of each stage.
In addition, in this way you can get answers to many questions of interest, for example, how to plaster the corners of the walls and what needs to be done in order to keep the coating in its original form in the future. It is imperative to pay attention to the stage of finishing - the putty of the walls and their further processing.