In the process of construction or repair work, you always have to deal with the need to decorate the walls with plaster. This process cannot be called creative, so most people do not like it. At the same time, correctly and accurately applied plaster guarantees a problem-free finishing of the walls. But how to do everything yourself and without flaws? A video of plastering walls with your own hands with cement mortar is designed to teach this.

Plastering the walls with your own hands is quite real
Content
The main types of plaster mixes and their preparation
There are three main types of cement plaster used in both new construction and renovation work. They differ in the composition of the plaster mixture:
- Cement-lime-based plaster. It is prepared by mixing in equal parts lime and cement. To this add 10 parts of sand and dilute with water to the desired consistency. Rooms with high humidity are ideal for plastering with such a solution. These include kitchens and bathrooms, cellars and garages. This type of plaster is irreplaceable for work on wooden walls, since lime has good adhesion to wood.

The proportions of the preparation of cement mixtures for plastering walls
- If the main component of the solution is sand, and the binder is cement, then such a plaster is called cement-sand. With such a composition, it is convenient to level both internal and external walls. Just be aware that sand does not like moisture. For this reason, this type of plaster is not recommended for use with excessive moisture. A solution for brickwork in a ratio of 1: 5 can be prepared independently for plastering walls with your own hands. A video of mixing a cement-sand mixture will help with this.

The dry plaster mixture is added to the water and mixed with a construction mixer
- Gypsum predominates in the composition of gypsum plaster. The ability of this mineral to set quickly allows this type of plaster to be used on ceilings and in other places with difficult access.
Related article:
|
Today, few people independently prepare plaster mixes from individual ingredients. There are ready-made dry compositions on sale, which it is enough to dilute with water in accordance with the instructions and mix thoroughly. Mixing can be done with a drill with a nozzle.
Mortar for plastering walls, proportions: video instruction
Useful advice! When preparing a plaster mixture on your own, you need to take into account the brand of cement. The higher it is, the more sand will be required. The best adhesion will be provided by PVA glue, which can be added to the solution.

Tools that you may need for self-plastering walls with cement mortar
Video of plastering walls with your own hands with cement mortar: preparatory work
DIY wall plaster cement mortar necessarily includes preparatory work. If this is a new construction, and there are walls made of ordinary ordinary bricks, then there is no great need for their preparation for applying the plaster mixture. It is only necessary to cut down the protruding bricks with an ax, if any. This will help to avoid overcoating unnecessarily.

The cement mortar is first thrown onto the wall with a trowel, then the mixture is evenly distributed by the rule
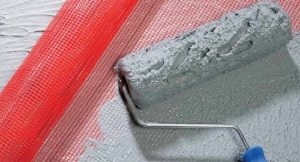
If the wall is made of facing bricks, then you need to drive nails between the rows and tie everything with aluminum wire. It would be even better to secure the plaster mesh. The wall itself must be primed and the tile adhesive is applied to it with a notched trowel. Only then can the mixture be applied. Concrete and aerated concrete blocks also require preliminary priming and glue application. Special plaster mesh will help to make high-quality plaster on such walls. Otherwise, the plaster mixture will bounce off them.

Application of plaster cement mixture to the wall
Wooden walls are much more difficult to plaster. To do this, it is imperative to fix on them a crate made of slats or a ready-made mesh sold in stores. You should also apply a primer.

For plastering walls, a rule with a length of 1.5 - 2 meters is used
In the case of repair work, before the preparatory work, it is necessary to completely dismantle the old coating to the very foundation. If parts of the old plaster remain on the walls, the quality of the new work cannot be guaranteed. DIY wall plaster presented on any video, always begins with preparatory work, the quality of which determines the success of the entire repair.
Useful advice!Too dry walls do not allow the mixture to stick. Therefore, before plastering, it is necessary to wet the bricks well.
Algorithm for plastering walls
As in any construction process, plastering walls has its own specific rules and sequence of actions. To apply plaster to a prepared brick wall, you must:
- Fasten the plaster mesh on the wall with staggered dowels. The mesh must have an anti-corrosion coating. Otherwise, traces of rust will appear on the wall even before the plaster is completely dry. The dowels are tied together with knitting wire Z-shaped patterns.

Plastering a wall using a reinforcing stack
- Guide beacons are installed. A smooth surface can be created only when plastering the walls on the lighthouses with your own hands. A video of such a process is evidence of such a statement. You can use wooden slats as beacons, but professionals use perforated slats sold in stores. Beacons are installed strictly according to the level.

Optimal placement of wall beacons
- A plaster mixture is applied and leveled along the beacons.
- Plaster is grouting.
The process of applying the mixture is the longest and most laborious. The mortar is thrown onto the wall using a trowel or bucket, as it is convenient for anyone. Throwing movements must be made from bottom to top. You need to fill all the space between two adjacent beacons. Then, using a special rule, we level the applied mixture. In this case, the ends of the tool should slide up and down the surface of the profiles.

One of the difficult processes in plastering walls with your own hands is the design of internal corners.To facilitate the task - you can use a homemade corner level from a building profile
In the process of this movement, the rule must be moved to the right and to the left with sharp movements. This allows you to evenly distribute the solution along the wall, compacting it. The result is a flat wall. After completing the first segment, move on to the next. We repeat all movements again. In the video of plastering walls on lighthouses with your own hands, you can see in detail what movements are made by the rule.

An example of fastening a construction beacon to a wall
When the walls dry out a little, they must be wiped. For this, a sander or trowel is used. These tools move around the surface in a circular motion. The process continues until the surface is smooth. If the plaster has dried too much before grouting, then it can be moistened.

Grouting of dried plaster is carried out using a floor screed
To obtain a smooth surface without cracks, the drying process must be carefully controlled. First, high room temperatures are unacceptable. Secondly, the walls must be periodically moistened with water. Thirdly, you should always immediately rub in the cracks that appear. Correct drying control ensures high quality plaster.

The solution does not adhere to the tool soaked in water, which makes plastering easier
Useful advice! During all work, the tool must be moistened with water. This will prevent the mortar from sticking, which will allow you to accurately and competently plaster the surface.

When the plastered walls are dry, you can start filling them.
Although the procedure for applying plaster to walls is laborious and unpleasant, the quality of its implementation should not be in doubt. Irregularities on the walls will not allow you to make a beautiful finish or force you to take additional leveling measures, which will entail additional costs.