The word "repair" immediately evokes negative emotions for many. This feeling is due to the fact that this is a very laborious, lengthy and costly process. Especially if the work is done independently. This article describes in detail how to start repairing an apartment, depending on its type, what materials to choose and in what sequence to carry out the work, so that the repair goes without problems, and the result exceeds all expectations.

A competent and planned approach to apartment renovation is the key to a beautiful and reliable finish
Content
- 1 All about apartment renovation: varieties and finishes
- 2 How to start renovating an apartment: creating a design project
- 3 Where to start renovating an apartment: the main strategy
- 3.1 How to start renovating an apartment with a rough finish in a new building
- 3.2 Where to start repairs in a rough apartment: installation work
- 3.3 Features of installation of communications
- 3.4 How does a ceiling repair begin in an apartment?
- 3.5 Wall finishing
- 3.6 How does floor repair begin?
- 3.7 Floor screed procedure
- 4 Turnkey apartment renovation. Price per square meter
- 5 DIY apartment renovation. Video plot
All about apartment renovation: varieties and finishes
The stages of repairing an apartment and the cost of work depends on the condition of the premises, the type of repair and the size of the covered area, that is, it can be the entire apartment or its individual premises. There is a major, cosmetic and renovation. Each of them has its own clear sequence of actions, on the correctness of which, the final result and the duration of the operation period depend.

Apartment renovation can be done with high quality by hand, having studied all the nuances of the work in advance and preparing the necessary materials
Overhaul is considered the most ambitious and time-consuming, which will require not only a lot of effort, but also significant financial costs. It involves a complete reconstruction of the apartment with possible redevelopment, replacement of windows, doors, utilities, ceiling, wall and floor coverings. It usually starts like this apartment renovation from scratch.
Cosmetic home repairs or apartment involves the replacement of decorative finishing elements of the premises in one or more rooms. It may be necessary to make minor surface adjustments to the walls, ceiling, floor and corners when removing the old coating. However, the work will not take too much time and will not require significant financial investments, which directly depend on the chosen finishing material.
How to start renovating a room when doing cosmetic finishes? An important process in this case can be the execution of a rough finish, which will increase the total cost of work, but will allow you to get the expected aesthetic effect from the selected facing materials.

Cosmetic repair does not require significant financial investments and can be carried out in a short period of time
Renovation involves the use of an original design approach when decorating a room using expensive foreign-made materials, unique technologies and bold style solutions. Such an exclusive and beautiful renovation in an apartment can only be afforded by wealthy people who intend to spend a substantial sum of money on the realization of their desires.
How to start a major overhaul in an apartment
This type of repair is usually carried out in new buildings. However, it is not uncommon for residential apartments when the owners decide to radically change their housing. It is important to follow a certain procedure for carrying out repairs in an apartment, which consists of the following stages:
- redevelopment of the apartment premises with the possible dismantling of old or erection of new partitions, reduction or expansion of doorways;
- laying or complete replacement of engineering communications;
- full or partial replacement of plumbing fixtures;
- electrical work related to the implementation of a new wiring or a change in the location of the old one;
- full or partial replacement of windows and doors;
- plastering work, implying high-quality execution of rough finishing of the apartment;
- installation of built-in furniture, if provided by the project;
- decorative finishing of the elements of the room.

An important stage in the preparation for the repair of a rough apartment is the development of the design and convenient placement of all communications
Overhaul is a lengthy process that cannot be completed in one to two weeks. Therefore, all rooms should be freed from furniture and other things that could be damaged during the renovation process. These works also assume the absence of tenants for the entire period of the repair. In order to carry out repairs efficiently and in a short time, you should outline an action plan, decide on the contractor for each stage and choose building materials.
Where to start renovating an apartment without finishing?
To understand where to start repairing an apartment without finishing, you should know what it is. This is a bare room in a new building designed for free planning. Load-bearing monolithic or brick walls are not plastered, the floor is without screed, the ceiling is unfinished. Here, electricity is entered into the apartment with the installation of a shield. The room has a heating system with possible installation of radiators. Hot and cold water supply and drainage is carried out through risers with outlets provided for future distribution. The apartment has an entrance door and plastic windows.
The order of repair in an apartment without finishing is determined by its condition. First, all the preparatory work is carried out, after which the finishing stage of finishing the premises begins. The preparatory stage of apartment renovation for final finishing consists of the following steps:
- drawing up a design project for an apartment;
- dismantling and installation of enclosing structures inside the apartment;

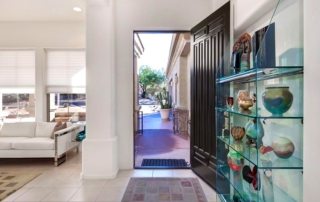
An unfinished apartment is a bare room designed for free planning, which can be a tangible advantage if you need to equip a studio apartment
- replacement of windows and front doors;
- expansion or reduction of doorways;
- preparation of holes in the walls for laying utilities;
- installation of electrical wiring, water supply, drainage and ventilation networks;
- alignment of room elements;
- floor screed.
The final stage of DIY apartment renovation is the following sequence of actions:
- wall, ceiling and floor cladding with finishing materials;
- installation of interior doors;
- installation of platbands and baseboards;
- installation of switches and sockets;
- installation of lighting elements.

The best solution for visualizing the future interior is a design project worked out independently or with the help of a specialist.
Where to start renovating an apartment with a rough finish?
Before developing an action plan, you should know what the rough finish of an apartment is. Repair of such a room will be less costly, since the necessary minimum of finishing work has already been done here. Namely:
- floor screed is made;
- walls and ceiling are leveled and plastered with a base layer;
- installed electrical wiring;
- an entrance door and windows are installed;
- the distribution of engineering communications with taps for the installation of plumbing fixtures has been completed.
This minimum of finishing work somewhat simplifies the implementation of further repairs. It is much easier to change the location of some of the outlets and switches than to wire the wiring from scratch. Floor screed and rough wall plaster may not be of sufficient quality and perfectly flat, but this is a good start for finishing, which will save on materials.

An apartment with a rough finish does not require wall and floor alignment, as well as communications
Rough repairs are typical not only for an apartment in a new building. It is with such a rough finish that the owners of secondary housing will have to face after dismantling the old finishing coating and plumbing. And the sequence of repairs will depend not only on the condition of the elements of the premises and utilities, but also on the new design of the premises.
How to start renovating an apartment: creating a design project
Before deciding in what sequence to make repairs in an apartment, you should choose an interior style, on the basis of which to develop a design project for the premises. The choice of building materials and the progress of the repair will depend on the design option of the premises.
Today there is an opportunity to create an individual and unique design in your own apartment thanks to the use of various finishing materials and the latest modern technologies. A design project can be developed independently, on the basis of which repairs can be made in the future. To do this, it is necessary to put a plan of the apartment on a sheet of paper with the arrangement of all standard sizes of rooms. The plan can be applied manually or using a computer program. In the first case, you should make several copies, and also depict each room separately.

The design project of an apartment helps not only to determine the arrangement of furniture, color schemes and wall decoration, but also allows you to correctly position sockets, taps and light sources
On one of the plans, furniture and household appliances are being arranged. This will help determine the locations of the switches and outlets for future wiring, which can be displayed on a separate drawing. On each of the plans, you can indicate the number of the stage, which will help you correctly plan the work, observing the strict sequence of activities. This will not only reduce the repair time, but also save financial resources.
Helpful advice! It is better to carry out a design project in color, which will allow you to visually see the correctness of the color-matched decorative finishing of the elements of the room, and its combination with the shades of furniture.
Before making repairs in an apartment, you should calculate the amount of building materials based on the work plan. After all, an approximate calculation may entail a shortage of products that will have to be purchased.And then the likelihood of choosing a finishing material from another batch increases, the shade of which may differ significantly from the previously purchased one.
You can entrust the development of a design project to a professional who will help, based on personal preferences and visions, of the owners of the future premises to choose the most suitable option.

The design project of each room can be ordered from a specialist or worked out independently
Redevelopment of premises
To know where to start repairing an apartment with your own hands, you need to decide on the layout of the premises. If the redevelopment of rooms is not provided for during the repair of secondary housing, at this stage you can plan the expansion or reduction of doorways. Therefore, before making repairs in a room or apartment without redevelopment, it is necessary to free all free space from equipment and furniture in order to exclude the possibility of damage. And only then can you start repair work.
If the project provides for the dismantling and erection of interior partitions, the creation of new openings and niches in the walls, a change in the location of utilities, then you may need a permit to perform certain work on the basis of current legislation. This is especially true when deciding where to start renovating a new apartment.
List of works for which you need to obtain permission:
- installation or dismantling work that affects the bearing walls of the premises;
- expansion, unification or relocation of the bathroom and toilet;
- work related to heating a loggia or balcony from the common house system;
- all activities that affect centralized gas supply.

An example of redevelopment of an apartment depending on the number of people living in the house
There are works, the implementation of which must be notified to the relevant authorities:
- installation or embedding of doorways or other niches in non-bearing wall structures;
- moving plumbing fixtures in the existing dimensions of the kitchen, toilet and bathroom;
- dismantling and installation of non-bearing partitions without significant changes in the load on the floor slabs.
It is absolutely legal and without notifying the relevant executive bodies to perform the following work:
- redecoration of the apartment;
- changing the location of electric stoves within the kitchen;
- works related to the installation of air conditioners, antennas and protective nets on the facades of the building;
- changing the appearance of external structures: balconies and loggias;
- dismantling and installation of new utilities and equipment similar to the previous one in terms of parameters and technical arrangement.
Related article:
Redevelopment of an apartment: what you can and cannot do on your own
How to legitimize an apartment redevelopment already made. How to get permission to remodel your own home.

Choice of interior design
Where to start renovating a room or apartment as a whole? With the choice of the style of room decoration. The right interior design will help you create a comfortable and stylish home. His choice depends on the taste, character and outlook on the life of the owner of the apartment. Today, there is a variety of interior styles with distinctive features that should be studied before making repairs in order to be able to successfully bring the chosen direction to life.

An important point when choosing an interior is the right combination of colors and shades of finishes, furniture and decor
Designers divide all existing style directions into certain groups:
- classics, which includes Provence, Empire, Baroque, English and antique styles;
- ethnic style covers Japanese, Egyptian, African, Scandinavian and Chinese;
- contemporary style combines country, modern, classicism and minimalism.
The most popular remains the classic interior design.The characteristic features of the direction are considered splendor, grandeur, functionality, causing aristocracy and noble grace. All interior elements indicate the high status of the apartment owners.
The rooms are decorated in restrained pastel colors. Massive expensive furniture with handmade carved patterns becomes a visiting card. On the ceiling rises an unusual picturesque stucco... Large apartments are often decorated in the classic style, in which you can not save on free space.

The choice of style and color of the interior should depend on the temperament and preferences of the owners
Modern youth prefers to decorate the room in a modern style. This is especially true for small apartments. Everything here should be simple, restrained and laconic. The premises contain a minimum amount of furniture, which should be compact, mobile, functional and modern. You can dilute the calm palette of decorative finishing of premises with the help of bright decorative elements.
Ethnicity reflects the owner's predisposition to a particular culture, the main features of which are embodied in the interior design. With the help of modern technologies and finishing materials, you can make your dreams come true and create an imitation of your beloved country in your apartment. This direction is chosen by non-standard thinking people with a great love of adventures and travel. You can more clearly see each style in the photo of renovated apartments.
Where to start renovating an apartment: the main strategy
After the design project of the apartment has been developed and the question of in what sequence to make the repairs has been resolved, you can proceed to the work, which consists of the following stages:
- preparatory stage;
- rough work;
- finishing the premises.

The repair process consists of three stages, observing which you can quickly and efficiently carry out all the necessary work
How to start repairing an apartment with your own hands? From the preparatory stage, which consists in performing a complex of dismantling works. This applies to both the new building and the old apartment. Regardless of the planned renovation, cosmetic or major, all surfaces must be cleaned of old finishes. At this time, the dismantling of window blocks is carried out with the subsequent installation of higher quality products. The front door also needs replacing. It may be necessary to expand or reduce the doorway. On the basis of the project, the dismantling and erection of partitions, sealing or arrangement of doorways for the installation of interior doors or the creation of arches are carried out.
Helpful advice! Do-it-yourself room repair should begin with dismantling the interior doors.
Surface preparation is one of the most important steps in DIY repair. Where to start the process depends on the condition of the foundation. This stage includes cleaning the walls, ceiling and floor from the old coating and eliminating all flaws on the surface of the structures using building materials. It will depend on the quality of the work performed at this stage, how firmly and accurately the new finishing coating will hold.

The preparatory stage consists of dismantling old window or door structures, removing old finishes from walls and floors, and sealing irregularities
The first step is to clean the ceiling from the old coating. The whitewash is washed off with a brush dipped in water. The old putty is removed using a sander with an iron brush.
You can remove ordinary wallpaper from the walls with a spatula, having previously moistened them with water. Vinyl wallpaper is quite resistant to moisture, so you can remove it with a steam generator or ironing.If there is no such device, you can use a regular iron with a steaming function, which is brought to the wall at a distance of 10-15 cm. Under the influence of steam, the wallpaper easily leaves the wall. You can remove the paint using a grinder with a special attachment or a hair dryer. Next, you need to remove the old flooring.
Helpful advice! If the project provides for the installation of a suspended or stretch ceiling, the old coating can not be removed. It is enough to treat all problem areas with a strengthening primer and antiseptic.

Regardless of the choice of materials for wall decoration, the surface must be leveled and primed
How to start renovating an apartment with a rough finish in a new building
Where to start finishing the apartment depends on the state of its structural elements. Usually the developer performs the required minimum of work without strictly adhering to the technology of their implementation and without using high-quality building materials. Therefore, all the elements of the room need a rough rough finish of the apartment with their own hands or with the help of specialists, which consists in performing such activities:
- dismantling of old and construction of new non-bearing structures based on the new layout;
- replacement of windows;
- preparation of holes in the walls for laying new engineering communications in accordance with the developed scheme;
- electrical wiring layout;
- installation of technological communications: water supply, sewerage, heating, ventilation, air conditioning inter-unit line;
- leveling of all concrete surfaces;
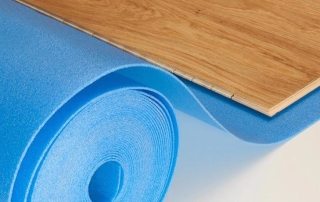
- installation of insulation and sound insulation;
- floor screed.

During the overhaul of the apartment, it is planned to replace the window structures
After completing the rough repairs in the apartment, the premises are finished. The solution to the question of how to plan the repair at the final stage will depend on the type of finishing material and the method of its installation. For example, if the walls and ceiling are painted or covered with wallpaper, then finishing work starts from the ceiling, then the walls are tiled and the floor covering is laid. In the case of a suspended ceiling, installation work is carried out after the walls are finished.
If parquet is installed, then the work is carried out before finishing the walls and ceiling, so as not to damage the surface. Doors can be installed both before and after wall finishing. If there is no platband, then the installation of the door leaf is performed before finishing in order to be able to seal the joint between the wall and the door frame. In the case of the platband, the gap is filled with foam, and the platband is attached to the wall after the walls have been finished.
After completing all the finishing work, they proceed to the installation of baseboards, sockets, switches, platbands, lighting and plumbing fixtures. Then a general cleaning is carried out, after which you can start arranging furniture and decor elements. It is in this sequence that repairs are carried out on their own.

The process of performing a floor screed with a self-leveling mixture
Where to start repairs in a rough apartment: installation work
The list of installation works when performing repairs from scratch includes:
- erection of non-bearing partitions;
- replacement of windows and doors;
- work related to the laying of electrical wiring and other communications.
The construction of non-bearing interior partitions is carried out on the basis of a previously developed plan. For the installation of structures, gas, foam concrete blocks, brick or metal frame with plasterboard finish can be used.
Concrete blocks provide a solid structure that can withstand significant cantilever loads. Therefore, this is the most suitable option if a TV or wall cabinet will be hung on the wall. The surface needs a basic plaster for further decorative finishing.

Before starting finishing work, it is necessary to mark the placement for all communications
Much less often, partitions are erected from building bricks. This is due to the fact that the structure takes up a significant part of the free space. Indeed, in order for it to be stable, the thickness of the partition must be at least 170 mm. In addition, this design creates a significant load on the base.
The most popular option is to create a partition from a metal frame, which is sheathed with plasterboard. The structure has good sound insulation and does not place significant stress on the supporting element of the building.
Helpful advice! In plasterboard partitions, it is necessary to provide for the installation of embedded parts that will withstand the load from possible hinged structures.
Installation of windows and entrance doors should be entrusted to specialized organizations, the quality of whose work will determine the nature of the apartment's protection from the cold and the likelihood of burglars entering.

Wall slitting for wiring is carried out before finishing work
Features of installation of communications
How to start DIY repairs after redeveloping an apartment? With the implementation of electrical wiring and the laying of other utilities. First, you need to complete all plumbing work. New radiators are being installed, and pipelines are being connected to the general heating system. Pipes are being laid for connecting faucets, a toilet, a washing machine, a sink, a bathtub, a shower stall, a water heater and a dishwasher. Before installation, you should clearly know the locations and connection features of all devices.
Hot and cold water pipes can be hidden in wall niches or mounted in plasterboard or plastic boxes. It is recommended to use polypropylene as a material for pipes, which has high strength and performance characteristics.
Helpful advice!The size of the holes for laying plumbing communications should be twice as large as the diameter of the pipelines, which is associated with the high value of the coefficient of thermal expansion of the material.

For a high-quality plumbing system in a rough apartment, it is better to invite a specialist
The wiring is usually hidden. All cables and wires are laid in the grooves of the walls, above the suspended or suspended ceiling, or in the floor under the screed.
Important! When repairing panel apartments, wall chasing for future electrical wiring is performed only vertically. Horizontal sections are mounted at the junction of the wall and floor or under the ceiling.
Work must begin with the markup, which is carried out on the basis of the developed apartment plan. Walls are channeled according to this marking. The size of the holes is determined by the number and thickness of the cables to be laid. In new buildings, all electrical wiring is installed from scratch, starting from the electrical panel. In old apartments, when carrying out major repairs, you can also completely change the electrical cables, or mount separate sections of it, which are necessary for connecting electrical appliances on the basis of a new design project.
At this stage, it is necessary to provide for the laying of cables for the intercom, TV, telephone and Internet, which can also be hidden.

Before starting the wiring around the apartment, it is necessary to create a wiring diagram for sockets and switches
How does a ceiling repair begin in an apartment?
Where to start repairing a rough apartment? It is customary to carry out all repair work in the apartment from top to bottom. Hence, it is necessary to start from the ceiling. In new buildings, it is presented in the form of a monolithic concrete slab, the surface of which must be cleaned, plastered, primed and revetted with decorative trim.If the renovation is carried out in an old apartment, then at the first stage the surface should be cleaned from the old finishing material.
The further action plan depends on the chosen ceiling design option. If the surface is perfectly flat, then the simplest and cheapest option is to whitewash or paint it. If the base requires preliminary elimination of defects using plastering work, then this option will be very laborious and costly.
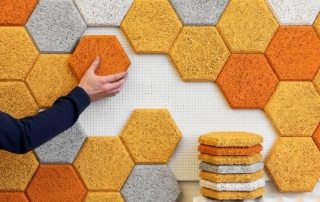
Another budget, but not so laborious option is the installation of ceiling tiles, which even a beginner can perform. The surface of the base does not need preliminary leveling. The main thing is to choose the right quality finishing material and glue.

It is better to start painting work from the ceiling.
A more acceptable, but expensive solution is to create a suspended structure made of plasterboard, which can be of any shape and have several levels, which determines the cost and time of work. Thanks to this solution, you can get free space between the ceiling and the structure for laying electrical wiring and installation of spotlights.
The modern solution today is to create a stretch ceiling made of PVC canvas. The result is a perfectly flat base of any texture and shade. Installation is carried out in a matter of hours by a specialized team. Before performing work, you should first prepare the wall structures. Because the process of installing a stretch ceiling involves the execution of edging from baguettes. In addition, all dirty work must be completed in the room so that dust and possible dirt do not settle on a clean ceiling.
Wall finishing
Aligning the walls is an important event, the quality of which determines the durability and aesthetic appearance of the future decorative finish. Usually, when repairing apartments with a rough finish, they are faced with fairly even concrete walls that only need light adjustment with the help of plaster mixes. However, if the walls are made of expanded clay blocks, gas silicate or bricks, rather laborious and costly work associated with their leveling is required.

Smooth white walls allow you to embody any design solutions, so this stage of repair should be given special attention
Before you start leveling the walls, you must thoroughly clean the surface from the old coating. This is a mandatory step for the overhaul of old apartments. Any cracks or other defects found need to be repaired. To do this, problem areas must be embroidered, primed and sealed with cement mortar, putty or sealant. Wide gaps and cracks in the corners can be filled with polyurethane foam.
Wall alignment can be done in two ways:
- plastering walls with building mixtures;
- wall decoration with gypsum board and gypsum plasterboard sheets.
The first option involves the use of plaster mixes on a gypsum or cement basis. If the wall has minor irregularities, visual alignment is performed using a building level. If the surface has a significant drop, then it is advisable to align with the beacons. This is especially important when the walls are being painted. When installing furniture along a flat wall, the possibility of cracks is excluded.

For plastering walls and ceilings, use high-quality materials with anti-fungal properties.
Along with leveling the wall surfaces, you should finish the door and window openings. For this, you can use plaster, drywall or plastic panels.
The second option is preferable when the walls are made of bricks or have significant irregularities. The use of plaster turns out to be an unreasonably expensive and time-consuming measure.GKL or GVK sheets are mounted on a previously installed metal frame. As a result of such a finish, a gap is formed between the wall and the cladding, in which various communications can be hidden. This process is distinguished by the absence of dirty work and low labor intensity. The walls do not need further plastering before finishing with decorative material.
The main disadvantage of this design is its fragility. Therefore, if hinged furniture or appliances will subsequently be located on the surface, you should take care of the embedded parts that are mounted before performing the leveling layer.

Wall paint must be chosen based on the functional purpose of the room
How does floor repair begin?
Floor repair in the apartment, it begins with the implementation of a screed, which is used to eliminate significant damage and unevenness of the base relative to the horizon. This is due to backfilling or pouring the floor with a special compound, which forms a perfectly flat surface necessary for further installation of the floor covering. In addition, the screed serves to strengthen the surface of the concrete slab and increase its strength characteristics. Before performing it, it is necessary to create a sound and heat insulation layer. For this, expanded clay is often used, which is laid with a thickness of at least 5 cm. Due to the leveling layer, you can raise the floor level or make a technological slope.
Helpful advice! In the bathroom, it is advisable to set a certain floor slope for water drainage in the event of a flood, which will prevent flooding of the entire apartment.
Floor screed can be:
- concrete;
- cement-sand;
- self-leveling;
- dry;
- semi-dry.

The underfloor heating system is laid before the rough screed stage
The traditional method for correcting the floor surface is the use of concrete or cement-sand mortars, which are advisable to use to eliminate significant irregularities and surface damage. They are used in the installation of heat and sound insulation.
The most practical and modern solution is the use of self-leveling compounds, consisting of two mix options: a leveling agent and a level. The first is used to eliminate significant irregularities in the base, the second is a finishing layer that creates a flat and smooth surface without defects.
However, despite the less laborious process when using these formulations, their cost is much higher than traditional mixtures. Therefore, it is advisable to use self-leveling compounds when the height difference relative to the horizon does not exceed 4 cm.
The semi-dry or dry version is used to level the base when the height difference reaches more than 3-5 cm. This is a good alternative to traditional compositions, but the new layer will create much less pressure on the concrete slab. Therefore, this method is recommended when performing renovation of apartments in old and houses for laying carpet and laminate.

A rough floor screed is the basis for a high-quality coating and is performed in several stages
Floor screed procedure
First you need to prepare the base of the floor. To do this, the old floor structure is opened with the dismantling of the baseboards, flooring and the old screed. Further, the surface is cleared of construction debris and dust. If cracks, potholes and chips are found, it is necessary to carry out repair work when using filling mixtures. To eliminate deep damage, the method of joining is used, which consists in making cuts perpendicular to the crack with a depth of 20 mm and a thickness of 5 mm. Further, all damage must be repaired with concrete mortar.
Leveling the floor begins with marking it, namely determining the lowest and highest point relative to the horizon.A level is indicated on the walls, which indicates the thickness of the future fill layer. Beacons and guides are installed on the basis of the markings. Pouring the mixture starts from the far corner of the room. The mortar is spread and leveled using a metal rule.
The concrete screed should dry within three weeks. After 24-30 hours after the end of the work, it is necessary to wet the surface once a day.

A special needle roller is used to evenly distribute the screed and remove air bubbles
Helpful advice! In order to get a solid and high-quality base, it is not recommended to disturb the natural process of moisture evaporation with the help of heating devices and ventilation of the room.
In a similar way, the floor surface is leveled with a semi-dry mortar, which is evenly distributed and compacted using a conventional shovel. After complete drying, the surface must be treated with wood grout. The process is carried out until the floor surface is perfectly flat.
A dry screed involves laying a layer of expanded clay with a fraction of 1-5 mm, on top of which gypsum fiber boards are mounted. They are connected to each other using self-tapping screws with the end edges coated with special glue. This is the easiest way to level the floor, which allows you to get a coating of increased strength. After the floor screed has been completed, you can proceed with the installation of the selected floor covering.

The flooring is only laid when the final floor screed is completely dry.
Turnkey apartment renovation. Price per square meter
Regardless of what kind of renovation is planned in the apartment, you can do it yourself or use the services of professionals. You can also involve specialists to perform specific types or stages of work in the entire apartment or in a specific room.
The cost of cosmetic repairs includes the following list of works:
- dismantling of old finishes from the elements of the room;
- painting or whitewashing the ceiling;
- partial alignment of the walls;
- gluing non-woven or paper wallpaper;
- laying flooring;
- partial replacement of electrical and plumbing equipment;
- laying tiles.
The cost of such a list of works starts from 2500 rubles / m², which depends on the complexity of the process. Repairs studio apartment will cost 85 thousand rubles, two-room - 110 thousand rubles, three-room - 120 thousand rubles. This is all without taking into account the cost of materials.

Turnkey apartment renovation includes all stages - from design to the removal of construction waste
If it is necessary to perform rough work, which includes the installation and dismantling of wall structures, alignment of all elements of the room and electrical work, the price of services is on average 3500-4000 rubles / m².
When it is necessary to complete all turnkey electrical work in a new building, the price of the work will be 25 thousand rubles for a one-room apartment, 35 thousand rubles for a two-room apartment, and 45 thousand rubles for a three-room apartment.
The cost of a turnkey overhaul is on average 5500 rubles / m². It all depends on the condition of the apartment and the total area of the premises. Many experts offer to carry out premium-class renovations, which include the development of an individual design project. The price of such a repair is about 7,500 rubles / m².

With the help of the designer, you can make repairs in the apartment according to the individual needs of the customer
Turnkey apartment renovation price with materials
The cost of renovation work, taking into account the materials, depends on many factors: the area of the apartment, its current state (new or secondary housing), the volume and complexity of the stages of work and the quality of the building materials used. You can roughly calculate the cost of repairs using an online calculator located on specialized sites.This takes into account the average cost of apartment renovation per square meter of area. More accurate information can be obtained only after drawing up an estimate in each individual case.
So, the cost of a budget repair of an apartment in a new building with materials will cost an average of 6-6.5 thousand rubles / m². If more expensive building materials are used for the renovation of the apartment, the price of the work will be about 11-12 thousand rubles / m². Those wishing to decorate their homes with exclusive finishing products must prepare at least 20 thousand rubles / m². The cost of repairing secondary housing will be 10-15% lower, which is determined by the condition of the apartment.
Also, the functional purpose of the premises affects the cost of repairs with materials. So the repair of a living room will cost 6,000 rubles / m², a corridor - 6,500 rubles / m², a kitchen - 8,500 rubles / m², a bathroom - 8,000 rubles / m², a loggia or balcony - 5,000 rubles / m².

Repair in an apartment is a complex and costly process, but if you approach the issue correctly, planning all the work and choosing the most suitable materials, the result will delight the owner for a long period of time
When deciding where to start repairs in a house or apartment, it is necessary to study in detail each process. Especially when it comes to doing work with your own hands. If you are not confident in your own capabilities, it is better to entrust the execution of all work or a specific stage to professionals who will offer a clear plan for the renovation of the apartment. As a result, the work will be performed efficiently and in a short time.