The article examines in detail the technology according to which a do-it-yourself bathhouse is built from a bar. The text describes the process of the correct selection of materials, the design features of a future wooden bath, creating a foundation for it, erecting walls, taking into account the formation of window and door openings in them, as well as other stages of construction and finishing work.

Wooden timber is considered one of the best material options for building a bath, due to its environmental friendliness and long service life.
Content
- 1 Advantages of building a bath from a bar, prices of turnkey projects and photos
- 1.1 Advantages and photos of baths from a bar at their summer cottage
- 1.2 How to build a bathhouse from a bar with a terrace: photos and recommendations
- 1.3 Recommendations for the construction of a turnkey two-story timber bath with a terrace
- 1.4 Features of the construction of a bath from a bar with an attic
- 1.5 What is the cost of a turnkey log bath: prices of finished projects
- 2 How to independently build a bath: video review and description of technology
- 2.1 List of materials required for the construction of a bath
- 2.2 How to choose the right timber for the construction of a bath with optimal characteristics
- 2.3 Construction of a bath from a bar with your own hands: arrangement of the foundation
- 2.4 Making strapping and creating a log house from a bar with your own hands
- 2.5 We build a bathhouse from a bar with our own hands: working with the upper part of a log house
- 2.6 How to build a roof for a log bath with your own hands
- 2.7 Installation of a roof on a do-it-yourself sauna from a bar
- 2.8 Decking of floors for a bath under shrinkage from profiled timber
- 2.9 How to build a podium in a sauna from a bar for installing a stove
- 2.10 We build a bath correctly: the technology of arranging a portal for a furnace
- 2.11 Electrification of a bath from a profiled bar: construction of wiring
- 2.12 Arrangement of door and window openings in a wooden bath
- 2.13 Interior decoration of a bath: how to properly build and sheathe the frame
- 2.14 Methods for mounting lining on a wooden frame made of rails
- 2.15 DIY construction of a bath from a bar 150x150: video instruction
Advantages of building a bath from a bar, prices of turnkey projects and photos
For the construction of a bath in a summer cottage, various building materials can be used. There is an extensive range on the market that allows you to achieve any performance characteristics from the future structure. If the owner of a summer cottage decided to build a turnkey timber bath, the price will be one of the most important criteria for choosing a material. In addition, personal preferences are taken into account. If the construction will be carried out with his own hands, the choice may also be based on the experience of working with a certain material.

The bathhouse can be built as a separate building or an extension to a private house
Most often, the owners of suburban areas give preference to wooden buildings, choosing projects from rounded logs or timber.These materials combine the beneficial advantages of natural raw materials and a relatively low price.
Advantages and photos of baths from a bar at their summer cottage
The popularity of timber as a building material for a bath is due to a large number of advantages. First of all, consumers are captivated by the natural origin of this raw material. Wood is environmentally friendly, it does not contain toxic substances and impurities at all, therefore it is completely safe for humans. Having little practical experience in handling it, a person can build a bath with his own hands in a fairly short period of time. Moreover, the work is done with a minimum set of tools.
The timber has excellent technical characteristics. It can be easily stacked in rows, due to which the structure does not take much time to shrink. The price of log cabins made of timber is more democratic than other buildings. The material retains heat well, creating optimal climatic conditions inside the premises and filling the air with a pleasant aroma of wood and natural resins.

In order to protect the bath from the negative influences of the external environment, it is necessary to use protective compounds for wood
The timber can be glued and profiled. The last of them has a special structural structure, which allows the assembly of walls using the thorn-groove method. The result is a very robust and reliable structure.
Helpful advice! If you do not want to wait long for shrinkage to occur, you should not choose a profiled material. For these purposes, glued laminated timber is better suited, the price of a turnkey bath made on its basis is much higher, but the construction is more reliable. In addition, this material is less susceptible to deformational changes.
The timber lends itself easily to all types of processing, it is malleable and does not impose design restrictions. The material allows you to build baths with almost any design features and layouts:
- one- and two-story;
- with attic;
- with one or more entrances with a porch;
- with a veranda;
- with a terrace;
- swimming pool, etc.

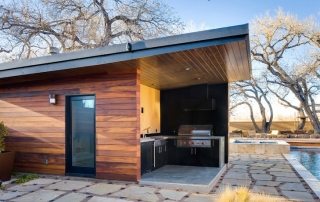
An example of a compact bath for a private house with panoramic windows
The construction of a bath does not require the construction of a solid foundation. The use of a bar simplifies the technology as much as possible. In many ways, this material is even better than a log. It is convenient, cost effective and does not require a fit on the ground during wall construction. The material can be laid immediately on the foundation.
How to build a bathhouse from a bar with a terrace: photos and recommendations
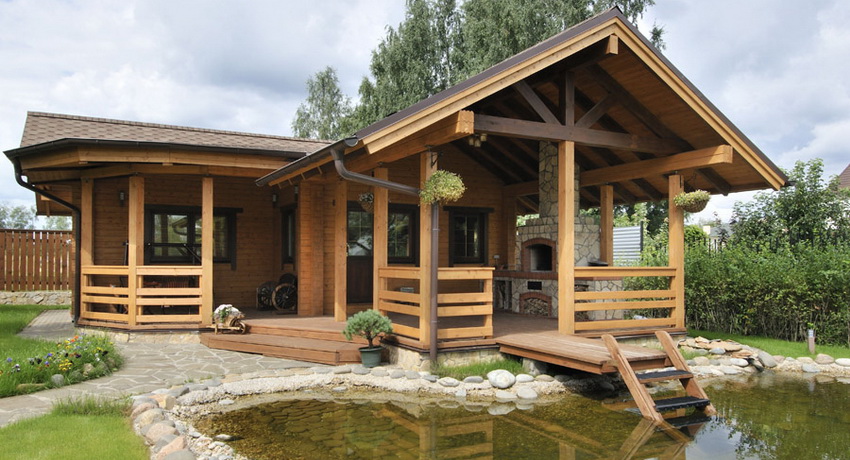
The bathhouse is used for taking water procedures, however, this is not its only purpose. Here people can rest and relax. Moreover, this can be done in the open air, if the building provides for the presence of a terrace. The smaller the dimensions of the structure, the higher the need to create this additional structural element. In self-made saunas made of timber 3x4 m or 4x4 m, the presence of a terrace will not only add useful space, but also give the overall appearance of the building a finished look.
If the construction is carried out with your own hands, it is better to opt for the project of a one-story structure. A 4x6 m bathhouse will be an excellent option. In this case, you need to make a support-column foundation. It is desirable that each cabinet contains 4 blocks. Profiled timber is suitable for walls. The optimal height of the premises with such dimensions of the bath is 2.15 m. For the construction of partitions, frame-panel technology can be used.

Plain bath construction project you can do it yourself in a short period of time
To prevent heat loss through window openings, it is advisable to use double glazed structures. In the layout, at least 4 m² of internal space should be allocated to the washing compartment.In this room, you need to organize a drainage system and build a shower tray.
The steam room should have the same size. Lining can be used as a decoration for the walls in this room. Foil padding will help keep warmth inside. The floor and ceiling need additional insulation, which are also hemmed with clapboard. For the interior arrangement of the steam room, you can take an aspen. Based on this material, you need to make and install shelves with a two-tier structure.
After that, the roof is made. To begin with, a rafter system based on a bar is being built. After that, on the basis of a non-edged board, a crate is made for mounting the roof. Heating equipment for a turnkey log bath with a stove, as well as the colors of the ondulin for the roof, are selected taking into account the taste preferences of the owner of the summer cottage.

An example of a layout scheme for a bath with a 6x4 m terrace
Helpful advice! It is recommended to place an extension in the form of a terrace on the leeward side. Otherwise, glazing will have to be performed to protect against drafts.
The most popular design of heating equipment is a heater stove. It should be installed so that it can be kindled from the side of the rest room.
Recommendations for the construction of a turnkey two-story timber bath with a terrace
Often, the owners of summer cottages resort to the construction of a two-story bath. Even relatively small buildings of 6x6 m or 6x8 m in size. The presence of a second floor will make it possible to equip additional rooms that provide comfort in the operation of the bath.
Such premises include:
- closet for drying and storing fuel (firewood);
- a vestibule, which acts as an airlock that keeps heat inside the bath;
- pantry;

The construction of a two-story bathhouse with a log track requires laying a solid foundation
- dressing room;
- guest rooms, etc.
Construction is carried out by analogy with the previous option. Due to the second floor, the weight load on the foundation increases, so the foundation should be strengthened. In this case, you can choose absolutely any internal scheme of the bath. If you do not want to complicate the layout, you can add space to the recreation room and organize there an area for playing billiards, darts, install upholstered furniture with a TV, etc.
It is better to equip the steam room on the ground floor. It is recommended to organize a washing room with a shower nearby. It is allowed to transfer this room to the second floor. It is worth choosing an abrasion-resistant material with a non-slip surface as a floor covering for these rooms. A two-story building needs a quality ventilation system to keep humidity and temperature at optimum levels.
The upper level of a two-storey building must be protected from the negative effects of moisture, since there is a high probability of mold and mildew in this area. For this, a layer of vapor barrier material is laid on the ceiling. You should not make the ceiling slabs too high, as they can become a source of unnecessary heat loss.

Layout plan of a two-story bath with a terrace 7.5x5.6 m
When the bulk of the work on assembling the building frame and organizing the internal systems is over, you can start installing the heating equipment. The stove-heater should be placed in the steam room, turning it with the area for laying firewood towards the washing room or rest room. Installation of bunk benches is carried out along the walls. In order for the chimney to provide heating of the upper tier, it should be run through the second floor. A terrace is also set up here, which can be decorated as a gazebo or a large balcony. It is installed on poles made of rounded logs.
Helpful advice! The standard beams from the store are not long enough to build a terrace. You can order material up to 12 m long by visiting the sawmill.
Features of the construction of a bath from a bar with an attic
The procedure for building a glued laminated timber bath with an attic floor should begin with laying the foundation. If the site has complex soils, it is better to opt for a strip foundation. It is reliable and is perfect for two-story buildings. It is advisable to organize a separate base for a brick oven, which will be autonomous in relation to the common foundation. This is done in order to equalize their level after shrinkage. The fact is that the base of the building will lower more under the influence of a large weight than the area where the furnace is installed.

The type of attic roof should be thought out even at the planning stage in order to calculate the future load on the foundation and walls of the bath
Then two layers of roofing material are spread on the concrete base. If a ready-made log house was purchased from a turnkey profiled bar, then it is enough to assemble its parts according to the instructions. It contains the order of joining the elements by numbers.
Installation of floors can be performed based on any of the technologies you like, however, the arrangement of a sand and gravel cushion is mandatory. In addition, you need to put several layers of waterproofing material, and also impregnation of wooden elements with antiseptic and moisture protection agents is done.
The stove is installed in such a way that as many rooms as possible are heated. Correct organization of the ventilation system will avoid the effect of stuffiness in the attic. The bath is also equipped with a vapor barrier system to prevent the growth of mold and fungi. To climb to the attic floor, a staircase is constructed inside the building with comfortable non-slip steps and safe railings.

It is worth considering that an important point when choosing an attic roof type for a bath is additional measures for warming and insulating the structure
Baths made of laminated veneer lumber with an attic and a sloping roof, which consists of the following elements, look very attractive in the photo:
- lathing;
- a layer of hydro and vapor barrier material;
- insulation;
- interior decoration;
- roofing material.
Related article:
Bath projects with a gazebo under one roof: the best ideas for implementation
Features of the structure and an overview of the best options for implementation. Construction recommendations. Original planning ideas.
Since the attic is characterized by a special temperature and humidity regime, the floor is additionally insulated from heat and moisture using film material or foil. Then the insulation is laid and the finished floor is installed. The ceiling is sheathed with lining.

On the attic floor baths from a bar can accommodate a lounge, dining room or guest bedroom
Helpful advice! The use of a sealant will help protect the structure from moisture penetration into the walls through the joint area during oblique rain.
What is the cost of a turnkey log bath: prices of finished projects
Developers offer two approaches to the construction of a bath from a bar: for shrinkage or for finishing. The fact is that wood is subject to deformational changes under the influence of natural factors. This feature should be taken into account if the construction of a bath is carried out with your own hands. It takes about 1-2 years for the material to stabilize. This process is called shrinkage. This construction technique is suitable for owners of summer cottages who wish to divide the costs into several parts.
In this case, the construction scheme is divided into stages:
- creating a skeleton;
- manufacture of rafter structures;
- installation of the sub floor.

The construction of a turnkey bath takes less time, since specialists use ready-made construction plans and are aware of all the nuances of installation
When the shrinking process is complete, finishing work is done. The price of a bath made of profiled timber, made for shrinkage, is significantly lower than the cost of implementing a project for finishing, since the customer receives a building ready for use.
Prices for buildings for shrinkage and turnkey construction of a bath (timber 150x150 mm):
| Feature of the project | Building size, m | Total area, m2 | price, rub. | |
| Shrinkage | Full construction | |||
| One floor | 4x5 | 19 | 232000 | 336000 |
| 4x6 | 24 | 234000 | 338500 | |
| 5x6 | 26 | 237800 | 340800 | |
| 5.5x6 | 27 | 265000 | 384000 | |
| 6x6 | 32 | 272000 | 396000 | |
| Two floors | 5x7 | 55 | 354000 | 515000 |
| 6x8 | 72 | 404000 | 561000 | |
| 8.5x10.5 | 99 | 571000 | 832000 | |
| With attic | 6x6 | 60 | 297000 | 447000 |
| 6x6 | 63 | 307000 | 457000 | |
| 6x8 | 66 | 392000 | 582000 | |
| 6x9 | 94 | 430000 | 640000 | |
Many owners of summer cottages note the practicality and convenience of baths from a profiled bar, reviews on the forums confirm this:
“A couple of months ago I finished the construction of my own bathhouse in the country. I did not bother too much, since I have no special experience in this matter. I opted for a small 4x4 m bathhouse. Of course, I had to work hard, but the result met all expectations. The steam room heats up very quickly; little firewood is required for the stove. Even friends were frequent guests. I would especially like to note the pleasant aroma that the timber exudes. Bricks or blocks cannot be compared to natural wood. "
Evgeny Novokshanov, Moscow

The cost bath construction turnkey depends on the complexity of the project and the desired size of the building
“Last year my wife and I saw in the photo a bath from a profiled bar with a pool and just fell in love. I myself am not friends with the tool, so we hired specialists for the construction. Not only the price, but also the speed of project implementation was a pleasant surprise. Within a few months we were handed over a completely ready-to-use project with all the amenities. A year later, we are still happy with the result. "
Sergey Nikitin, Samara
How to independently build a bath: video review and description of technology
The simplest and most budgetary option for construction will be a 3x3 m bathhouse. The dimensions of this building allow the building to be located in any zone of the summer cottage. Construction technology is available even for those who do not have professional knowledge and skills. The layout includes a combined washing and steam room, where the oven is installed, as well as a room for relaxation.
Helpful advice!When performing construction work, it is advisable to be guided by the requirements of SNiP. In this case, you need to take into account the regulatory document 31-02-2001.

Interior decoration of the bath room requires compliance with fire safety rules
The technology of building a bath from a bar 150x150 with your own hands step by step:
- Arrangement of the foundation part of the building.
- Assembly of a log house (frame part).
- Roof manufacturing.
- Installation of floors.
- Organization of door and window openings.
- Installation of electrical wiring.
- Wall cladding on the outside and inside.
List of materials required for the construction of a bath
Even if the construction of a bath is carried out using budget technology, all materials must be of satisfactory quality. Otherwise, the building will not last long enough.
List of materials for construction:
| Material | Features: | amount |
| Cement | M400 | 150 Kg |
| Bar | sawn, 150x150 mm | 3.5 m³ |
| Reiki | 50x20 mm | 25 lm |
| Boards | 100x50 mm | 0.3 m³ |
| Brick | refractory, chamotte | 500 pcs. |
| Lining | natural | 0.5 m³ |
| Ondulin | — | 10 m² |
| Board | cut, thickness 25 mm | 0.3 m³ |
| Concrete blocks | standard size | 30 pcs. |
In addition, you will need window and door structures, as well as consumables:
- metal corners for the construction of the truss system;
- self-tapping screws of different sizes;
- nails;
- fittings;
- insulation material;
- electrical cable and sockets with switches.
All materials are indicated with a margin to cover inconsistencies in calculations, as well as unforeseen moments.
How to choose the right timber for the construction of a bath with optimal characteristics
Wood material for the construction of houses, baths from laminated veneer lumber or monolithic is selected taking into account the homogeneity and humidity. The degree of shrinkage of the building and its service life depend on these indicators. Residual moisture contributes to material cracking and deformation, and also reduces the thermal insulation capabilities of the timber.
The moisture content of the timber for the bath:
| Material type by degree of moisture | The percentage of moisture in the material,% |
| Dry | <25 |
| Semi-dry | 25-35 |
| Natural | >35 |
If you choose a dry material for the bath, you can not interrupt work after the walls have been erected. The kiln-dried timber does not shrink, so you can immediately equip the roof using technology and put the building into operation. However, the risk of material cracking remains.

The choice of the type of timber for the construction of a bath determines the period of shrinkage of the building and the need for additional measures to protect wood from negative influences
Buying a timber with a natural moisture level will be much cheaper. Such material will significantly increase the construction time, since you will have to wait about 1 year before installing the floors. Drying of such a bar occurs in a natural way, but the material is homogeneous, which eliminates the appearance of cracks.
The material from which the timber is made also affects the service life and performance of the bath. It is not recommended to use softwood. Under the influence of moisture, such a material releases resins that are harmful to human health. For this reason, coniferous beams should not be used for interior decoration.
Helpful advice! If you finish the walls with natural clapboard made of hardwood, for example, linden, you can reduce the negative impact of harmful resins.
Optimal breeds for a bath:
| Wood type | Features: |
| Oak | Used to make an expensive and reliable bath. |
| Larch | Used for arranging 4-5 basement rims of a log house (bottom rows). |
| Pine | The most popular material that is technologically advanced and optimal in price. |
| Spruce | It is used for the construction of upper crowns and partitions. It has similar characteristics with pine, but it is more prone to rotting. |
Most often, a material with a cross-sectional size of 150x150 mm is used for construction. Although there are do-it-yourself photos of baths on the network from a 100x100 mm bar. Such material can be used if construction is carried out in southern regions with a mild microclimate. For harsh areas, you should select massive products with a diameter of 180 mm or more. A bar with a section of 145x150 mm is suitable for those regions where the temperature does not drop below -30 ° C in winter.

Wooden beams with a cross-sectional size of 150x150 mm are used more often than other types
Construction of a bath from a bar with your own hands: arrangement of the foundation
To begin with, marking is done on the ground for construction. For example, according to the project, the bath has dimensions of 3x3 m. A columnar foundation is suitable for this building. The marking of the outer contour of the base is carried out using a rope and wooden pegs, spaced in 1.5 m increments. Since the partition between the rooms is not a load-bearing one, there is no need to equip a foundation under it. First, posts are installed in the corners, and a rope is pulled between them. After that, the intermediate pegs are mounted.
Wells are dug in the soil for the installation of the posts. Their diameter is 40 cm, depth is 0.5-0.6 m. A sand cushion is formed at the bottom. The thickness of the fill is 15-20 cm. If the site has clay soils, the construction of formwork is not required. Concrete is poured into the recesses. For the base to completely harden, you need to wait at least two weeks.
Next, the zone for the installation of heating equipment is marked. In this case, it will be located between the combined rooms of the washing and steam room and the rest room.As a result, the oven will heat the maximum area. The foundation for the heating equipment is set up deeper than the main one. It is desirable that it passes below the level of soil freezing. But if the stove has compact dimensions and low weight, it is enough to deepen the base for it by 1 m.A sand cushion 25-30 cm thick is formed at the bottom.

The type of foundation depends on the quality of the local soil as well as the size of the bath and the number of floors
Helpful advice! The use of expanded polystyrene plates will reduce the risk of "undermining" the foundation in winter. For this, products with a thickness of 20-30 mm are suitable, which fit along the perimeter of the pit. When the soil begins to swell, the slabs will take up the bulk of the impact force on themselves. As a result, the base will remain stationary.
It is better not to fill the columns of the common foundation with concrete, but to muck up. For this, blocks of 30x20x60 cm are used. First, level the concrete at the base. To achieve the desired result, it is advisable to use a building level with bubbles. All shortcomings are filled with a cement-sand mortar. First, the procedure is performed with all the extreme pillars, then with intermediate elements.
Additionally, with the help of concrete blocks, the furnace foundation should also be adjusted. The difference between the level of the posts and the base for the installation of heating equipment includes the width of the beams and beams, as well as the floorboards.

Before the rough screed of the floor for the bath, the base must be leveled
Making strapping and creating a log house from a bar with your own hands
There are several methods for joining bars. Since the construction is done by hand, you can limit yourself to the simplest of them. In the corners the system will be used "in the paw", and at the end connections - "in half a tree without a remainder". Before starting work, check the distance between the base posts again. To identify horizontal deviations, you need to pull the threads and check the parameters of each side and the diagonals between them. If there are any problems, the foundation is adjusted.
Before performing the installation of the first rims of the log house from a bar, it is advisable to treat the material with an antiseptic. It does not hurt to lay 2-3 layers of roofing material under the bottom. It is necessary to mark on the first crown of the zone for the future placement of door and window openings. Installation of the first row in progress. In the corner areas, the timber must be fastened. To do this, you will need pins, which are affixed both as main and intermediate fasteners.
Further, according to the "half-tree without residue" method, the lower floor beams are laid with a step of 1.2-1.5 m. This stage requires special attention and careful control, since it will be very difficult to correct mistakes made at the moment, and sometimes impossible. Given that the bath is small, you can do without sawing off the corners. You only need to lay the ends of the material in a checkerboard pattern.

Types of cutting wooden beams
A traditional material, for example, tow, or modern tapes, which greatly simplify and speed up this process, can be used as a mezhventsovy insulation. It is imperative to check the spatial position of each crown. Through a row, metal or wooden dowels are installed with a step of about 1 m. In the corner zones of door and window openings, the maximum allowable indentation is 0.2 m from the edge. You should not put pins further.
Important! The hole for the pins should be formed strictly vertically. In this case, the part itself should not be placed end-to-end inside, but with a small gap, otherwise, during the shrinkage of the structure, the rows will sag, because one dowel holds 1-2 rows.
We build a bathhouse from a bar with our own hands: working with the upper part of a log house
The next step is to install the ceiling beams.This should not be done until the very end, the last two rows are not put. The approximate ceiling height is 2 m. However, a slight deviation from this indicator is not critical. Sawing beams for ceiling slabs is carried out using the "half-tree without residue" technology. Since the bath is small, you can limit yourself to installing a pair of ceiling beams.

Beams for ceiling slabs are installed in the "half-tree without residue" method
Installation of the first two rows of material is in progress. For fixing, you need to use pins, which must be placed in the holes with force so that the structure is fixed very rigidly and firmly. If this is not done, then the rafter system will put pressure on the crowns, deforming the frame. Next, a temporary ceiling is laid. For this, boards are used, which are partially fixed. Once the main roof construction work has been completed, it will be removed.
Experts engaged in the construction of houses, baths from a bar recommend that all the stages preceding the installation of the roof be completed as quickly as possible. After that, you can calmly slow down, because the inside of the structure will be protected from bad weather.
For arranging a roof for a bath, a single-slope or gable structure can be used. In the absence of experience, it is better to stay with the first option, since it is easier to execute. In this case, the arrangement of the ceiling is carried out immediately. Insulation will be required. Usually mineral wool is used for these purposes. If you want to simplify and reduce the cost of the insulation process, you can take foam plates. This material is not afraid of moisture and is capable of replacing hydro and vapor barrier.

The complex roof structure requires a rafter fixing pattern for even weight distribution
Insulation works are carried out in stages:
- Edged boards 2 cm thick are nailed to the ceiling beams from the bottom side.
- On top of them, a layer of insulation is laid in a dense layer without gaps.
- Planks or pieces of wood are laid on the ceiling beams that can support the weight of people (this layer is necessary for roofing work, after which no one will move along the roof).
Helpful advice! It is better to cut the insulation with allowances of 1-1.5 cm. During the installation process, the material will shrink, which will allow you to get an airtight layer. A joiner's knife and ruler are suitable for cutting styrofoam.
How to build a roof for a log bath with your own hands
First, the dimensions of the upper rim and its vertical position are checked. If there are deviations, the defect can be leveled using rafters. Then you need to determine the angle of the slope. Experts recommend stopping at 20 °. Next, the side on which the rainwater will flow is determined. In addition, you should take into account the features of adjacent buildings and the nature of the placement. doors.

To fix the rafters, you can use the notched method or fastening with metal corners
Based on the calculated height, a rafter stop is formed. To do this, you need to take the bars of the required length and install them as vertical supports. A bar is laid on top of them in a horizontal position. Supports are placed in 1.5 m increments. In the process of assembling the structure, you can do without cuts. Self-tapping screws or metal corners are used for fixing. To increase the reliability of the stop, you can fix it on the floor beams using corner boards.
In the next step, the length of the rafters is measured. This takes into account the departure. In this case, 3.2 m is enough. Planks of 100x50 mm can be used as rafters. To build a 3x3 m bathhouse, 6 pieces will be enough. According to the technology, the extreme rafters are first installed. Then you should pull the rope between them. This will allow the rest of the roof to be laid flat.The most reliable option for fixing structural parts is the notched method, but metal corners are also suitable.
Installation of a roof on a do-it-yourself sauna from a bar
Ondulin is the best material for roofing. It has a low cost and is of sufficient quality. If the laying of this material is done correctly, the roof will turn out to be solid. This eliminates the likelihood of leaks, so you don't have to use hydro-barriers.

The process of installing ondulin using slate nails to a wooden lathing
For the installation of roofing material, a frame base in the form of a crate is required. Outwardly, ondulin resembles asbestos-cement sheets. Unlike slate, its installation will require a lathing with more frequent placement of slats. Alternatively, for the construction of the frame, you can use non-edged boards of small width. They are more convenient for driving nails. When building the lathing, it is very important to ensure that all rows are placed evenly. In the absence of experience, it is better to immediately lay out the first row, check its position, and only then start hammering in nails.
Note! It is desirable that each sheet of ondulin be supported in four places. For this, the slats are laid at a distance of 35-40 cm from each other.
For fixing ondulin, ordinary slate nails are suitable. The fasteners are installed along the upper wave. The lower the angle of inclination of the roof, the more the sheets should overlap each other. In this case, it will be enough to overlap by about 10 cm. You need to hammer in the nails very carefully, otherwise you can damage the wave. If desired, a storm drainage system can be arranged on the roof.

When installing ondulin on a flat roof, you should take care of the presence of channels for water drainage
The space located between the wall of the bathhouse on the side where the slope rises and the rafters is clogged with boards. This completes all urgent work. Now the frame can be left to shrink. During the winter, all deformation changes will occur, the relative humidity of the material will reach its natural value. If you do not want to postpone the construction of a bath from a bar for several months, you can continue to work by arranging a bath from the inside.
Decking of floors for a bath under shrinkage from profiled timber
The floors in the bath are formed according to the principle of a pie, where the materials are laid in layers.
The optimal flooring scheme is as follows:
- sand and crushed stone pillow;
- concrete screed 20-30 mm thick (no reinforcement required);
- insulating film layer "Izospan D";
- extruded polystyrene foam plates;
- insulating film layer "Izospan D";
- concrete screed 80-100 mm thick with reinforcement.

Installation and insulation of the floor is carried out in accordance with the rules and recommendations of specialists for finishing flooring for a bath
In addition, expansion joints will need to be made. For this, sheets of EPSP with a thickness of 3 cm are cut. The seam is laid along the entire perimeter of the room, as well as around the base intended for installing the oven. At the same stage, the internal wiring of water pipes and sewerage is equipped. Next, sand and gravel are poured onto the floor, after which the pillow is compacted. A concrete screed is poured over it. It is better to use a rule to level the surface.
When the screed is completely dry, you can lay Izospan. The canvases should be laid with a slight overlap. The material must partially overlap the expansion joint. All edges of the film and joints are fixed with adhesive tape. Next, the installation of expanded polystyrene sheets is carried out.
Helpful advice! Experts recommend using extruded polystyrene foam boards with a thickness of 6-10 cm.
Plates do not need to be fixed, but they should be laid as tightly as possible.After that, another layer of Izospan is laid, which is also fixed with tape. Next, a reinforced concrete screed is poured. When it is dry, you can install heating equipment, and then finish the floors with tiles, porcelain stoneware or other material.

The final floor covering can only be installed after the screed is completely dry
How to build a podium in a sauna from a bar for installing a stove
The base for the oven must be waterproofed. To make the equipment look aesthetically pleasing, it is advisable to build a podium of bricks with a height of 10 cm or more on top of this layer. For this, two continuous rows are laid out. Before doing this, you need to provide protection from fire.
A rectangle is drawn on the floor according to the dimensions of the furnace structure. The markup is done strictly at the place where the equipment will be installed. Next, you need to make allowances of 5-10 cm on each side and draw another rectangle of a larger size.
Important!Do not forget that there must be a distance of at least 38 cm from the walls of the heating equipment to the cladding of the room.

The process of building a podium for installing a furnace
A protective sheet will be installed in front of the firebox door, the dimensions of which are 50x70 cm. The sheet should run along the stove. On the floor you need to apply markings for its installation. If the combustion door opens into an adjacent room, the protective sheet is installed there.
Taking into account the dimensions of the rectangle drawn on the floor, a part is cut out from the minerite slab and screwed along the markings using self-tapping screws. A couple of solid rows of bricks are laid on top. You can use a red, solid material, but fireclay is preferable. First, you need to soak the bricks in water.
It is better to fix the brickwork with a cement mortar with refractory properties. The horizontal placement of each row must be checked. If there are deviations, the bricks can be knocked out with a mallet or their position can be corrected by adding mortar. Next, a refractory adhesive is diluted and with its help a protective steel sheet is fixed on the podium. Instead of metal, you can use porcelain stoneware, which perfectly tolerates the influence of high temperatures. In two days, it will be possible to start installing heating equipment.

When building a podium for installing a furnace, it is important to use prepared refractory bricks
Not only the floor needs protection from temperature and fire, but also the walls of the bath. Most often, for these purposes, protective screens are used in the form of brickwork, natural stone or porcelain stoneware. Due to this, the cost of building a bathhouse from a bar increases, but the result is aesthetically attractive. There are also more budgetary methods, for example, applying a layer of plaster 2.5 cm thick over a metal mesh or installing a steel screen.
Note! The stainless steel sheet provides protection not only from heat, but also from infrared radiation.
We build a bath correctly: the technology of arranging a portal for a furnace
To install the stove inside the bathhouse, a partition is formed between the relaxation room and the steam room. A pair of bars is taken (their length should correspond to the height of the premises), pre-impregnated with an antiseptic and installed vertically. Self-tapping screws and perforated corners are used as fasteners for the ceiling and floor. In the same way, the horizontal jumper is fixed between the bars.

The placement of the furnace should be thought out even at the stage of laying the foundation.
The result should be a frame base in the form of the letter "H". The lower part will house the brickwork and the furnace fuel channel. The upper area will be insulated and sheathed with lining. Basalt wool slabs 10 cm thick are installed between the beams.Next, a horizontal crate is formed of wooden slats with a cross-sectional size of 2 cm.
Using a construction stapler, fix the foil-coated vapor barrier on each side of the framing partition. The lining is mounted on the lathing in a vertical position with the help of nails or clamps. Before making a brickwork, it should be soaked in water. The material is stacked according to the level. A distance of 3-4 cm is maintained between the masonry and the timber. The fuel channel of the furnace should be located at the same distance from the brick.
If it becomes necessary to cut the material, it is better to use a grinder for this. The use of steel corners will simplify the process of making the floor, because the brick will rest on them. When the laying is completed, minerite or basalt cardboard should be inserted into the gaps between the brick and the timber. It is not allowed to use foam or glass wool for these purposes.
Helpful advice!With the help of wooden platbands, you can close and decorate unsightly areas with insulation between the timber and the brick.

A properly constructed portal for the stove will allow you to cook and warm up the sauna room from the rest room
If, according to the project, it is supposed to build not only a portal, but also a protective screen made of bricks in a bath from a bar, the heating equipment is installed in its place immediately and covered with a film that will protect this area from dirt during internal work. In other cases, the oven can be installed after the completion of construction and finishing.
Electrification of a bath from a profiled bar: construction of wiring
When working with electricity, it is very important to adhere to all the rules and requirements for the installation of electrical equipment. These regulations contain all the necessary information on the safe supply of electricity to the bath, the correct wiring and connection of devices.
First you need to decide in what way the power cable will be supplied:
- Air.
- Underground.

When conducting electricity to the bath, it is important to adhere to the rules of fire safety and the installation of electrical equipment
The cable can be fixed directly on the outer wall of the bath, after hiding it in a corrugated pipe or a protective plastic box. Since it is strictly forbidden to enter the self-supporting insulated wire directly into the room, a box with a two or four-pole automatic switch is installed at the entry point. The hole through which the cable will enter the room must be reinforced with a metal tube with grounding. The rubber tube cannot be used in this case.
A specialist who understands the design of networks for rooms where there is an increased level of moisture and temperature should work on drawing up the scheme. It is worth deciding whether the connection will be three-phase or single-phase. This affects the cabling. A three-phase connection is advisable if a large number of powerful electrical equipment will be installed in the bath.
It is advisable to carry out the installation of electrical wiring according to the drawn up diagram by an open method. It is not only safe but also convenient. You can hide the wiring under the casing only in the steam room.

When conducting electricity in a bath, all wires must be insulated to prevent the negative effects of moisture condensation
To secure the cables, you can use:
- staples;
- porcelain insulators;
- cable trays.
Helpful advice! To add aesthetics to the wiring, it can be hidden under European skirting boards or cable channels.
Further, all the necessary equipment is installed in the switchboard:
- a step-down transformer;
- RCD;
- automatic machines.

For a bath, it is better to purchase sockets with protective screens
It should be installed as close as possible to the exit, since in this area the level of temperature and moisture is the lowest in the room. The shield must be grounded and also check that all wire fixings are secure. Boxes, sockets and switches must be installed in the break room. Installation of these elements in a steam room is unacceptable.
Wiring regulations:
| System element | Height (distance from the floor), m |
| Electrical board | 1,5-1,7 |
| Sockets | >0,2 (<1,2) |
| Switches | 1-1,5 |
Arrangement of door and window openings in a wooden bath
Self-production of door and window openings requires experience with wood and specialized equipment. It is much easier to purchase the necessary products ready-made. Moreover, the structures can be both wooden and metal-plastic. Installation will require preparatory work.

Window installation scheme in a bathhouse from a log house
Existing openings need to be trimmed and leveled, since each beam is not adjusted during the laying of the log house. To do this, you need to mark the wall with the linear dimensions of the door and window openings. You will need an electric or gasoline saw to cut. With this tool, you need to cut off the ends of the beams that protrude beyond the marking.
Further, on the basis of boards 100x50 mm, boxes are made for installing door and window structures. If you don't want to bother with making grooves and spikes, you can assemble the parts by driving nails into the end part. Boxes prepared for the installation of windows and doors are placed in openings and fastened with screws or nails.
Important!It is imperative to leave a free distance of 3-4 cm between the box and the upper bar. It is no longer required, since the height of the bath is small. This is necessary in order to compensate for the changes that occur during the shrinkage of the building, otherwise the door can be blocked, and the window structures will lead.

It is better to entrust the installation of plastic windows to professionals
The gap left in the upper part is insulated. For these purposes, polyurethane foam or tow is ideal. Then you can install doors and windows. If wooden windows are selected for the bath, they should be fixed to the casing with self-tapping screws. If you don't want to drill a box, you can limit yourself to using anchor plates as window clamps.
Installation of metal-plastic structures requires professionalism and special skills. Therefore, the installation of such windows should be carried out by the company from which they were purchased. This approach will eliminate errors in the installation of structures and receive a guarantee. The same goes for double-glazed doors. The door to the steam room must open outward. This requirement is dictated by security considerations. External placement of crossbars and hinges is made. Such an installation will exclude the negative influence of temperature and moisture on these elements.
Interior decoration of a bath: how to properly build and sheathe the frame
As a decoration for the washing room and steam room, you need to use natural lining. Other material is not recommended for these purposes. The rest room is less demanding in this regard.

The interior decoration of the bath room should be as environmentally friendly as possible and not emit harmful substances when heated
Wall decoration in it can be done:
- plywood;
- plastic clapboard;
- OPS, etc.
Of all the materials listed, the lining installation technology is considered the most difficult. To install it, you need to build a supporting frame. This process requires diligence and care. For the manufacture of the frame, wooden slats with a cross-sectional size of 50x20 mm are suitable. Before starting work, the surface of the walls should be leveled, eliminating strongly protruding parts. After that, the markup of the future frame is applied.
According to the marks at the corners, the extreme slats of the base are nailed. To evenly install the wooden elements, you need a level. For this, a rope is pulled between the extreme slats. Focusing on it, you need to install the remaining frame slats. They are attached at a distance of 40-50 cm from each other. Next, you need to check the height parameters at the corners of the bath. In this area, the distance between the ceiling and the floor is measured.

The lining should not be attached end-to-end to the ceiling in order to avoid negative consequences during the shrinkage of the building
Helpful advice! If there are height differences between different corners, this defect can be eliminated on the last and first row of the lining. For this, the material is fastened with a small gap at the floor and ceiling. It will be enough 1-2 cm. The cracks that are formed in the process of this will be closed with skirting boards. The baguettes must be nailed directly to the lining and not to the ceiling base. Otherwise, the cladding may deform during the shrinkage of the building.
To fix the lining on the frame, you need nails. The optimal length of the fasteners is 1.5-2 cm. These nails are driven into the groove of the lining, thus, the material is fixed on the wooden slats of the frame.
Methods for mounting lining on a wooden frame made of rails
Lining elements can be mounted vertically or horizontally on the walls. The technique of vertical installation of panels is accompanied by one significant drawback. In this case, the heating of the lining along the length is uneven. As a result, the service life of the coating is significantly reduced.

Wooden lining can be used to decorate both the inside and outside of the bath
Vertical clapboarding is ideal for rooms with sauna climatic conditions. When operating in a steam room, high temperatures and low levels of humidity are observed. To increase the circulation of air flows between the sheathing and the insulation, several small holes should be drilled in the lining.
With the horizontal placement of the panels, the deformation changes occurring in the lining under the influence of temperature will be less noticeable. This method allows you to visually increase the size of the room, which is an undoubted advantage for a small steam room. The horizontal fixing of the lining maintains air circulation, since the panels are attached to the vertical slats of the frame, due to which there are vertical gaps. It will be more difficult for rodents to penetrate the finish through such a coating.
In general, everyone can handle the construction of a small bathhouse. To a large extent, the result depends on the diligence and quality of materials, as well as the correct adherence to technology. And such complex processes as the design of the wiring diagram and the installation of metal-plastic windows can be entrusted to professionals.