Each owner of a summer cottage has a need to erect a building in which you can store garden tools and other things necessary in economic activities. A do-it-yourself shed can be used to keep poultry, rabbits, pigs or goats. A workshop or storage room for storing crops is often organized here. In the utility block, you can equip a toilet with a shower, complementing the building with a bathroom.

A garden shed is an irreplaceable building on a summer cottage
Content
- 1 Shed for a summer residence: construction features and basic requirements for it
- 2 How to build a barn in the country: construction technologies
- 3 How to build a barn with your own hands: preparatory activities
- 4 Do-it-yourself foundation for a barn
- 5 Frame shed: features of construction technology
- 5.1 We build a barn with our own hands using frame technology
- 5.2 The floor and walls of a wooden building in the country with their own hands
- 5.3 DIY frame shed roof device
- 5.4 Varieties of roofing for a country shed
- 5.5 How to inexpensively sheathe a barn outside: popular options
- 5.6 Budget and environmentally friendly frame cladding options
- 6 Do-it-yourself shed from foam blocks: the main advantages
- 7 How to make a barn for a summer cottage out of logs, beams or sleepers
- 8 Prefabricated shed for a summer residence: design features
- 9 Ready-made shed in the form of a container: compact and functional structure
- 10 Sheds for animals: design features and requirements for them
- 11 Video "How to build a barn cheap with your own hands"
Shed for a summer residence: construction features and basic requirements for it
Such a building can be temporary or permanent. The second option requires drawing up a draft barn with reference to the site plan. The structure can be designed for specific purposes or be multifunctional, consisting of several compartments. The building is often used as a barn for keeping domestic animals and food supplies. There are special requirements for the construction of such structures.

A shed for a summer cottage can be temporary or permanent
A multifunctional building most often consists of several zones, where a storage room is organized, a toilet and a shower are equipped. By adding a veranda or terrace, you can expand the functionality of the structure by arranging a place for rest and eating.
A number of requirements are put forward for an outbuilding in the form of a barn. The building must be built quickly and cheaply. Despite the fact that it belongs to the category of non-residential, the structure must be solid, reliable and durable, have the minimum comfortable conditions necessary for further operation.Depending on the purpose, the building must be insulated to the required degree. The size of the shed should be selected based on the size of the site and the purpose of the building. It should provide comfortable and free movement of a person.
Helpful advice! A structure that is too tall should not be erected. However, it should be borne in mind that a person must move in it in full growth, without bending.

The barn must be reliable, easy to use and of a suitable size
The construction of the barn is carried out taking into account technical, sanitary and fire safety requirements. If gas cylinders, flammable liquids and other combustible materials are to be stored here, fire safety should be taken with particular care. Proper organization of good ventilation plays an important role in utility units.
How to build a barn in the country: construction technologies
There are three options for building a barn in the country:
- monolithic technology;
- frame construction;
- modular method.

There are several technologies for building a barn: frame, monolithic and modular
Monolithic technology consists in the construction of a structure from building elements in the form of cinder blocks, foam concrete and aerated concrete, brick, cobbled or log frame. This method allows you to get a high-strength, capital and durable construction, which will be quite expensive. You can speed up construction while reducing costs by using cinder blocks or foam blocks. Such masonry is used today quite often for large structures with an area of 20 m² or more.
Frame technology is the most popular in the construction of sheds. Its principle is to create a solid frame, which is the skeleton of a building, from wooden beams or a shaped pipe, followed by sheathing with shields, panels, slabs or wood. Such a do-it-yourself shed construction is carried out at a fast pace and is relatively cheap. At the same time, the proper strength and reliability of the structure are ensured.
The modular method involves assembling a house from ready-made modules that can be made of metal or plastic, which is demonstrated by photos of beautiful sheds. The elements are fastened to each other through the use of special parts. The main feature of such structures is their mobility. The building can be disassembled and moved to another location.
How to build a barn with your own hands: preparatory activities
Before making a barn, you should plan the site with the definition of the location of the future structure. This issue has its own characteristics. The barn is being built on the territory not used for the cultivation of summer cottages. The building should not be located in the lowlands. In the event of heavy precipitation, the building will be constantly flooded.

First of all, before starting construction, you must choose a suitable place for the barn
Depending on the purpose of the shed, it should be located at a remote distance from the residential building and the boundaries of the section with the neighboring site, which is regulated by the current regulatory documentation.
Then you will need to draw up a plan for the future construction with the design of the premises. All dimensions must be listed here. The drawing can be done independently, taking into account personal preferences, or you can use ready-made standard projects of a barn for a summer residence, presented on specialized sites.
The next step is to compile (based on do-it-yourself shed drawings) a list of building materials, which depends on the construction technology of the structure. For frame construction, the amount of material required to create the frame of the structure and finish the building is calculated.In the case of using a monolithic option, the number of masonry material and the amount of mortar that will be needed to complete the work are determined.

Shed plan with an area of 11.15 m2: 1 - shed 7.30 m2, 2 - storeroom 1.75 m2, workshop - 2.10 m2
Do-it-yourself foundation for a barn
Under the shed, you can make one of two types of base: strip or columnar. The first option is arranged for capital frame structures with a concrete base. Lightweight buildings are recommended to be located on a columnar base.
Important! The strip foundation should not be erected in areas with sedimentary soil or peat bog.
A step-by-step technology for laying a strip foundation under a shed with your own hands is as follows:
- making markings for the future building according to its size;
- preparation of a trench 40 cm deep and 30 cm wide;
- filling the groove with a layer of sand with rubble 15 cm high;
- strengthening the bottom and side walls with roofing felt;

For a columnar foundation, it is necessary to dig holes 80 cm in size
- installation of formwork along the perimeter of the trench;
- laying a reinforcing frame in the form of a box of 12 mm thick rods over the entire area of the recess;
- pouring concrete solution.
Important! The foundation should protrude above ground level to the height of the base.
After two to three weeks, it will be possible to start building a shed in the country with your own hands.
Installing a columnar base involves the following steps:
- making holes 80 cm deep under the foundation pillars at the corners of the structure and at the junction of partitions, which should be placed at least 1.5 m;
- backfilling the bottom of the holes with a layer of rubble or gravel with sand 15 cm thick;
- installation of pieces of metal or asbestos-cement pipe or roofing felt sleeves into the holes;

The strip foundation is suitable for frame structures with a cement base
- filling the space between the rack and the ground with sand and gravel;
- filling the pipe cavity with reinforcement with a thickness of 10-12 mm, tied with a wire of 2 mm;
- filling pipes with concrete.
Helpful advice! To improve the waterproofing of the base and extend its service life, the support pillars should be coated with a special mastic.
The posts can be made of bricks or concrete blocks. You can also use oak or larch logs with a thickness of at least 300 mm. Wooden products must be carefully treated with an antiseptic. The lower part of the logs, which is buried in the ground, is covered with bitumen mastic and wrapped in several layers of roofing material. After installing the racks in the holes, the wooden supports are poured with concrete.
Frame shed: features of construction technology
Frame technology is very popular in the construction of sheds, according to which the skeleton of a building is erected, which is subsequently sheathed with finishing material. The frame is created from wood or metal. The last option is used to create a do-it-yourself shed from corrugated board. A wooden frame structure is widespread, which is characterized by increased strength and the ability to withstand significant loads.

The plan of a frame shed with a pitched roof measuring 2.2x2.5x2.7 m
Frame technology makes it possible to build a building in a short time with minimal costs. Since wood is a high-tech raw material, it becomes possible to add additional elements. The material is quite durable, with high thermal insulation characteristics and environmental friendliness.
Wood is characterized by hygroscopicity, which contributes to high moisture absorption with the formation of rot, mold and fungal infections. Therefore, the material needs to be treated with special moisture-resistant and antiseptic compounds, and to extend its service life, it can be covered with an outer protective layer of varnish or paint.
The durability and design of a barn directly depends on the cost of materials. You can build a barn cheaply and quickly with your own hands from an unedged board of spruce, birch or pine, while the building will have an unsightly appearance. A more aesthetic structure will be obtained from high-quality material in the form of edged boards, profiled beams or lining.
We build a barn with our own hands using frame technology
After the base for the shed is completely frozen, you can start building the frame of the wooden shed with your own hands. Its manufacture begins with a lower frame, which will serve as the basis for future construction. Therefore, for its manufacture, you should use a high-quality wooden beam without knots and mechanical damage.

For the frame of the shed, you can use not only timber, but also steel corners, pipes or profiles
Before you make a do-it-yourself shed out of boards, you need to waterproof the foundation. For this, the base must be covered with two sheets of roofing material. This procedure will protect the wooden frame from moisture.
Related article:
Garage: photos of the interior and exterior of auto-premises
Varieties of garages. Room arrangement plan. Wall and floor decoration in the garage. The choice of lighting. Shelving placement. Helpful hints.

The lower frame is created from a bar with a section of 100x100 mm. In the corners, the elements are attached with a dowel. Logs from boards with a section of 50x100 mm at a distance of 50 cm from each other are attached to the strapping ring. The next step is the erection of wooden racks from a bar of the same section as for the lower frame. They are fixed by means of overhead metal plates or can be nailed obliquely.
Important! If a pitched roof is arranged, wooden posts are installed at different heights, which will facilitate further roofing work.
The distance between the wooden posts should not exceed 1.5 m. 0.6 m is considered optimal. In this case, each support will coincide with the upper floor beams and will become a reliable base for the roof. To create additional rigidity, struts are bolted to the uprights and the bottom frame. In the upper part, at a distance of 2 m from the lower crown, the racks are strapped by creating a wooden frame. Door and window openings are formed using vertical posts and horizontal transoms. The distance between them is determined by the dimensions of the structure.

To erect a frame of a barn with your own hands, you must use a high-quality timber
To create a shed frame, not only wooden beams can be used. Here you can apply a steel pipe, angle or profile. The order of erection of the frame in this case remains unchanged. The only difference is that all metal elements are connected by electric welding. Such a frame does not require the construction of a foundation. It can be installed on a sand and gravel embankment.
Helpful advice! The metal frame should be painted before sheathing. The exception is a galvanized profile.
The floor and walls of a wooden building in the country with their own hands
After creating the frame and laying the lags, you can start installing the floor. For a cold shed made of boards with your own hands, it is advisable to use OSB sheets, which are nailed to the logs. On top of them, waterproofing is laid in the form of a sheet of roofing material. Next, a finishing floor is made from grooved or edged boards. The first option is more preferable due to the fact that there are special grooves at the ends of the boards, which eliminate the likelihood of cracks formation, thereby increasing the strength of the floor.
The floor can be insulated. To do this, use mineral wool, expanded clay or foam, which are laid before the installation of the floor covering. For this, the OSB slabs are knocked out from the bottom of the lag. This process is carried out before the stage of erection of the frame racks.If this moment was missed, then the subfloor made of this material is filled with a lag on top. A counter-lattice is mounted on the plates, which is necessary to create cells in which the insulation is laid. Waterproofing is laid under it on the subfloor. From above, the insulation is covered with a layer of vapor barrier. Next, a clean floor is mounted.

If necessary, the floor of the shed can be insulated with mineral wool, foam or expanded clay
Helpful advice! The height of the insulation should be slightly less than the height of the log in order to provide a ventilated gap between it and the floor covering.
Until the walls are finished, the frame must be reinforced with permanent jibs. They are especially needed if the structure will be sheathed with a board or clapboard. The jibs are installed at an angle of 45 °, which provides the best structural rigidity. It is allowed to maintain an angle of 60 ° near doors or windows. Docking of elements with the frame is performed "in a paw" or "half-tree", which eliminates the formation of gaps.
Important! Before fixing the jibs, you should check the evenness of the corners of the frame using a building level or a plumb line.
After completing the installation of jibs and flooring, the walls are insulated. To do this, use foam or mineral wool. From the side of the room, the material is closed with a vapor barrier followed by sheathing, and from the side of the street - with waterproofing, to which a counter-lattice is nailed from slats with a section of 20x40 mm for arranging a ventilation gap.

To strengthen the frame of the barn, it is necessary to install jibs at an angle of 45 °
DIY frame shed roof device
To create a shed roof of a shed with their own hands, wooden boards with a cross section of 50x100 mm are used, from which the rafters are made. It is most convenient to assemble the structure on the ground and fix it in finished form on the frame racks. The rafters are attached at a distance of 0.7-0.8 m from each other. A crate is mounted on top of them. For this, strips of unedged boards are installed with a gap of 15-20 cm from each other (in the case of using slate as a roofing material). If rolled products are used, then the pitch of the crate should not exceed 2-3 cm.
Important! The lathing must be covered with a waterproofing material.
You can do without rafters. For this, the front wall of the frame is made 50 cm higher than the back one, as shown in the drawing of a shed in the country house with your own hands 3x6 with a pitched roof. In this case, the floor beams are laid on the upper harness with a certain slope. They will play the role of rafters. With this option, the overhang of the roof should be organized, which is ensured by overlapping beams 50 cm in front and behind the structure.

Wooden boards are used to create a roof in a frame shed.
To obtain an attic space, a gable roof is erected above the shed, which is formed by triangular rafters that are attached to the upper frame of the frame. In this case, the front and back walls of the frame must have the same height.
Varieties of roofing for a summer cottage
You can use metal tiles, slate, ondulin, flexible shingles, roofing material or profiled sheet as a roofing covering of a shed for summer cottages. One of the most budgetary options is slate, which is characterized by durability, good strength, and weather resistance. However, it is quite fragile and therefore requires careful handling. When installing it, there is no need to fill a reliable crate. The material has low aesthetic properties, which is not so important for a shed in the country.
Metal roofing is also an inexpensive material that is characterized by durability, wide range and attractive appearance. When installing the coating, one should beware of scratches and other damage that will lead to corrosion.
The professional sheet is similar in its technical and operational characteristics to metal tiles. However, it costs much cheaper and has a simpler appearance, which is clearly shown in the photo of the barn with your own hands from corrugated board.

Soft tiles, slate, roofing material, ondulin or profiled sheet are used as roofing
A cheap and simple roofing covering is a roll roofing felt. It is distinguished by ease of installation, carried out in several layers, and low aesthetics. Soft slate is represented by ondulin, which is lightweight, flexible, easy to install and has an aesthetic appearance. However, the material is flammable.
Flexible metal tiles have good operational and aesthetic performance. However, the material has a relatively high cost, so it is impractical to use it as a roofing barn.
How to inexpensively sheathe a barn outside: popular options
For sheathing frame wooden sheds with your own hands, you can use clapboard, wooden board, OSB sheets or profiled sheets.
The most popular and cheapest option is to use unedged boards. They are dismantled into elements of the required size, which are used for the outer skin of the frame. However, in such a facing, gaps form over time, which can be closed with wooden planks. But it is better to perform sheathing with a herringbone overlap. With this technology, each subsequent row of boards is poured onto the lower tier with its edge.

You can use unedged boards for sheathing the shed outside.
Slightly more expensive in cost, but easier to cut and install are OSB boards. It is important to position the elements in such a way that their joints fall in the center of the frame posts. This material does not deform under the influence of moisture and does not rot. However, to create additional protection and give the structure a more attractive appearance, the surface should be painted.
To organize a cold warehouse, you can use a profiled sheet, the elements of which are attached to the wooden frame with self-tapping screws. Sheets should be overlapped by 15-20 cm. If the structure is set aside for keeping animals or for a workshop, the walls of the shed from the corrugated board are sheathed from the inside with insulation material.
A polycarbonate shed is being built for indoor poultry walking. The technology for installing honeycomb plastic is similar to installing OSB boards. Fastening is carried out using self-tapping screws with a wide head and a sealing washer.
Budget and environmentally friendly frame cladding options
One of the cheapest and most popular materials in rural areas is compressed straw blocks, which are also environmentally friendly. Such bricks are treated with a special compound that protects them from fire. They have good strength and heat retention properties. Straw bricks fill the gaps in the wooden frame, therefore, intermediate racks are installed during its construction.

Pressed panels or straw blocks - an inexpensive and sustainable cladding option
The resulting barn walls are finished with clay plaster, which is applied to a steel mesh fixed over the straw. The thatched building is characterized by a minimal cost, and in terms of heat engineering characteristics it surpasses sheds made of cellular concrete and bricks.
Another budget option is to use sawdust concrete. For this, a flat and solid formwork is constructed from OSB sheets, which is securely attached to the building frame. Next, a layer-by-layer pouring of a mixture of sawdust and cement mortar in a ratio of 2: 1 is performed.
You can make a cheap and at the same time environmentally friendly shed for domestic animals using clay. It is a mixture of clay, wood and cement-sand mortar, which is used to fill the voids in the frame of the structure.The result is a robust design with high energy efficiency.
Do-it-yourself shed from foam blocks: the main advantages
For the construction of solid outbuildings, blocks of cellular gas or foam concrete are most often used. The main advantages of the material are:

Plan of a small country shed made of foam blocks measuring 6x4x3 m
- large size of products, which allows you to perform work quickly and conveniently;
- precise geometry, which reduces the labor intensity of the process;
- low weight of the product, which is 11 kg;
- low thermal conductivity due to the porous structure of the material, which allows you to retain heat for a long time;
- increased frost resistance;
- good sound insulation properties;
- high hygroscopicity, which allows the material to breathe, removing water vapor outside, while preventing the likelihood of mold and dampness in the room;
- incombustibility;
- pliability of the product when sawing (due to the porous base);
- environmental friendliness of the material;
- low cost.
However, the material can be used for buildings no higher than 10 m, due to the limited strength of the material. Another drawback is the unattractive appearance of the products, which requires additional finishing of the walls of the barn for giving with your own hands from foam blocks.

Foam blocks have high frost resistance, low thermal conductivity and good noise insulation
How to make a shed with your own hands from foam blocks
Before building a shed from foam blocks, a strip foundation is erected, the manufacturing technology of which is described above. The blocks are laid on a waterproofing material covering the base. In this case, roofing material or hydroisol can be used. For laying blocks, an adhesive mixture should be prepared, which consists of sand and cement in a ratio of 1: 3. The first row starts from the corner of the building and continues along its entire perimeter. The thickness of the seam between the products should not exceed 30 mm. After laying the first row, the wall is checked for evenness using a level.
Helpful advice! To obtain a strong and strong structure, after every third row, reinforcement rods with a diameter of 80 mm are placed on the blocks.
The last row is covered with waterproofing material. Next, the roof of the shed is created. For a small building (no more than 3 m wide), a single-pitched version is suitable. For do-it-yourself sheds 6 by 6 m, it is better to equip a gable roof, the installation description of which is given below.
With the help of metal studs, a Mauerlat in the form of a wooden bar with a section of 50x150 mm is attached to the upper row of masonry. The distance between the studs should not be more than 120 cm. The extreme trusses are installed on the Mauerlat, which form the pediments. For ease of installation, the rafters are assembled on the ground and then lifted for installation. All elements should be connected to each other using metal fasteners and overlays. The installed rafter structure is covered with a waterproofing membrane, on top of which the crate is stuffed. The selected roofing material is attached to it.

Blocks must be laid on a waterproofing material
Next, the outer surface of the walls of the dacha building is insulated with their own hands using the selected material. Most often, foam plates are used, which are glued using a special composition. The slopes of windows and doors should be strengthened using aluminum squares. Further, the insulation is covered with an adhesive mass 3-4 mm thick, into which the reinforcing mesh is embedded. After complete drying of the surface, which comes after 48 hours, the walls are plastered and painted. They can also be sheathed with siding or profiled sheet, which will give the structure a more aesthetic appearance.
Other options for block material for building a barn
An alternative to foam concrete blocks is wood concrete.It is often used for the construction of utility rooms. The material is characterized by increased strength, high vapor permeability, low thermal conductivity, rodent and mold resistance. At the same time, in comparison with foam concrete, it is less fragile. The material has low frost resistance and moisture resistance.
To build a shed with your own hands 3 by 3 m, you can use a brick. The material is reliable, moisture resistant, fire resistant, rodent and mildew resistant. Having an attractive appearance, the walls made of bricks do not need subsequent cladding. At the same time, bricks are expensive. Brickwork is a laborious process. In addition, the material is characterized by significant weight, which requires a reliable base device, and this will entail additional costs.

A suitable block material for the construction of a barn is brick
For the construction of an outbuilding, you can use a stone from a quarry, which is laid on a cement-sand mortar. Such a structure cannot be called warm, therefore it requires additional insulation from the inside with mineral wool. The outer surface of the walls can be sheathed with clapboard.
How to make a barn for a summer cottage from logs, beams or sleepers
You can build a shed with your own hands from logs or timber. The material is characterized by high thermal insulation performance, so it can be used to equip a workshop or a place for year-round keeping of animals. The service life of the structure can be up to 70 years. The assembly of the structure should be carried out by specialists in order to exclude the possibility of errors and mistakes in work.
Important! Firewood should not be stored in a log or log shed, since there is insufficient ventilation in the room to dry the heating oil.
For the construction of a building in the country, a beam with a section of 100x100 mm or 150x150 mm is suitable. Elements are laid on a strip or columnar foundation. The first crown is treated with an antiseptic. The beams are cut to half the width of the product to ensure good grip. The length of the elements must match the width of the wall. Depressions in logs are made in the form of a semicircle or an angle along the entire length. It is necessary to lay a layer of insulation material between the rows. For this, tow or jute is used. To ensure the strength of the structure, the crowns must be connected with pins, which is clearly shown in the photo of sheds from a bar.

It is recommended to entrust the construction of a shed from logs or timber to specialists
The barn can be made from old wooden sleepers. Such a structure will be solid and durable. The walls are erected by stacking sleepers on top of each other. In the corners, the elements are tied with steel staples, which are hammered into the upper edges of the beams, making the connection of the joined crowns. Along the perimeter, staples are hammered into the side faces of the elements.
There is another installation option. To do this, one part of the sleepers is dug into the ground along the perimeter of the structure. The remaining elements are trimmed at the ends with a chainsaw so that a thorn is obtained. A groove is formed on the pillars by stuffing two beams onto the sleepers. Further, sleepers are inserted into the prepared grooves. The elements are fixed between themselves using brackets.
Prefabricated shed for a summer residence: design features
The prefabricated shed is made of separate elements according to the principle of a constructor. The cost of such a structure will exceed the costs required for the construction of a frame or block structure. The buildings are distinguished by their mobility and high construction speed. A prefabricated shed with your own hands (photos clearly show different options) can be made on the basis of:
- sandwich panels;
- SIP panels;
- plastic panels.

A shed for a summer cottage can be assembled from plastic, SIP or sandwich panels
SIP panels consist of two layers of wood, between which insulation is placed. Sandwich panels have the same structure, only metal sheets are located on the sides of the insulation material.
The first stage of the assembly of the structure involves the creation of a frame. Then standard elements are attached to it, specially made for a certain construction option. The assembly of the structure is carried out on the basis of detailed instructions with a drawing.
SIP panels can be made by yourself. To do this, you need OSB boards, foam plastic, glue and wooden beams. The assembly takes place according to the "sandwich" principle. An adhesive composition is applied to the OSB sheet laid flat. Styrofoam is laid on it so that there is free space for the docking bar along the contour of the product. Glue is applied to the insulation, and then the second sheet is laid. The load is evenly distributed over the entire area from above to the resulting structure.
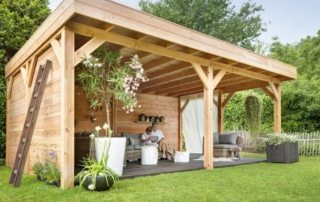
Plastic shed for a summer residence: characteristics of the structure
Such a beautiful shed is made of frost-resistant composite plastic, which is characterized by strength, wear resistance, reliability and practicality. The material is resistant to sunlight, moisture, does not corrode and attack by harmful insects, mold and mildew do not form on it. Despite its low weight, such a structure is capable of withstanding constant and prolonged loads. For a long service life, plastic, unlike wood, does not need to be treated with special compounds. With proper use, such a building will last at least 15 years.

Plastic shed - practical, reliable, durable and durable
The ridge of the roof is made of transparent material, which makes the room light in the daytime. The design is characterized by passive ventilation, which ensures the unhindered movement of air masses inside the shed, so that the air does not stagnate and the room remains dry. The service life of the facility is about 25 years. The plastic construction is suitable for setting up a workshop or garden storage space. It is not recommended to use this structure for keeping animals, which is due to its small area and lack of insulation.
Modern models of plastic sheds for summer cottages - the photos clearly confirm this - attract attention with a neat and stylish appearance. Such a barn can become a real decoration of a summer cottage. Such a structure is assembled without assistance in 2 hours. The work is carried out without the use of additional fasteners, complex tools and the use of welding. There is no need to build a foundation for this structure. The object is mobile, which makes it possible to transport the structure to a new location.
Helpful advice! Do not move the plastic shed often, as its fasteners will loosen, as a result of which the structure will lose its proper strength and reliability.
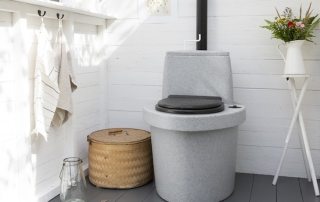
Ready-made shed in the form of a container: compact and functional structure
Today you can buy a ready-made metal shed for a container-type summer cottage. The basis of such a monoblock structure is a rigid metal frame, sheathed on the sides with metal with an insulating layer, where the electrical wiring is laid. Such a shed looks like a container.

Container shed - compact and robust design
The internal content of different models can vary significantly. There are models with shelves in a barn, which resembles a pantry. Some structures are equipped with a canopy for arranging an open terrace. There is an opportunity to purchase a ready-made barn for a summer residence with a toilet and shower. Multifunctional containers are recommended to be used as a small country house while the main building is being built. The container can be sold later.
To install the finished structure, no foundation is required.It can be placed on a concrete slab. The container is delivered ready-made and mounted using a truck crane. Such sheds have a high cost and not very attractive appearance, which is offset by the durability and practicality of the structure.
Sheds for animals: design features and requirements for them
Sheds for animals belong to a separate category of household units, to which special requirements are imposed. The building for domestic animals must be well ventilated. This is primarily due to the large amount of animal droppings inside the building. It is chemically active and releases ammonia. The consistency of the droppings and the rate of drying are different for different animal species. The shed can be additionally equipped with a place for storing manure and manure, which are valuable fertilizers.

The animal shed must be well ventilated, environmentally friendly and insulated
The location of the livestock shed on the site is strictly regulated by regulatory documentation. The structure must withstand significant loads and mechanical stress. This is especially true for barns. It should also be borne in mind that some species of animals like to gnaw wood. Therefore, you should not build a shed of wood, additionally impregnated with bactericidal and water-repellent compounds, which can be fatal to some species of animals.
For chickens, the structure should be made of chemically resistant material and equipped with good ventilation. For pigs, a prefabricated wooden shed with a reinforced frame is suitable. For goats, a shed made of wood is undesirable. The barn must be warm and secure. It can be performed on a strip foundation made of block material, followed by insulation.
A barn in the country is an irreplaceable multifunctional structure that can be built from any building material. The installation technology directly depends on the purpose of the building, its size and the financial capabilities of the owners. In order to build a barn in the country, the price of the work of which will depend on the version of the building, it is important to use high-quality material and follow the algorithm of actions when erecting a structure of the selected type. With a good financial opportunity, you can purchase a ready-made mobile shed for a turnkey summer cottage in the form of a container or a set of structural parts for self-assembly.