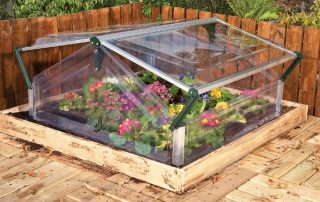
Growing crops early is always a serious risk that external factors will become a hindrance, robbing crops and devaluing all efforts. Therefore, summer residents try to protect their plants from weather changes, providing them with the most comfortable conditions. One of these ways is to use open-top polycarbonate greenhouses. Let's consider what are the advantages of such a design and how to make it yourself.

Thanks to the opening roof, it is easy to ventilate in a polycarbonate greenhouse, thereby controlling the optimal temperature and humidity
Content
- 1 Open top polycarbonate greenhouses: features and purpose
- 2 Greenhouses made of polycarbonate with an opening roof: types and advantages
- 3 How to choose a place to install a polycarbonate greenhouse
- 4 How to install a polycarbonate greenhouse with your own hands: step by step instructions
- 4.1 Choosing the right material for creating a greenhouse frame
- 4.2 How to make a foundation for a greenhouse with your own hands
- 4.3 DIY polycarbonate greenhouse assembly: "Snail" model
- 4.4 Additional tips for assembling a polycarbonate greenhouse "Snail"
- 4.5 Features of the assembly of the greenhouse "Zucchini" video instructions and recommendations
- 4.6 Belgian greenhouse: design description and installation features
- 5 How to properly care for greenhouses and polycarbonate greenhouses
- 6 How to choose and buy a polycarbonate greenhouse with an opening top
- 7 Do-it-yourself polycarbonate greenhouse installation: video instruction
Open top polycarbonate greenhouses: features and purpose
A greenhouse is a structure for agricultural purposes, which is designed for growing seedlings or small plants in greenhouses. Due to the fact that the walls of the greenhouse are made of a transparent material that does not interfere with the penetration of sunlight, the soil inside heats up, and the moisture does not evaporate as it does in open ground. As a result, the most favorable conditions for plants are created inside: high and stable temperature, as well as humidity.

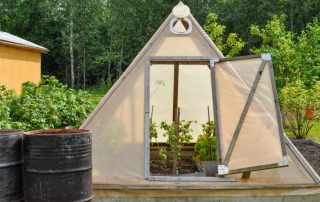
A compact opening greenhouse for seedlings with a shelf for garden supplies and fertilizers can be built independently without large financial investments
Helpful advice! If you want to provide plants with comfortable conditions, you can increase the level of CO2 in the greenhouse. To do this, just place it next to a place where any organic waste decomposes.
It is important not to confuse a greenhouse with a greenhouse, since these structures have serious differences from each other, and first of all it concerns their dimensions. Greenhouses are much larger than greenhouses in size, and may well be used for growing large crops.Greenhouses, as a rule, do not exceed human height in height and are used for seedlings or small plants.
The standard dimensions of a greenhouse do not exceed 1-1.5 m in length, 1-1.5 m in width if the structure is single-leaf and 2-3 m if it is double-leaf. In length, such a structure can be from 1.5 to 4 m, depending on the wishes and capabilities of the owner.
Buildings of this type are used to grow a variety of crops, including all kinds of greens: dill, parsley, lettuce, lettuce, sorrel; vegetables: carrots, onions and others. You can also grow berries such as strawberries, strawberries. Often, greenhouses are also used to grow flowers.

Open-top polycarbonate greenhouses are convenient for growing small plants such as aromatic herbs, peppers or strawberries
It is important to understand that placing plants inside a greenhouse is only one of the stages of growing them. In the future, you will have to constantly monitor that the conditions inside the structure are comfortable for the grown plants. Overheating or freezing must not be allowed. It is for this purpose that opening doors are used, which allow you to regulate the temperature and prevent dehydration and death of plants.
Greenhouses made of polycarbonate with an opening roof: types and advantages
Open-top greenhouses gained their popularity due to the ease of use of this design. But at the same time, one should not overlook the fact that structures of this type may differ from each other, and have their own characteristics and advantages. Among the main types, three options are worth noting:
- Greenhouse "Snail" is a structure with a cross-section in the form of an arch. One or both doors of such a structure open, giving the owner access to the plants.
- The greenhouse "Zucchini" is another structure with an arched section. This differs from the previous version in the way of opening: the sashes rise up, which is often associated with the wings of an insect. Because of this, you can often find the second name of this greenhouse - "Butterfly".
- "Belgian greenhouse" - not so popular, but still quite well-known among summer residents option. Outwardly, the body of this design resembles a box or chest, the top cover of which rises. In this case, the upper part of the greenhouse can be single-slope or gable.

"Belgian greenhouse" from the manufacturer is equipped with a special holder for the lid
According to greenhouse owners, each of these options has its own advantages, and is worthy of being installed on the site. Consider the main positive aspects of using such structures:
- the size of the greenhouses allows them to be installed in almost any, even a very small area;
- low cost is another advantage of such greenhouses. All the materials required for the manufacture of the structure have a completely affordable cost, which makes it possible to purchase such a greenhouse or make it yourself;
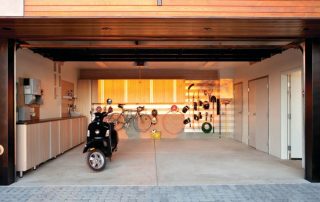
- greenhouse constructions are mobile. The owners do not have problems in order to dismantle the structure or simply rearrange it to another place, because the size and weight of a polycarbonate greenhouse is not at all large;
- effective use of the entire territory that is allocated for the greenhouse. Thanks to the opening roof, the owner can access any plant located inside the structure;
- there is no need to buy a ready-made greenhouse if you can devote a little time and effort. With minimal financial costs, it is quite possible to build a structure with your own hands, especially if you have a basic set of tools and the ability to handle them.

In order to make it convenient to open and fix the lid of a small greenhouse, you can use the old mechanism from the cabinet
Helpful advice! To buy the most convenient greenhouse, you can view as many design options as possible on the Internet. To do this, you need to set an exact query in the search engine, indicating the city in which you live. For example, prescribe "Greenhouses made of polycarbonate with an opening top Cherepovets". In the photo section you can see all possible options and prices.
How to choose a place to install a polycarbonate greenhouse
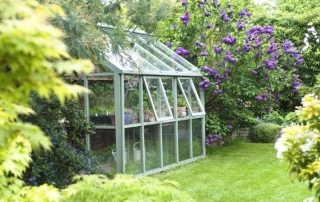
The owners of summer cottages do not always have the question of where to locate the greenhouse. Indeed, in most cases, the territory is initially small, so that the structure is placed where it is located. But even in this case, it is worth taking care of its correct location. As for large plots, where there is enough space for a greenhouse, here you need to try to comply with all the necessary conditions, which will allow you to get a high yield in the future.
Regardless of the size of the plot, the greenhouse should be positioned so that it "looks" to the south or east. This will provide the plants with ample sunlight. As practice shows, in greenhouses that are located to the north or west, most crops grow worse.

Before installing a greenhouse, it is worth considering its location so that the plants receive enough sunlight and heat.
In addition, it is important to ensure that the greenhouse is located in a well-lit area. Trees and walls of buildings should not interfere with the penetration of sunlight, as this is extremely important for their growth and development. At the same time, it is worth providing the structure with protection from the north, since it is from this side that the coldest winds blow.
Helpful advice! In addition to all objective factors, when choosing the location of the greenhouse, it is also important to consider the convenience of its use. The most important thing is that you have free access to any point of it and can open the top without any problems.
How to install a polycarbonate greenhouse with your own hands: step by step instructions
Looking through photos of polycarbonate greenhouses, you can see that they all have a fairly simple design, the independent production of which does not require too much effort. But in order for the resulting design to meet all the requirements and be durable, you need to try to comply with some recommendations. We will consider each step of the construction step by step.

Ready-made polycarbonate greenhouse easy to install as the kit includes all necessary mounts, holders or assembly instructions
Choosing the right material for creating a greenhouse frame
You can make an open-top greenhouse from almost any material. However, this will largely determine its operational life and will affect how comfortable it will be to use and how often you will have to face the need for repair work. Let's consider the most common materials and their characteristics.
Wooden frames for the same greenhouses are not used too often, although it should be admitted that this material is used for this purpose more often than others. Now they are gradually abandoning it, which is due to its two significant shortcomings: a tendency to rotting and drying out. In addition, wood can be a habitat for insects.
A much more durable greenhouse will turn out if you use a galvanized profile for the frame. This is a very durable material, so that the structure made from the profile will not be afraid of precipitation and strong winds. In addition, the material is easy to work with, allowing assembly even by one person.

When choosing a material for a greenhouse frame, it is worth considering the required service life and the possibility of rearranging the finished structure
For the assembly of the frame, you can also use galvanized corners. Due to this, the structural strength will be extremely high, however, the cost of the greenhouse will be slightly higher.It is because of the extra spending that summer residents do not use this material too often, especially when it comes to building a small greenhouse for seedlings or greenery.
Another, very convenient, but not so expensive option is metal-plastic pipes. They are very flexible, due to which it is easy and convenient to work with them, giving them the desired shape. The finished structure will be lightweight, and if necessary, it can be easily rearranged to another place.
Helpful advice! If you need to make a temporary structure, and at the same time you need to spend as little money on it, then the ideal option would be to use plastic pipes and plastic wrap.
If you value reliability and durability, then you should pay attention to aluminum pipes. This is a rather expensive material, which, nevertheless, can last for many years. But such a structure should not be installed in an uncovered and unguarded area.

In the case of using wood in the construction of a greenhouse, you should take care of covering such elements with special paint on wood for outdoor use.
How to make a foundation for a greenhouse with your own hands
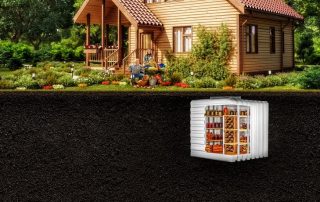
The foundation is no less important part of the greenhouse than the frame or covering material... It acts as a support, as well as a heat-insulating layer, preventing the soil from freezing inside the structure. In addition, a favorable environment remains inside the greenhouse, which is formed due to the decomposition of organic residues.
Given the fact that a polycarbonate greenhouse is lightweight, it is quite possible to do without a foundation. But if you do not plan to move the greenhouse, then it is better to take care of arranging the foundation made of brick, timber and concrete.
The simplest algorithm of actions is as follows:
- Marking is performed along the perimeter of the future greenhouse.
- According to the marking, it is dug out trenches with a depth of 10-25 cm.
- A third of the trench is covered with sand.
- Bricks or a box made of timber of a suitable size are laid inside.
- Any space remaining in the trench is filled with gravel. Although it is perfectly acceptable to just cover it with earth.
- The frame is fastened to the foundation using long metal pins, each of which is hammered into the ground by 50-70 cm. This method allows you to fix the greenhouse as efficiently as possible and prevent it from moving even in the event of very strong winds.

When erecting a foundation and a box for a greenhouse, you can immediately equip warm beds for plants, thereby providing fertilizing for vegetable crops
DIY polycarbonate greenhouse assembly: "Snail" model
This design provides for the possibility of opening one or two side flaps by sliding up and back. This model is often referred to as the "Bread Box" due to a similar mechanism of action. The moving parts are attached by means of hinges, due to which the possibility of their movement is ensured.
Related article:
Greenhouse Butterfly: features of self-assembly of the structure
Disadvantages and design features. Self-assembly: choosing a location, assembling the frame and installing the covering material.
Most often, for the frame of a greenhouse with an opening roof of this type, a profiled pipe is used, which has a section of 20x20 mm. Cellular polycarbonate 4 mm thick is ideal for cladding.
Helpful advice! It is highly not recommended to use a wooden beam for the construction of a frame of such a structure. This material does not bend well, which significantly complicates the construction process.
In order for the structure to end up being strong enough, in addition to the basic elements of the frame, additional arcs must be installed, which are designed to strengthen the greenhouse.

In order for the coating to serve for a long time, polycarbonate greenhouse from arcs should be fixed using special fasteners, profiles and plugs
As an example, consider how to assemble a ready-made kit for a greenhouse, taking into account the fact that the procedure for its independent construction is not much different from a standard assembly, except for the need to carry out calculations and cut materials.
- All elements are unpacked and laid out on the ground. This also applies to polycarbonate sheets. In this case, it is imperative to determine on which side the stabilizing coating is located.
- One of the polycarbonate sheets is applied to the end part of the frame and fixed with roofing screws or thermo washers. Moreover, the second option is preferable, since this will eliminate the risk of deformation and swelling of the coating in case of exposure to high temperatures.
- Using a sharp construction knife, the polycarbonate is trimmed around the edge. The same is done for the second end of the structure.
- Then both ends are connected with horizontal elements, thus forming a single structure.
- The frame is assembled with a hinged greenhouse wall and a polycarbonate sheet is laid on top. Using the same roofing screws, the polycarbonate is fixed to the frame. Next, you need to cut off all the excess with a construction knife.
- It remains only to connect all the components together and check the serviceability of the movable mechanism, which is provided for comfortable opening of the sash.

For fastening steel profiles, special corners are used, which ensure the reliability and durability of the entire greenhouse
Helpful advice! Be sure to use special plastic plugs to close the ends of the profile pipes. So, you can prevent moisture from entering the frame. Also, to prevent corrosion, treat all fasteners with cold zinc.
Additional tips for assembling a polycarbonate greenhouse "Snail"
For a comfortable use of the greenhouse, it is important to take care of the little things. For example, in order to lift the opening sash it was convenient, you need to screw the handle to it. This can be done with small screws.
It is also worth considering the possibility of locking the lid in the open position. This will avoid dangerous situations when, as a result of a strong gust of wind, the sash spontaneously closes, which can injure the owner or render the polycarbonate unusable.

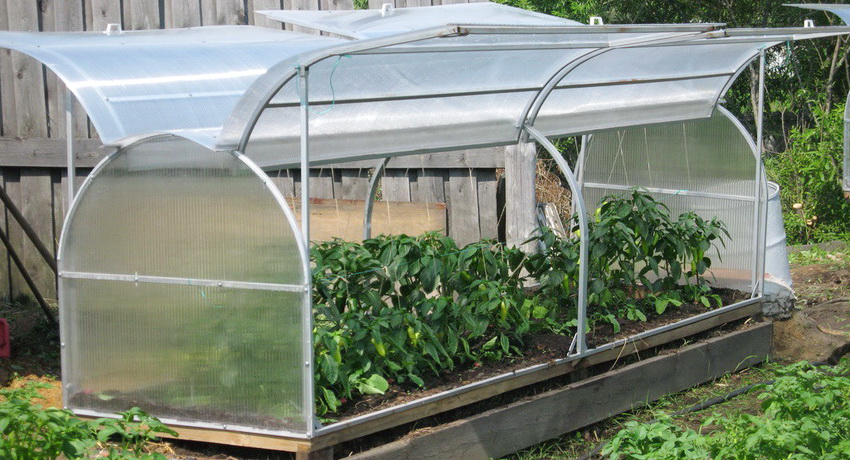
The Snail polycarbonate greenhouse model is one of the most popular solutions for growing tomatoes and cucumbers
Helpful advice! It is important to note that a greenhouse with a lid will not be completely sealed, since there will be a gap between the opening part and the main frame, one way or another. This is not a problem, but on the contrary, natural ventilation, which will allow the plants to feel comfortable, and also ensure the movement of the sash.
Before you start using the greenhouse for its intended purpose, you need to take care of its internal arrangement. The ideal option is a system of warm beds, which you can do yourself. For this purpose, in advance, you need to prepare a pit 50-60 cm deep under the greenhouse, which is filled with organic residues.
The remains are stacked in stages, depending on the size: the largest are placed under the bottom, and the smallest on top. The topmost layer (about 15 cm) is fertile land. All this is watered with microbiological fertilizers that promote the decomposition process. Such beds will be full of nutrients and will positively affect the growth of the planted plants.

Ready-made constructions from the manufacturer can be equipped with special mechanisms for fixing the greenhouse cover
Features of the assembly of the greenhouse "Zucchini" video instructions and recommendations
Greenhouse "Shell", aka "Zucchini" differs from the previous model in the way of opening the moving sash. In this case, it is not moving backward, but upward.This mechanism is similar to opening the lid of a chest. In this case, if desired, you can make it so that one or both flaps open.
The selection of the site and the preparation of the foundation in this case occurs according to the standard scheme. After that, you can proceed to the assembly of the frame itself. As in all other cases, you need to start assembling the structure from the ends. They are represented by two vertical posts, which are used to fasten the structure to the foundation or ground.
Then the assembly of a greenhouse with an opening top consists in connecting the elements of the hinged cover, which are connected to each other using special horizontal ties and by welding. The cover is attached to the main frame with hinges. At the same stage, you need to take care of the presence of open position latches, which will hold the sash in the open position.

Greenhouse "Zucchini" opens from two sides, which provides easy access to each planted plant
After the structure has acquired an integral appearance, all its connections must be checked for strength and treated with an anti-corrosion coating or paint, which will act as a protective layer.
Polycarbonate sheets are in turn applied to a part of the frame, attached with self-tapping screws, after which all excess is removed.
Helpful advice! In order to extend the life of the covering material, it is recommended to use a sealing tape. With its help, you can glue all ends.
Each of the doors must be equipped with a convenient handle for opening, and during the installation of the structure, you must use a building level to make sure that all supports are driven in evenly.
Belgian greenhouse: design description and installation features
The main difference between this model and those that were considered earlier is the absence of any rounded elements. This greatly simplifies the assembly and installation process, and also provides more options for the choice of materials. For this purpose, both a profiled pipe and a wooden beam are suitable. The instructions for these materials will be the same.
Work begins with calculations and determination of the parameters of the future greenhouse. According to the drawing, cut the timber or profiled pipe into elements of the appropriate size.
A simple rectangular frame is assembled with corners and self-tapping screws, if we are talking about a wooden base. For a metal pipe, you can use bolts and nuts, or you can simply weld all the elements together. In the same way, vertical posts are attached to the lower base. In order for the structure to be durable, additional rafters are installed between the racks.

An example of the implementation of a simple design of a greenhouse with an opening lid, which can be easily moved to another location
The greenhouse cover is assembled separately and attached to the frame with hinges. Here, as in the assembly of all other models, you need to take care of the lid lock in the open position.
After the frame is completely ready, all that remains is to cut and secure the polycarbonate. To do this, remove the packaging film from it and attach each of the sheets to one of the sides of the greenhouse. The material is fastened with roofing screws, after which it is cut to the desired size.
The Belgian greenhouse is perfect for installation both on a foundation and on an open ground. And provided that it is not too large, you can easily access any of its points, which will ensure comfortable work in the beds. And if you watch a thematic video before starting work, assembling a polycarbonate greenhouse will not be at all difficult.

The Belgian greenhouse is rarely found in garden centers or on specialized sites, but if necessary, it can be ordered from private producers
How to properly care for greenhouses and polycarbonate greenhouses
One of the main advantages of polycarbonate greenhouses is a long service life and material resistance to external factors. But it is important to understand that the period that the structure will serve you directly depends on how well you take care of it.
Proper care of a polycarbonate greenhouse includes a number of measures aimed at preparing the structure for the winter period. First of all, it is necessary to remove all residual vegetation. If there are removable shelves inside or containers are installed, they also need to be dismantled and taken out.
Given the fact that the greenhouse has so-called "closed ground", it must be treated, which will help prevent the development of pathogenic bacteria that can further harm the plants. For this, the top layer is treated with special disinfectants or simply removed.

The main stage in preparing the greenhouse for the winter period is the replacement or fertilization of the soil.
Each inner wall must be treated with a special soap-based solution. With its help, each seam and joint is processed, since it is in these places that microorganisms most often accumulate. Moreover, some insects can lay larvae there. Use a soft sponge or rag to clean the walls. Any harsh impact is unacceptable as it may damage the polycarbonate.
Important! It is not recommended to use chemically active solutions for cleaning the greenhouse, since they will negatively affect the characteristics covering material.
After processing, the walls should be allowed to dry naturally, after which the greenhouse will be ready for winter.
How to choose and buy a polycarbonate greenhouse with an opening top
Looking through photos of polycarbonate greenhouses, many are wondering how to make the right choice and which option to give preference to. In fact, all the options considered are easy to use and at the same time look quite aesthetically pleasing. Therefore, one of the main criteria that should be followed is the cost of the structure and materials for its construction.

When buying a greenhouse, you should pay attention to the quality and reliability of small parts, since they are the first to fail.
Consider the approximate cost of several structures of different types and sizes:
- Provided that quality material is used for manufacturing, a 2 m long "Snail" greenhouse will cost an average of 4-6 thousand rubles. Of course, you can find options both more expensive and cheaper, but here it is important to understand that quality directly determines the cost, and therefore you should not purchase a frame that is too cheap. The use of soft or thin metal will reduce its cost, but the slightest stress will deform and malfunction the opening system.
- As another, more ambitious example, consider a construction of the "Zucchini" type, the size of which is twice the size of the previous version. Its cost will be about 5-7 thousand rubles. In this case, it is worth paying attention to the fact that the frame you are purchasing has a sufficient number of additional stiffeners that will not allow such a long greenhouse to sag and deform under a layer of snow.
- Looking through a photo of a greenhouse with your own hands of the "Belgian" type, you can make sure that this structure is simpler in its structure than all the others. In addition, it should be noted that large manufacturers do not often undertake the production of greenhouses of this type, so if you need to purchase a ready-made frame, most likely you will have to order it from a small entrepreneur and pay the price that he will indicate.
It is important to understand that speaking about the cost of a greenhouse, this price does not include the cost of the covering material.That is, polycarbonate will have to be bought separately, and this should be counted on when planning the construction budget.

Polycarbonate is a reliable and durable coating that perfectly transmits sunlight, which favorably affects the growth and quality of crops
Do-it-yourself polycarbonate greenhouse installation: video instruction
Each of the mounting options we have considered is a simple yet effective way to make an open-top polycarbonate greenhouse suitable for growing seedlings and small crops. Of course, there are no problems in order to purchase a ready-made structure, but many summer residents still prefer home-made structures, believing that only on their own you can realize an ideal polycarbonate greenhouse. The video of installing the frame and covering the greenhouse with covering material clearly confirms that all stages can be done by hand.