When planning to carry out repair work in the house, it is worth thinking not only about the design of a stylish and modern interior, but also about how to provide comfortable living conditions. One of these methods is laying a warm floor under the tiles. Let's consider how to carry out all the necessary work as simply as possible and what to look for in the process of self-installation.

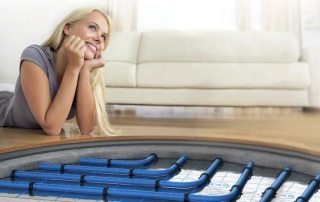
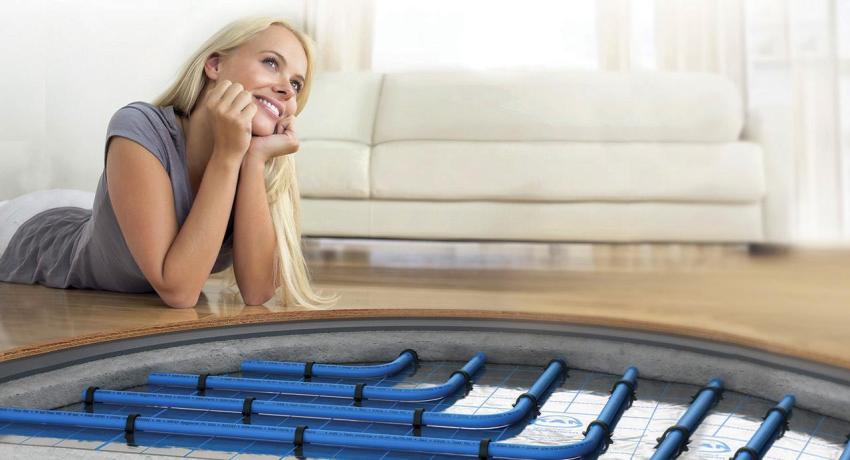
Underfloor heating is an effective solution for additional or primary space heating
Content
- 1 Benefits of installing a warm floor under the tiles
- 2 Laying underfloor heating under tiles: features of choosing a system
- 3 Water underfloor heating under tiles: features and benefits
- 4 Features of the device of an electric underfloor heating under tiles
- 5 Electro underfloor heating: varieties and classification
- 6 How to make an electric warm floor with your own hands
- 7 Technology for laying tiles on the floor with a heating system
- 8 How to install a warm floor with your own hands: video instruction
Benefits of installing a warm floor under the tiles
Underfloor heating has a lot of positive characteristics and, provided that all recommendations are followed, it can have an extremely positive effect on many aspects, increasing the level of comfort for everyone living in the house.

Ceramic tiles have a high level of thermal conductivity, which allows you to effectively use the underfloor heating system to heat the room
First of all, this is due to the uniformity of heat distribution in the room. Due to the fact that the bulk of the warm air is located at the bottom, the overall temperature in the room will be as favorable as possible, because, as you know, warm air is easier and tends to rise up.
Interesting! From a medical point of view, distributing the air so that the legs are warm and the head is cool is considered the best option.
In the case of using heating devices such as batteries and converters, the air moves more actively in the room, due to which the number of drafts increases, and, accordingly, the amount of dust raised. Warm floors operate in a different way, which also has a positive effect on health.
As for ceramic tiles as a finishing material laid on top of such a system, this is an excellent solution for several reasons:
- high level of thermal conductivity;
- long service life;
- resistance to temperature extremes;
- the ability to withstand severe mechanical stress;
- resistance to water and steam.

Any type of underfloor heating system is controlled by a sensor and temperature controller
Laying underfloor heating under tiles: features of choosing a system
The high thermal conductivity of the tile makes it an ideal option for installing a floor heating system. Moreover, in this case, any type of system can be used: electric or water. But in order to choose the most suitable option, each owner must answer several questions in advance:
- whether the underfloor heating system is the main source of heating or will it be used only as an additional one;
- whether a concrete screed is provided and if so, what thickness it has;
- an autonomous or central heating system is provided in the house.
By answering these questions and considering the characteristics and advantages of each option, you can make and carry out the most efficient installation of a warm floor under the tiles. Consider all the options available today.

Special mats for the underfloor heating system act as a heat insulator that compensates for the lower tile temperature
Water underfloor heating under tiles: features and benefits
Underfloor heating water is the most widespread option today, which is widely used to equip bathrooms, kitchens and corridors. In this case, a special system consisting of water pipes is laid directly into the floor screed.
At the same time, it is imperative that several layers are laid, each of which has its own meaning and role in this design:
- a layer of heat-insulating material is laid over the base, which does not allow the system to waste heat in vain, warming up the floors;
- a reinforcing mesh is placed on top, which should give the base strength;
- then a pipe system is located, which is directly responsible for the circulation of warm water;
- another layer of screed (cement-sand or concrete) is designed to protect the structure from loads;
- in the end, an adhesive is applied, on which the ceramic tiles are fixed.

To connect a water floor heating system, you must obtain permission from the responsible authorities
If the owners decide to make such warm floors under the tiles with their own hands, then in the process of work it is important to observe some nuances. For example, the gap between the metal-plastic pipes of the system should be from 10 to 30 cm. In this case, fixation must be made using plastic clamps.
Useful advice! In order to increase the strength and quality of the water heating system, in those places where the expansion joint is located on the pipes, it is recommended to wear a corrugation.
During the installation of the system itself, joints should be avoided, therefore the inlet and outlet parts of the pipe must be located in the manifold. In addition, before you start pouring the top layer of the screed, it is worth installing a damper tape around the perimeter of the room. It serves to compensate for those expansions that will occur as a result of expansion processes associated with changes in temperature.
After the installation of the pipe system is completed, it is imperative to carry out a check, and only after that you can proceed to pouring the rough surface. It is important that the thickness of the screed layer is at least 30 mm.

Installation of a pipeline network for a warm water floor does not require special knowledge, but for a correct connection to central heating, it is better to contact a specialist
If all the calculations, as well as the procedure for laying the warm water floor under the tiles, were made correctly, such a solution will save up to 10% of the heat resources required for monthly heating of the room.
Features of the device of an electric underfloor heating under tiles
Once only wealthy people could afford to buy electric warm under the tiles. But today this technology has become available to almost everyone, especially considering the fact that its installation is able to provide savings of up to 35% of spent resources. Such a high figure became available, first of all, due to the possibility of installing a thermostat.
As an example, you can consider the option of arranging a heated bathroom floor using a heating mat. With an area of 0.65 m², it consumes no more electricity than a regular light bulb. In this case, a one and a half meter mat will require a little more (like 3 bulbs). If we compare more mats with household appliances, then a three-meter one is comparable to a computer, and a six-meter one is comparable to a refrigerator.
Important! Electricity consumption in this case directly depends on how fast the surface is cooling. In other words, high-quality thermal insulation can significantly reduce costs.

In the case of choosing an electric underfloor heating, it is worth checking the quality of the wiring in the apartment
The price of a warm electric floor under a tile depends on how high-quality and reliable the option was chosen, as well as on how many conductive cores are located in the heating cable. There are two options: single-core and two-core. Moreover, the first option can be used only in non-residential premises, since it emits a large amount of electromagnetic waves. But in the second case, two conductive elements are able to compensate each other's fields.
Electro underfloor heating: varieties and classification
There are several different technologies on the market today that allow you to effectively heat the floor. Depending on the element used for heating, the following types are distinguished:
- Cable.
- Infrared (film).
- Heating mats.
Each of these methods are safe enough to be used in residential environments. In addition, these modern technologies have a rather long operational life (up to 20 years). All options are designed to reduce energy consumption, and can be used both as the main and as an additional source of heat. So even in the case of installing underfloor heating in the bathtub under the tiles, the savings will be noticeable immediately.

You can purchase a floor heating system complete with all the necessary elements
Under-tile floor heating using heating mats
This is one of the newest methods that has recently become widespread. But every day its popularity is increasing due to the ease of installation and excellent technical characteristics. In this case, a special cable system is used in the form of a heating mat, which can be installed during the installation of a new floor or reconstruction of an old one.
The technology provides for the use of a special two-core screened cable with a thickness of 2.5 mm. And the installation procedure is as simple as possible: using a cement-sand screed, the heating element is poured onto the surface of the base.
Under-tile floor heating using a heating cable
In this case, a special electric cable is used as a heating element, which is laid on the surface of the base with a snake. In this case, it is imperative that a certain step is observed and fixation is performed using the petals of the mounting tape. All this, including the corrugated tube and the thermal sensor, is poured with a concrete screed, the thickness of which is 3-5 cm.

When installing the underfloor heating system under the tiles, it is important to evenly arrange the heating elements
Infrared underfloor heating under tiles: technology features
The main advantage of this method is the ability to mount the system not only on the floor, but also on walls, and even on the ceiling. A heating element of this type is made using a special technology, which allows you to make a warm floor without a screed.
Film underfloor heating under the tiles provides for the presence of a special coating, which eliminates the need to pour the screed and makes the installation process easier. In this case, not only tiles, but also any other building material that can be found on sale today can be used as a finishing floor covering.
Bottom line: which warm floor is better for tiles
As mentioned earlier, the selection of the most suitable option should be based on the original premises data. Each of the considered methods has its own advantages and can be used for home improvement. So, for example, a water heating system can be connected to both autonomous and centralized heating systems. In addition, this option is the most profitable in terms of financial costs.

The advantage of the electric underfloor heating system under the tiles is the ability to install it both on the floor and on the walls
The costs of maintaining the water system are also low. However, this method is far from always the best. For example, it is better to refuse such a solution in old houses, where the floor slabs are not designed for the serious loads that the installation of such a system is fraught with.
Electrical heating is easier to install and also has higher energy efficiency. The surface of the coating heats up faster, and with proper thermal insulation, it can retain the accumulated heat for a long time.
Related article:
Do-it-yourself water floor heating, video and description of the process
Description and video of the process of installing a water-heated floor. Its advantages and disadvantages, in contrast to other types.
Warm floor under tiles: prices for various types of equipment
The price of underfloor heating for tiles will differ depending on which option you prefer. So, you can order the laying of a heating cable at a price of 500 rubles / m². The laying of heating mats will cost a little more - from 800 rubles / m². Perhaps the most expensive procedure is the installation of a thermostat - about 1,500 rubles.

When choosing specialists for installing a warm floor, it is worth asking for user reviews in order to first make sure of the quality of the work
As already mentioned, the cheapest option is a water-heated floor under the tiles. The price per m2 can start from 380 rubles. Therefore, if you want to install a warm floor in a bathroom, the area of which is usually small, this task can be solved with a very modest budget.
How to make an electric warm floor with your own hands
In the case of laying a warm floor under a tile, the installation technology allows for all the work to be carried out independently. So, if you wish, you can refuse to call the master, and do everything you need with your own hands.
Before making warm floors, it is necessary to carefully prepare the base, leveling it as carefully as possible. In this case, it is not at all necessary to apply a new screed. It is perfectly acceptable to use an old concrete base if it is level enough. In this case, you only need to vacuum and wash the surface.
Useful advice! You can find quick-drying mixes on the market for leveling the sub-floor. This option is permissible, but only if there is no way to wait for the usual composition to dry, since its quality is much lower than that of the traditional cement-sand composition.

The sequence of installing the underfloor heating system under the tiles
Next, the thermal insulation layer is laid - an extremely crucial stage designed to ensure maximum savings in heat and money.Penofol is considered to be the best material for this purpose. It is easily attached to the base using double-sided tape and has a thermal insulation coefficient of 0.049 W / mK.
Now you can proceed directly to laying the underfloor heating system. This procedure will depend on which of the above suggested methods you have chosen. At this stage, it is worth considering the placement of the temperature sensor, especially if you purchased the individual components and not the ready-to-install kit. The sensor is pushed together with a power cable into a corrugated pipe, which is subsequently poured with concrete from the outside.
Useful advice! Thermal sensor malfunction is the most common breakdown that owners of heated floors have to deal with. Therefore, it is very important to install it correctly in order to be able to replace it at any time in the future.
Installation of a film underfloor heating is carried out according to the same instructions, except perhaps for the need to fill the screed after laying.

Layout of the elements of the underfloor heating system in a standard bathroom
How to independently check the health of a warm floor
Before proceeding to the final stage of work - laying tiles, it is necessary to check the health of the system. To do this, you need to follow the following algorithm:
- Check all joints and folds.
- Turn on the power and check the temperature.
- Using a special tester, measure the resistance readings (all information about the norms for a system of this type can be found in the data sheet).
If all indicators are normal and the system is working properly, then all that remains is to fill in the screed layer (if necessary) and lay the tiles.

Before laying screed and floor tiles, it is worth checking the functionality of the installed system
Technology for laying tiles on the floor with a heating system
Having figured out how to fill in a warm floor, it remains only to lay the tiles, which in this case will be the final coating. The installation procedure in this case is practically no different from the traditional one, except for the need to purchase a special glue that is resistant to temperature increases. And in this matter, it is better to refuse to save money, since low-quality material can cause the tiles to soon begin to simply fall off.
If we are talking about laying a warm floor in a bathroom under the tiles, then it is important to pay attention to the aesthetic side, properly adjusting the elements. To do this, in open areas it is better to place solid elements, and hide the scraps under the bathroom or in other inconspicuous places. For simple and high-quality cutting, a grinder is best suited.
Important!In the process of cutting tiles, it is extremely important to pay attention to your own safety. The use of protective equipment such as a respirator and goggles is recommended.

During installation, two screeds are made - a rough one with installed insulation and a screed of the warmest floor, which is poured over the heating elements
The first thing to do is to prepare the adhesive according to the manufacturer's instructions. After that, you can start laying, starting from the corner to apply the glue with a notched trowel. It is important that the adhesive solution fills all voids and that the layer thickness is at least 5 mm.
In order to lay the tiles evenly, you can use special crosses. In this case, it is imperative to check for horizontal evenness of all elements, and also make sure that the gaps between the elements are the same.
Also, do not remove the crosses immediately after the tiles are finished. It is better to wait as long as necessary (usually this period is indicated by the manufacturer).After complete drying, the cracks must be sealed with grout using a spatula.
Useful advice!Do not turn on the floor heating until all compounds (glue and grout) are completely dry. The same applies to concrete screed, the drying period of which can be from two weeks to a month.

In order for the underfloor heating system to work properly, and the coating has a long operational life, the laying of tiles should be started only after the screed has completely dried
How to install a warm floor with your own hands: video instruction
An excellent guideline for the installation of a warm floor is a photo instruction that will allow you to consider each of the stages of work in even more detail and clearly demonstrate all the nuances. But still, the most complete information about the process can be obtained by reading the corresponding video tutorial.