Standard locks that are installed on interior doors often need to be replaced for various reasons. In addition, the finished canvas can be sold without a locking mechanism. Installing a door lock is a rather difficult operation that requires an understanding of the design of the device and knowledge of the nuances of work. The main factor that determines the installation features is the type of locking mechanism.

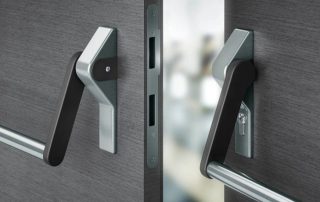
The type of installation of the lock on the interior door depends on the type of locking mechanism
Content
- 1 Installing a lock in the door: choosing the type of locking mechanism
- 2 Door lock installation: flat and round devices
- 3 Installing a door lock in interior doors: the necessary tools
- 4 Insert a lock into an interior door: the preparatory stage
- 5 How to insert a lock into a wooden door: organizing handle holes and locking mechanism
- 6 Insert of a lock into an interior door: a cutter for installation
- 7 Installing a locking mechanism with a larva: step by step instructions
- 8 How to embed a lock into an interior door: installation of a counterpart
- 9 How to disassemble a round type interior door handle
- 10 How to disassemble a push-type interior door handle
- 11 How to remove the door handle of an interior door (round with a button): detailed instructions
- 12 How to install a handle on an interior door: push model
Installing a lock in the door: choosing the type of locking mechanism
Design features are the main factor by which all locking devices used in interior linings are classified. Consider the most popular appliances installed in interior doors.

Installing a mortise lock requires precision, while the mechanism is reliable and durable
Latch (regular). This type of locking device is most common. Conventional latches are used everywhere in interior linens. Installation of a lock on an interior door in this case is not difficult, which often attracts buyers. The peculiarity of this device is that its design includes a cylinder and a locking tab controlled by a special mechanism. Most often, these locks are sold complete with a handle. Thus, in order to avoid mistakes during the installation process, it is necessary to study the instructions, which will answer the question of how to insert the handle into the interior door.
Locking latch. The mechanisms that belong to this group are an improved modification of the previous type of locking devices. There is one more element in their design - a retainer. Its function is to keep the lock closed.For interior doors, such products are perfect.
Helpful information! Today you can find two types of latches equipped with a latch: push-button and lever. For home use, it is recommended to pay attention to the second option.
Mortise mechanism. It is the second most popular among interior door locks. Installation in the linen requires precision and care. Mortise devices are reliable and have a long service life. They are most often used for doors in private offices and bedrooms. Unlike the previous type, these devices are opened with a key.

The process of installing a magnetic lock is quite complicated, so if you do not have the skills, then it is better to turn to professionals
There are two types of mortise mechanisms. The first option provides for the possibility of unlocking the door from both sides (key-key). In the second case, a combination is used, which consists of a key and a turntable. In this situation, a separate insert of the handle into the interior door is required. How to perform this operation? There is a special step-by-step instruction for this.
Overhead lock. From the point of view of installation, this option is the most acceptable. However, overhead devices do not meet current safety standards. They can be easily disabled by mechanical stress.
Magnetic lock. The cost of such devices is higher than the price of standard types of locking mechanisms. Their main advantage is quiet operation. That is why they are most often mounted on interior doors, which are intended for bedrooms and children's rooms. It is quite difficult to cut the lock into the interior door on your own. The price of installing magnetic mechanisms depends on the features of their design and the type of door.
Lever device. Such devices are able to provide good protection for the premises. They are opened with a key and are used not only for interior, but also for entrance paintings.

Lever locks are quite reliable, so they are installed both on interior and front doors
Door lock installation: flat and round devices
Most often, interior doors are equipped with locks that are most suitable for use in such conditions. These include flat and round mechanisms, which differ from each other in the shape of the case.
Flat interior locking devices are expensive. Their independent installation is accompanied by certain difficulties due to the design. However, such devices have one major advantage: they provide a high degree of protection against the penetration of unauthorized persons.
It is worth noting one important feature of flat mechanisms: their installation weakens the door and frame. Before you cut the lock into a wooden door, you must establish its compatibility with the door leaf. Experts recommend installing flat products in cash doors. Canvases made of MDF are not suitable for installing full-fledged flat mechanisms. As a rule, shortened versions of devices are embedded in them.
Helpful information! When installing a flat mechanism in a door made of MDF, it is necessary to take into account that the thickness of the tongues should not be more than 15 mm. And also in this case, the restriction applies to the end plate of the locking device. Its width should not exceed 24 mm.

Round locks are the most suitable option for interior doors
Round locking mechanisms are the best option for home installation. Therefore, they are most often found in interior doors. You do not need to have special skills and abilities to carry out the installation of a lock on a wooden door. The main advantage of such devices is compatibility with any type of canvas.Most often, two types of handles are used for such mechanisms: halyard and knob. The second type of product is considered the most suitable. Knob handles are recommended for home installation as they are reliable and comfortable.
Installing a door lock in interior doors: the necessary tools
In order to independently carry out the installation of the locking mechanism, it is necessary to prepare the appropriate tools. Installation of such devices does not require a large number of instruments and fixtures. The minimum set includes the following elements:
- pencil (for marking);
- measuring tape;
- drill;
- screwdriver;
- construction knife;
- chisels (10 and 20 mm);
- set of drills;
- masking tape.
Before starting the installation, it is recommended to study the step-by-step instructions that will help you figure out how to install the lock on the interior door. It is worth noting that currently on sale you can find special kits, with the help of which locking mechanisms are inserted into canvases made of various materials.

In order to properly install the lock with your own hands, you need to have all the necessary tools
Kits for tapping locking devices, as a rule, include a perforated drill with a cross-sectional index of 22 mm. Such a part is not suitable for organizing a hole for a latch. In this case, it is recommended to use a chisel.
Insert a lock into an interior door: the preparatory stage
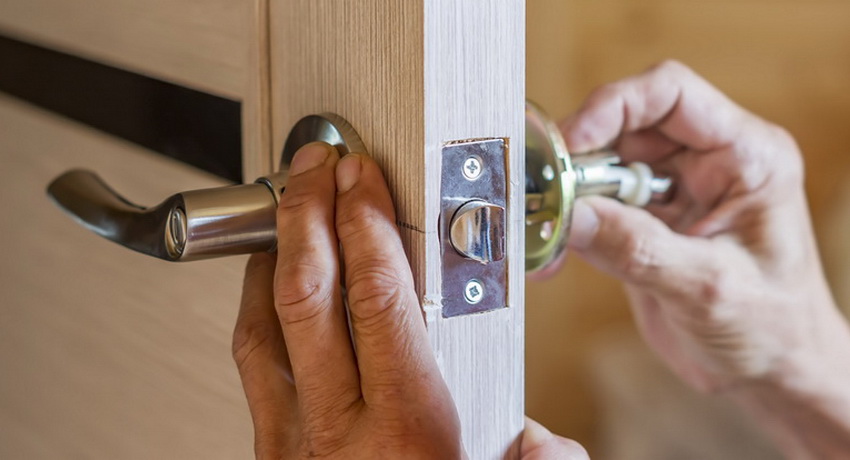
The end result of self-assembly of the locking mechanism depends on many factors. First of all, the type of door and the design of the lock itself affect the degree of complexity of the installation. Experts advise drawing up a preliminary drawing of the device. It should contain information on the location of future holes required for retaining elements, handles, etc.
Note! If the old mechanism is replaced with a new one, then it is recommended to study the instructions, which will make it possible to understand how to disassemble the lock interior door with a handle.
The more detailed the drawing was, the less likely it is to make certain assembly errors. Before starting the installation, it is necessary to prepare the door for installation. The preparatory stage includes marking the canvas. It is this method that will allow you to correctly embed the lock into the interior door.

In the process of installing the door lock, you will need masking tape
First of all, you need to determine the height of the castle above the floor. The standard value at which the locking mechanisms of interior linens are located is 1 m. If desired, you can reduce or increase the distance from the floor by 10 cm. The price of installing a lock in an interior door ranges from 1000 to 2500 rubles The final cost depends on the type of castle and the nature of the work. Repair of locking mechanisms can cost about 1,500 rubles.
After determining the desired height of the device, it is necessary to seal the place where the installation will be carried out with masking tape. Most often, a ready-made template is sold complete with locking mechanisms, which allows you to make accurate markings for a specific model. It must be applied to the end and flat surface of the door.
How to insert a lock into an interior door: markup without a stencil
It is possible to mark all the necessary points at which the holes for the installation of fasteners will be made without using a template. For this, there is an instruction that you need to pay attention to. The marking is done with a pencil or chalk.
First of all, it is required to measure a distance of 1 m from the floor. A horizontal mark is made at the desired point. Next, you need to draw a vertical line. The intersection of the two lines is the mounting center of the locking mechanism.The preparatory stage of inserting a lock into an interior door with your own hands requires special care. After marking the place where the locking device will be located, the points corresponding to the holes of the latch (on the end surface) and the door handle are determined.

If there is no stencil, then you can use a tape measure and a pencil
Then you need to attach the body of the locking mechanism to the lines and mark the lower edge of the device. Next, you need to separate the strips. The distance in this case corresponds to the thickness of the lock. After routing, two parallel lines are marked, which should be located perpendicular to horizontal lines at a distance of 5 cm.
Note! The accuracy of measurements affects the correct installation of the lock and handle in the interior door. Errors in the marking lead to various malfunctions that prevent the normal operation of the shut-off device. The lock is installed from the front side of the door leaf. In this case, it is necessary to clearly outline the center point.
Next, you need to mark the positions in which the latch and handle will be located. After that, the marking of the mating hole located on the door frame is made.
How to insert a lock into a wooden door: organizing handle holes and locking mechanism
The next stage, which follows the marking of the door leaf, involves making holes for the handle and the locking mechanism. This process is also subdivided into several stages.

To make a hole for a handle and a lock, you need a screwdriver with a crown for wood
First, you need to prepare the tool that will be used to organize the holes. The easiest way to do this work is with a screwdriver and a special attachment (wood crown). The hole for the locking device mechanism is made on the flat surface of the door leaf. And first you should make a depression on the outside, and then on the inside. This procedure will prevent damage to the electronic screwdriver.
The crown is used to organize the holes for the core and handle. The locking mechanism is installed on the door using another nozzle - a feather drill. It is used to make a hole for a latch on the end side of the web. It is important to remember that the drill must be immersed in the wood at a right angle.
Then you need to take out the tool and use a construction knife to remove the outer layer of wood in accordance with the marked lines. After that, using a chisel, you need to organize a groove for the crossbar. Its depth should not exceed the width of the transom frame. At the end, the latch is installed and fixed with self-tapping screws.
Insert of a lock into an interior door: a cutter for installation
The simplest way to install the locking mechanism involves the use of a milling device. The milling cutter is a vertical machine that has small dimensions and is quite easy to use. In order to install the lock in the interior sheet using a milling device, you must first remove the door from the hinges and place it perpendicular to the floor (on its side).

The milling machine is easy to use, it can be used to quickly install the lock
Next, you need to take measurements and set the marks corresponding to the location of the mechanism tongue. The next step in installing the lock with your own hands in the interior door is to transfer the parameters of the device to the canvas. To do this, you need to attach the lock to the surface of the door and circle its body with a pencil.
Note! In order to exclude the possibility of making mistakes, it is recommended to study video materials that will help answer the question of how to embed a lock into an interior door.Videos and photos allow you to study in more detail all the nuances of the process.
Then, straight lines must be drawn on the side of the canvas. After that, using the machine, you need to make a recess for the lock. The next step involves changing the nozzle on the milling machine and making a slot for the lock case. The exact implementation of these instructions helps to correctly organize the opening for the locking mechanism. To check the correct operation, you need to check the device with the place prepared for it.
Related article:
Interior door lock: how to choose a reliable and durable mechanism
Varieties of devices for interior doors. Latch locks, magnetic, electronic. Mortise and hinged devices. Councils for selection and installation.
How to install a lock in an interior door without using a cutter? The seat for the locking mechanism can be prepared without the use of special electrical equipment. Ordinary hand tools can also be useful for this job. It is important to remember that this method is not suitable in all cases. For example, the installation of a latch lock is impossible without the use of milling equipment.

To install the lock using a router, the door must be removed and placed perpendicularly
Installing a locking mechanism with a larva: step by step instructions
Mechanisms that include a core (larva) are used in cases where the door leaf is already equipped with a door handle. Such locking devices are rectangular in shape. The design features of these devices affect the degree of complexity of their installation. A person who does not have special skills in this area is advised to carefully study the installation instructions.
Installation of a door handle on an interior door is not required in this case. This simplifies the workflow somewhat. First of all, for the installation of the locking mechanism with the larva, it is necessary to choose the place of the device. It can be positioned above or below the handle.
After the location for the installation has been chosen, it is required to strictly follow the installation instructions. First you need to make a markup, for this you should draw a center line at the end of the canvas. Next, a standard procedure is carried out, which consists in transferring the outlines door lock... After that, you need to make holes on the centerline that have a small distance from each other. The drill removes excess web material (between the holes). The result should be a socket for the locking mechanism.
The most suitable area for installing the appliance is under the door handle. Installation on an interior door can be done using hand-held devices. The next stage of installation is to insert the mechanism with the larva into the opening, which was made earlier. The device is fixed using self-tapping screws.

It is necessary to choose a place for installation and make a markup
Then you need to mark the perimeter of the lock plate. A construction knife is suitable for this job. With the help of a chisel, excess material is removed. The borehole for the plate must match exactly its dimensions.
Note! If you plan not only to install the locking device, but also to install the door handle, you must read the instructions for its replacement.
After marking and sampling the lock plate, attach the locking device to the surface of the canvas and transfer the contours of the larva to the door. It is important to remember that this operation is performed both on the outside and on the inside of the door. Using a drill, you need to make a hole for the secretion (larva). For a free arrangement of the mechanism inside the recess, it is recommended to make it somewhat wider than the dimensions of the lock.
At the last stage, the mechanism is installed in a slot prepared in advance for it.The locking device is fixed with self-tapping screws. After installation, you need to check the correct operation of the device. At the end, you can decorate the surface of the door in the place where the lock is installed with special overlays, which are fixed with self-tapping screws.

The lock mechanism is mounted in a pre-prepared slot and fixed with self-tapping screws
How to embed a lock into an interior door: installation of a counterpart
In order for the door to be locked, it is necessary to install a striker plate with a hole for the lock tongue on the door frame. The installation of this element is quite simple.
The price of inserting a lock into an interior door depends on the type of mechanism. In any case, self-installation saves money. The first step is to mark the area in which the striker will be located. This area must correspond to the parameters of the latch of the locking device. To do this, it is necessary to close the door leaf and draw two lines on the bow, indicating the boundaries of the latch. It is also recommended to measure the distance between the upper edge of the latch and the corner of the door leaf. The obtained parameters should be transferred to the doorway.
Before starting work, it is necessary to check the accuracy of installation of a door handle with a latch or other type of locking mechanism. The device must be level. Otherwise, there may be problems with the opening and closing of the door leaf.
Helpful information! As an alternative to mechanisms that have a standard latch, you can purchase a magnetic lock. It is distinguished by its operational reliability and quietness. The installation of a magnetic lock in an interior door has its own characteristics, however, subject to the instructions, it can be performed by a beginner.

Installing the lock striker is simple and takes a minimum of time
After marking the zone corresponding to the latch, it is necessary to attach the striker to the door frame. There is one important rule that will help to carry out the correct installation of the response element. If the part is recessed in the material of the well, then in this case it is necessary to outline its contour both on the inside and on the outside. In turn, if the striker is located directly on the surface, then you should limit yourself to marking the inner contour.
After marking the striker, you need to make holes for the tongue and fixing products (self-tapping screws). After that, you can start installing the striker. At the end of the work, you need to close the door and check the size of the gap. If necessary, the excess backlash can be removed very easily. All that is needed for this is to bend the tongue of the lock on the strike plate.
How to disassemble a round type interior door handle
The method of dismantling round door handles for interior linens may differ depending on the design features of the fittings. The most convenient products are those that have two lag screws. In this case, it is easiest to dismantle it yourself. To do this, unscrew the locking elements and remove the mechanism.
However, there are situations that require a lot of effort. Mechanisms that are more complex from a constructive point of view are dismantled in several stages. On modern interior doors, round parts equipped with a button and various decorative elements are quite common. The function of these overlays is to hide the fastening screws. How to remove the handle from the interior door in this case?

To dismantle the round handle, you first need to remove the outside of the device
In order to dismantle the handle with a button and decorative overlays, first of all, you need to remove the outer part of the mechanism, which is attached using a special button. Next, you need to eliminate the overlays that hide the locking elements.
Note! It is important to know that the buttons that facilitate the fastening of the outer part of the mechanism can also be of different designs.
If the handle is out of order, it can be repaired. How to repair an interior door handle? The first step is to find out the nature of the damage. Based on this information, the necessary instruction is selected and the mechanism is rehabilitated. It is recommended that before starting to dismantle the old handle, determine its type and study the design features. To eliminate the mechanism of the round handle, experts advise you to read more detailed instructions.
How to disassemble a push-type interior door handle
Lever handles for interior linens are the more common fittings. They are ubiquitous and easy to install and operate. The design of the pressure products includes two main elements (external and internal), which are attached to the central rod.

To remove the push-type handle, first of all, you need to unscrew the screws
The operating principle of the lever handles is based on a simple mechanism. Such fittings have a latch, which is located in the recess of the striker when the door is closed. In order to open the door leaf, you must press the lever on either side of the door. Dismantling such mechanisms also includes several stages, as in the case of round analogs. How to disassemble a push-type interior door handle?
In order to remove such a piece of hardware, you must follow the instructions. Such work is within the power of any person who does not have special knowledge. First of all, you need to unscrew the screws, the function of which is to fix the decorative cover. This will allow access to the pivot element. In such fittings, it has four faces. On the Internet, you can find many materials to answer the question of how to remove the handle from the interior door. Video and photographic materials allow you to quickly and competently dismantle this piece of furniture.
The next step is to remove the rest of the handle. After that, you can proceed to dismantle the lining on the other side of the door leaf. The second fragment must be removed in the same way as the first. Thus, the lever handle used in the interior doors is dismantled.
How to remove the door handle of an interior door (round with a button): detailed instructions
To dismantle such a round door handle, you first need to find the button. It is located on the inside. In some cases, the button is below the hole level. It should be noted that sometimes you need to twist the fittings to access this element. How to remove a round interior door handle? The main thing to do initially is to access the button. After that, press on it with any suitable object, for example, a screwdriver. Then you can proceed directly to removing the door handle mechanism.

In order to remove the round handle, you need to find the button located on the inside
Note! In some cases, it takes a lot of effort to press the button.
Then you should dismantle the decorative element. For this task, any metal element with a small thickness, such as a knife or a building ruler, is suitable. Using such an object, you need to pry off the pad and remove it. It should be noted that some decorative elements have a special groove that is used for quick removal.
In order to answer the question of how to disassemble the round handle of an interior door, it is recommended to study video materials on this topic. After removing the lining, access to the locking elements opens. They must be unscrewed. This is how the round handle with the button is dismantled.
How to install a handle on an interior door: push model
First of all, before starting the installation of the lever handle on the interior door, you need to decide on the dimensions of the inner hole. To do this, you will need to lean the locking mechanism against the end surface of the web. It is very important that the decorative strip and the side surface of the door are in the same plane. Next, you need to transfer the contour of the product to the surface using a pencil. After that, it remains only to connect the lines at the end by means of a building angle.

In order to make a recess for the mechanism, use a chisel and a hammer
When installing a handle on an interior door with your own hands, do not forget that the hole is made with a special drill, which is called a chisel. The recess is removed using a chisel and a conventional hammer. In turn, the area in which the faceplate will be located is organized by using a chisel.
In order to answer the question of how to install a handle in an interior door, you need to carefully watch the video materials on this topic. It is important to understand that installation details depend on the door material and the type of handle and tool kit.
At the next stage of mounting the push product, the zone is marked in which a square will be installed for the door handles and the well of the locking mechanism. Next, you need to use a drill and make holes for the fixing elements. Recesses are organized on both sides of the canvas.
After making the holes, it is necessary to clean them of sawdust and dust. Then the locking device is installed in the canvas. The mechanism is fixed with a lining and self-tapping screws. Next, handles are installed on the squares, for which self-tapping screws are used.

When the hole is completely ready, the locking mechanism is installed
After that, a decorative ring is required for an interior door with a latch. There are special flange holes for this.
The final stage of installation, as in previous cases, involves the installation of a striker on the door frame. It is worth remembering that it is installed only after making a hole for the tongue and screws.
Installing a handle on an interior door: features of mounting round devices
The installation technology of round door handles (knobs) differs from the installation process of push pieces. This is due to the design features of such fittings. The handle can be mounted both on a removed and on a suspended canvas. The second option is more acceptable, since it simplifies the marking of the striker on the door frame.

First of all, you need to carefully perform the markup
Note! Most often, the installation of handles is necessary in case of failure of the old mechanism. It's worth noting that some issues are fairly easy to fix yourself. How to repair a door handle for an interior door depends on the nature of the breakdown. If the device cannot be recovered, it is replaced.
The height of the round handle is selected depending on the individual preferences of the owners. The standard distance from the floor to the device is 90-110 cm. And it is also important to remember that the installation of a new mechanism must be carried out as carefully as possible if the canvas is of the frame type. This is due to the fact that it is quite easy to damage it.
How to put a handle on an interior door? To install this type of door handle, you must first of all correctly perform the markings. After that, you need to arrange two holes. The first is drilled at the end (for the latch), and the second on the canvas (for the rotary handle). The organization of the holes on the canvas for the handle is carried out in several stages. The first step is to make a through hole.For this, a special nozzle is used - a crown. In turn, for the subsequent installation of the latch, a feather-type drill is used.

Two parts of the handle must be attached to both sides of the door and fixed
After organizing all the necessary holes, you can start installing the handle in the interior door. However, first you need to fix the latch by means of self-tapping screws. To fasten a round product, you need to disassemble its upper part and remove the decorative ring.
Both parts of the handle have special holes for screws. These elements are applied to the outside and inside of the door and are fixed to each other. Next, you need to install a decorative ring, after which the handle must be pressed until a characteristic click appears, which signals the end of the installation.
Thus, the installation of the handle on the interior canvas is not a very difficult undertaking. It is required to remember that the installation process is influenced by factors such as door material, type of lock, type of handles. If necessary, you can always use the services of a qualified specialist who will carry out the installation competently and in the shortest possible time.