The bar has long lost its narrow original purpose and is widely used not only in catering establishments, but also in residential premises. Thanks to this piece of furniture, the interior of a house or apartment will acquire an exclusive and stylish look. This article will tell you how a do-it-yourself bar counter will help you zone and divide the space, and step-by-step instructions will make it possible to independently create the desired model.

Functional and comfortable bar counter quite realistic to do it yourself
Content
- 1 Types and functions of bar counters in the kitchen: photo examples of various designs
- 2 Diy bar counter for the kitchen: stages of creation
- 3 Diy bar counter: step-by-step manufacturing instructions
- 3.1 Diy bar counter in the kitchen: a photo of creating a structure with a pipe support
- 3.2 How to make a bar counter with your own hands from drywall
- 3.3 Diy wood bar counter: manufacturing process
- 3.4 Backlit bar counter: installation options and types of lamps
- 3.5 Mobile bar table for the kitchen and living room: step by step instructions
Types and functions of bar counters in the kitchen: photo examples of various designs
In spacious rooms, in particular studio apartments, the use of a bar counter can have a direct purpose - used as a home mini-bar. For this, the structure is equipped with special holders and devices where glassware and bottles with drinks are stored. Such a design can be a component of a kitchen set or an independent structure.

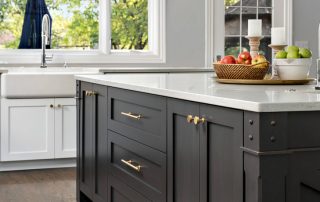
The island-shaped bar counter is ideal for rooms with a large area
In small apartments, the kitchen bar counter performs several functions at once. It serves to separate the kitchen from the dining room or living area, in parallel it plays the role dining table... The most common option in small rooms is a stand in the form of a small ledge or a structure located along the wall. Photos of bar counters for a small kitchen clearly demonstrate such examples.
Peninsula bar counters are also acceptable in medium sized kitchens. The space below is used as a closet where a minibar or various kitchen items are placed. In such designs, pieces of chrome pipes attached to the cabinet lid serve as a support for the countertops.
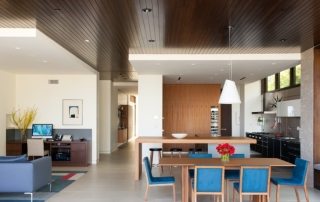
Popular multi-level home bar counters are multifunctional. One side of them is used as a work surface, and the opposite is used as a place for snacks and drinks.

A correctly chosen bar counter helps not only to decorate the room, but also to solve a number of functional problems
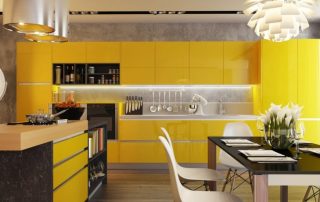
Bar counters are especially common in studio apartments, where they serve as a delimitation of various zones: they separate parts of the room according to their functional purpose. Often, such designs are a continuation of the kitchen set.
Important! When choosing a bar counter model, you need to take into account that it should be functional and easy to use by all family members. The design is created for more than one year, so it should please the eye.
Arrangement of a kitchen with a bar: photo options
A home bar counter can have the most unusual shape, non-standard sizes. It is quite possible to build a structure with your own hands, using the most unexpected objects for this. These are its advantages. At the same time, in order to make a bar counter yourself, you need to know the unspoken classification of models, which includes three main types.

For a studio apartment, a bar counter is an ideal option, it will divide into functional zones
Stationary bar counter. One of the most popular bar counter options for a small kitchen. The maximum height of such a model in mini format is 120 cm.
Combined with dining table the design also serves as the perfect example of a bar counter in a small kitchen. The tabletop of such a product has a height of up to 90 cm.
The two-tier model is a two-piece structure. One is a high bar counter, the other is a dining table. Such bar counters in the studio are an excellent option in zoning, where the lower part is located in the kitchen area, and the high one is in the living room.
Photos of bar counters in an apartment clearly demonstrate many ways to implement them. It is enough to choose an idea for certain conditions and space, create a drawing and start its implementation.

Two-level bar counters look interesting, this solution is suitable for those who have children at home
Foldable bar counter: rational ideas for a small kitchen
An ideal way to optimize space in a small kitchen is a transforming bar counter. There are several options for folding structures, which are distinguished by the principle of assembly. The most common are folding, pull-out, swivel and folding.
A retractable stand is a retractable mechanism that hides under the work area. Can be a tabletop with a pull-out leg or a drawer for drinks, glasses and other kitchen utensils. The movement of the structure is provided by a roller mechanism or simple wheels.
A folding rack is rightfully considered the most convenient option for a small kitchen. An additional plus is the ease of manufacture. The tabletop is attached to the wall on a special bracket, with its help, the stand is raised and lowered if necessary.

The swivel bar counter is a very convenient piece of kitchen furniture, the design of which often requires an individual approach.
When not in use, the folding stand is a small nightstand. Unfolded, it is convenient to have breakfast or a snack behind it. For lunch, it is doubled by raising the lower part with support on the legs or by fixing it on a special folding mechanism.
Useful advice! The most affordable way to build a folding bar on your own is to attach a small countertop to the wall using curtains. In the same way, a wooden leg is attached to the opposite side. The structure is folded according to the booklet principle (leg - table top - wall).
The swivel stand is designed so that part of the surface freely hides under the table top and, if necessary, easily turns into a dining table.The design is very easy to use and saves space. At the same time, making it at home will require certain skills, tools and equipment.

A folding bar counter is a very convenient option, since it can significantly increase the functionality of the space
Diy bar counter for the kitchen: stages of creation
Step-by-step instructions will tell you how to make a bar counter yourself. This process is not chaotic, but includes certain stages:
- selection of a suitable model, planning;
- taking measurements, determining future dimensions;
- creation of drawings of the bar counter;
- selection of tools, equipment and materials;
- creation of the base and frame;
- fastening the base to the floor, wall or stationary furniture;
- manufacture of countertops, its fasteners to the base;
- attaching additional elements (if necessary);
- coating the base with varnish, paint or pasting;
- decoration with trim or additional elements.

Kitchen bar drawing
This is a typical instruction used to create any DIY furniture. Below we will consider each of the stages. It should be noted that each individual option may have additional stages of creating bar counters in the apartment or exclude the listed ones.
Choosing a model, determining the dimensions of bar counters: photo
Choosing a model is one of the simplest, but at the same time crucial stages. After all, a somewhat costly, laborious process depends on the desires and the proposed design option.
There are no strict rules in the choice of sizes and dimensions. But there are certain recommendations, the violation of which negatively affects the final result.
Useful advice! The width of the countertop should not be less than 30 cm: even a portioned plate cannot fit on such a surface, so the dishes will be at risk of being broken. Sitting at such a counter is also inconvenient, since there is practically no place to place your hands.

The bar counter will significantly improve the functionality of the room, therefore it is important to think over what it will be like by drawing up a project
The recommended stand height is 110-120 cm. The minimum width of the table top is 30 cm, the optimal size is 50-60 cm. It is necessary to foresee the length, number and shape of the legs in advance. There is no size regulation here. Traditional bar counters in the kitchen provide for the installation of countertops on cabinets, but simpler designs are more popular in which the countertops are attached to a long pipe running from floor to ceiling.
In its traditional form, the rack is practically not used anymore. Owners are increasingly preferring functional counterparts with additional cabinets and bedside tables.
Creation of drawings and design of the bar counter
Having decided on the model and taking the necessary measurements, the proposed design must be displayed on paper. The drawing should also include the layout of the room (kitchen or living room) where the bar will be located. Meeting these requirements will allow you to correctly calculate the size of the furniture. In addition, the drawing will clearly demonstrate how organically the rack fits into the overall interior.

Bar counter structure diagram
To model a bar structure, you can use special design programs. Most of them are freely available on the Internet. The most popular are the following: PRO100, Sweet Home 3D, pCon.planner, IKEA home planner, Astron design, Google Sketchup, Floorplan 3D, Home plan pro, Arcon project, Autodesk 3ds Max, etc.
Related article:
Bar counter: height and dimensions of the structure for comfortable use
Factors that determine the size of the counters in the kitchen and living room. The ratio of the height of the structure to other furniture. Tips for choosing the right model height.
A virtual drawing, unlike a paper one, allows you to see the project from different sides and allows you to immediately make the appropriate adjustments to the drawing. In addition, the computer version will make it possible to see the finished structure.
A paper drawing does not imply a demonstration of a photorealistic image, but at the same time it allows you to create the necessary working project. This is all the more acceptable if an independent bar counter for a home is not a very voluminous structure.
Useful advice! Creating any model with your own hands provides for the preliminary preparation of drawings for the bar counter. To do this, you can use a special computer program or apply a diagram on graph paper.

Choosing a model is one of the simplest, but at the same time, crucial stages in the design of a bar counter
Choice of materials: value for money
In the process of manufacturing bar counters, all kinds of materials are used. The choice depends on the purpose, the intended location, the interior of the entire room and the budgetary possibilities of the owners. Let's consider the most practical and common materials.
Plastic assumes different colors, it is inexpensive and convenient, easy to process. At the same time, it is low-strength, therefore it is suitable for the manufacture of small structures or as a finishing material.
Laminated particle boards are more expensive and more difficult to process, but they last much longer than plastic. It comes in various colors and structures. The surfaces can imitate colored stones, metal and wood.

The material for the manufacture of the bar must be moisture resistant and strong enough to withstand everyday mechanical stress
Drywall, due to its "pliability", is widely used to create volumetric racks. The material can be putty, decorated and painted in various colors. A drywall bar is the option that allows you to create any shape in accordance with different styles.
Wood. A bar counter made of wood, especially valuable species, will unconditionally have a noble and expensive look. At the same time, it is a labor-intensive material that requires careful subsequent processing.
Brick. At first glance, it may seem that this is an unconventional material, but it is from it that loft-style bar counters are most often made.
For the manufacture of racks from various materials, additional parts, accessories and tools will be required. For structures made of plasterboard and chipboard, a frame made of corners or beams is required. To make a wooden bar counter, certain knowledge of carpentry and special equipment are required. In the process of building a brick bar, you will need the skills of a bricklayer, and a special solution must also be used.

Wooden posts wear out quickly and after a short time lose their presentability
For countertops, as a rule, materials are taken that are different from those used in the manufacture of the frame. It is a separate and often independent element of a typical kitchen bar.
Frame and countertop for bar counter: nuances in manufacturing
The worktop is the most important detail that contributes to the creation of special interior accents. The manufacturing process is the basic stage in the construction of the entire structure. The material must have an attractive surface, be strong and durable.
The base plate for the countertop can be acrylic stone, a wide polished board, a piece of chipboard, which is then covered with veneer or film. With the help of a jigsaw, the base is given the necessary shape, and the edges of the edges are carefully cleaned.

Scheme countertops standard bar counter on a leg
Useful advice! The advantage of chipboard countertops is that you can choose any color and structure of the coating. Over time, it can even be replaced using a self-adhesive tape. In addition, the finished product can be purchased in the retail network.
The creation of the frame is an equally important step. Here you will need corners, channels, wooden beams. More specific steps at this stage are described in the instructions for making the various rack models.
Diy bar counter: step by step manufacturing instructions
The most popular way of creating racks is the classic one, which includes making a tabletop and then fixing it from one end to a wall or headset, and from the other to a vertical pipe.
The worktop can be made from different materials, but it is advisable to select a base that matches the rest of the kitchen furniture. Other parts can be purchased at a hardware store. With regard to the price, in this case, it is better not to save.

For example, when buying a pipe that will serve as a leg for a bar counter, it is recommended to abandon inexpensive Chinese products. Such chrome-plated products, although they are three times cheaper, can sprinkle with flakes after a while. Hardware made in Germany is much more expensive, but has a lifetime warranty, good quality and Polish parts.
The tabletop for such a bar can be cut out of a wide board, on one side it will be supported by a shelf attached to the wall, and on the other - an ordinary pipe. To fix it, a hole of the corresponding diameter is drilled in the tabletop, a fastening ring is put on the pipe.
A hole of the required diameter must be drilled under the pipe in the body of the countertop. From above it is closed with a decorative plug. The bottom of the pipe is fixed to the floor using a universal mount called a thrust bearing. The foot plate is used when it is necessary to attach a pipe to the ceiling, as well as to install special bar shelves.

It is important to choose the right materials for the countertop of the bar counter
If the worktop is to be fixed directly to the wall, then reinforced mounting angles are ideal. They must be installed so that they are invisible, that is, a few centimeters from the edges.
Using special decorative shelf brackets, you can fix the small bar counter along the wall. In order to enhance the carrying capacity, it is better to use several pieces.
Diy bar counter in the kitchen: photo creating a structure with a support from a pipe
In the process of making the classic version of the rack, certain materials are required. An old window sill can serve as a countertop. A part of the required size is cut out of it, the edges are rounded, polished, tinted and varnished. Additional parts such as bar feet, brackets and clips are available at a furniture hardware store.

Scheme of a simple bar counter on a leg
Manufacturing sequence:
- Fastening the corners and stop to the tabletop using self-tapping screws.
- Before fixing the countertop, they make outlines on the wall. Using a level, check that the mount is even.
- Drilling holes for dowels.
- On the floor, mark the place for attaching the pipe, where the thrust bearing is installed.
- Installing the stand in place, fixing it with screws.
Important! In order to ensure the moisture resistance of the structure, all wooden parts must be treated with a special anti-corrosion agent. Most of these will help protect the rack from fire, too. This special treatment is primarily required by bar countertops for the kitchen made of wood.

Depending on the design of the furniture, the pipe for the bar counter may differ in length and the number of mounting points
Instead of a pipe, as a support, you can use a special two- or three-sided cabinet with mini-shelves. Wide boards docked at right angles are already a ready-made structure that just needs to be attached to the wall. Curved lines and any non-standard approach in the manufacture of the rack will give a modern look to the product.
How to make a bar counter with your own hands drywall
Drywall is often used for the base of the rack. You will need several standard slabs, and you also need to prepare beams or profiles for the frame. The stages of creating such a model are as follows:
- Assembling the frame.The main thing is that an angle of 90 ° is observed between the perpendicular planes, and a parallel distance between the horizontal surfaces. This requires a good building level, and an ordinary plumb bob is suitable for tracking verticality.
- Plasterboard sheathing of the assembled frame on both sides using self-tapping screws.
- Putty on corners, joints and self-tapping marks.
- The decoration of the product depends on the choice of the owners. It can be a decorative putty for painting with water-based emulsion; textured paint that is applied in a thick layer.
- Installing the countertop. It is advisable that it matches in color and structure the rest of the surfaces in the kitchen and decorative elements of furniture, provided that the bar is in the room.

It will not be difficult to make a drywall bar counter with your own hands, first you need to make a frame from a bar or profiles and sheathe it with drywall
Diy wood bar counter: manufacturing process
To build a rack made of wood, you need to prepare bars of 50 × 100 mm, edged board 25 × 300 mm, MDF sheets (18 mm), plinth, screws, varnish and paint. After creating a project, the manufacturing process has the following sequence:
- Marking the locations of the frame on the wall and floor.
- Fastening the timber to the floor and wall along the basting lines.
- Installation of support legs and cross beams for tabletop mounting. Their height is determined so that the countertop is flush with the kitchen working area.
- Connection of uprights using transverse beams or furniture corners.
- When the frame is assembled, sheathing is performed. To do this, you can use wide sanded boards or MDF sheets.
- Fastening the plinth on the border of the rack and the floor.
- Installation of a tabletop, which is cut from an edged board.
- The table top is sanded and varnished.

To erect a wooden rack with your own hands, you need to have basic carpentry skills
The gaps that form between the bar, the wall and the floor can be filled with acrylic sealant, and the ends of the countertop can be trimmed with molding.
Useful advice! To ensure a perfectly flat surface of the rack and eliminate errors made during the installation process, you can use special adjustable legs for the bar.
Backlit bar counter: installation options and types of luminaires
Lighting plays an important role in the design of the bar counter. For this purpose, different types of lamps are used:
- pendant lights, which have a suspension with the ability to adjust its length;
- spot lighting, in accordance with the name it illuminates the area above which it is located,

The backlit bar counter looks spectacular, and for its lighting, ordinary lamps of different shapes, LED lamps and strips, spots are used
- creating direct light;
- spots - special halogen lamps on metal brackets used in the design of modern high-tech, loft or modern racks.
- track luminaires are structures made of metal conductive buses with light elements;
- the LED strip serves not only as a backlight, but also as a decoration, it is easy to install and is practically invisible when not in operation.
Mobile bar table for kitchen and living room: step by step instructions
An alternative to a bar counter in a small apartment can be a bar table. This piece of furniture has a variety of shapes, heights; Basically it is a round, inflated design on one stable leg. You can create your own original model of a mobile mobile bar table-counter on wheels, and the material will be the remnants of building materials, in particular, trimming water pipes. For work, you will need water pipes with appropriate connectors, a pair of boards, perforated tape, fasteners and wheels.

A distinctive feature of mobile bar tables is the wheels, on which they roll around the kitchen or move into the living room if necessary
The frame of the table is assembled from water pipes, which are connected with connectors. Wooden shelves are attached to the pipes with screws or perforated steel tape. In order to make a place for hanging glasses in the upper part of the table, it is enough to cut out round holes with grooves. The mobility of the table is provided by wheels that are easily attached to the tube base. To ensure that nothing falls during movement, it is necessary that the surface of the shelves is non-slip. It would be advisable to install additional sides and partitions.
The bar counter is a comfortable, modern and functional piece of furniture in the kitchen or living room. With its help, you can successfully supplement, and in case of space saving, replace the dining area. Using the recommendations given in the article, designs of various shapes can be easily made independently. The main conditions for successful work are the correctly selected model and materials, the layout of the location and the sequence in manufacturing.