Even if there is no house for permanent or temporary residence on the territory of the summer cottage, there is still a need to build a latrine. Human natural needs make themselves felt, even if you come to the country for just a few hours to cultivate and water the land. A rational solution in this case would be a do-it-yourself toilet. The step-by-step instructions are quite simple, and the construction itself is inexpensive.

When building a toilet on your own, a minimum of effort and finance is spent
Content
- 1 How to make a toilet in the country with your own hands: general information
- 2 Sump toilets for personal plot
- 2.1 Features of a wooden toilet for a summer residence with your own hands, drawings
- 2.2 Disadvantages of structures made of wood
- 2.3 Do-it-yourself toilet in the country: photos and characteristics of structures from a metal profile
- 2.4 Do-it-yourself brick toilet drawings for the dacha: design features
- 3 Closets without a cesspool: the main varieties and their features
- 4 Toilet for giving with your own hands. Step-by-step instructions for creating the most popular designs
- 5 Construction of a toilet for a summer cottage: a drawing with dimensions for a "Birdhouse" type structure
- 6 Based on the drawings, we are building a toilet in the country with our own hands, like "Shalash"
- 7 How to make a toilet in the country with your own hands: drawing and step-by-step instructions for creating a peat toilet
How to make a toilet in the country with your own hands: general information
Despite the seeming, at first glance, primitiveness of the building, the design of the toilet at the summer cottage belongs to the category of basic structures. Its construction should be started first. Many will agree that the land outside the city can easily do without a fence, a country house and other buildings, but a latrine is an integral part of comfort, without which it is simply impossible to operate the site.

Toilet from a bar with a gable roof-visor
Note! Of course, a country toilet on the street, made with your own hands, will not replace a normal bathroom, providing only minimal amenities. However, summer vacation is impossible without them, it will not be possible to fully work on the site.
There are a number of sanitary and hygienic standards in accordance with which such construction is carried out. Therefore, it will not be superfluous to first familiarize yourself with them before starting work.
Sanitary and hygienic standards for the construction of a toilet
Installing a toilet in a suburban area is a simple matter, which, with proper study, does not require the involvement of specialists. However, such construction is still accompanied by some peculiarities.

Toilet on the plot, stylized as a fairy house
Basic standards:
- First of all, you should make sure that the construction of the structure will not create inconvenience to neighbors.
- The place for the installation of the structure is selected with great care. This stage of construction must be carried out in full compliance with the sanitary standards for the area of the bathroom. Violation of these rules can lead to serious pollution of the surrounding area (soil, groundwater), which will entail fines from the sanitary service and even health problems.
- At the stage of developing the drawings, a method should be thought out according to which the sump will be emptied.
- The choice of design is limited by several factors. One of them is the water horizon of the suburban area. If the water table is very high, the sump must be completely sealed.
These simple rules will help get rid of problems with further operation.

A washstand located near the toilet will create additional convenience
How to choose and make a toilet in the country with your own hands: photos and types of structures
At the summer cottage, it is possible to build various structures. There are a lot of options to choose from, so you should be guided by several criteria. The choice of design can be influenced by:
- the size of the budget available to the developer;
- the estimated frequency of the bathroom;
- the level of the height of the water horizon;
- the amount of money that is planned to be allocated for the maintenance of the toilet in the future.
Note! All outdoor toilets are classified based on one criterion - the method of waste disposal.

Examples of toilets made of wood, built by hand
Sump toilets for personal plot
Sump latrines are the most popular and widespread. And not only in summer cottages, but also in the courtyards of villages.
The construction of such structures with your own hands, as a rule, is not accompanied by difficulties, since the sewer system in this case is replaced by a deep pit. It accumulates liquid waste, which is disposed of by gradual evaporation and absorption through the soil. Only sometimes it is required to call a sewage truck to fully empty and clean the sump.
The frequency of calling the sewers depends on how deep the pit is and how well the structure is made. Waste disposal procedures can be extremely rare. In most cases, this problem is solved by filling the pit. After that, a new waste collection tank is dug out near it.

Country toilet sheathed with vinyl siding
The above-ground part of the toilet can be a structure made of various materials:
- metal profile;
- boards;
- slate sheets;
- bricks, etc.
The most important components of a high-quality design are the reliability of the frame base and the availability of effective ventilation.
Features of a wooden toilet for a summer residence with your own hands, drawings
Many homeowners give preference to wood structures. This choice is due to the fact that the technology of building a plank frame is very simple and does not require serious skills, and its cost is low.

Drawing of a wooden toilet based on a cesspool
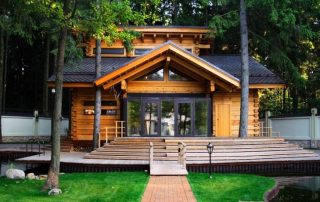
A wooden product can be stylized as a fairy-tale hut or a house, thanks to which you can get not only a functional, but also an aesthetic building. As a finishing material for the frame, you can use lining instead of boards. This will give the aboveground part of the toilet a very attractive and stylish look.
Note! One of the many advantages of a wooden product is its mobility. In the event that a filled hole is buried in order to dig a new one in another place, there is no need to rebuild the house. It is enough just to move the frame to the desired location.

Do-it-yourself toilet from a log house
Disadvantages of structures made of wood
When choosing this material, do not forget about the shortcomings of wood. It is influenced by many negative factors that reduce the service life of a building. These factors include:
- the influence of direct sunlight (under their influence, the wood cracks, crumbles and deforms);
- the hit of ultraviolet radiation on the surface of the tree leads to its burnout;
- humidity, which is necessarily accompanied by the operation of any toilet, contributes to deformational changes in the frame;
- fungi and mold, as a result of exposure to moisture, develop intensively in the wood, supporting the processes of decay, dampness and unpleasant odors.
Specialized means in the form of protective impregnations will help to avoid premature damage to the toilet under the influence of negative operating conditions. To increase the service life of boards or any other wood-based material, the surface of the product should be painted with a coloring compound designed for outdoor conditions. The wood is pre-treated with a primer.

Closet made of wooden slats with a metal door
Those who love the beauty of natural wood can be advised to use transparent varnish as a protective material. It will preserve the natural pattern of the tree.
Do-it-yourself toilet in the country: photos and characteristics of structures from a metal profile
The lavatory, made of metal profiles, offers several installation options. In the first case, a wooden frame is taken as the basis for drawings of a toilet for a summer residence. Another option involves the creation of a base from metal shaped pipes, connected by welding. To do this, it is imperative to have a welding machine with you and have the skills to handle it.
Then the wooden or metal base is sheathed with profile sheets. Rivets or self-tapping screws can be used as fasteners. You can purchase special protective washers for self-tapping screws, which will prevent moisture from entering the fastener, thereby protecting it from rust damage.

Country toilet of a round shape, built of corrugated board
Despite the fact that the construction of such a structure does not take much time and effort, a metal profile toilet has one significant drawback. In the summer, the structure is very hot. Therefore, it is recommended to install the metal product in a place that is constantly in the shade.
Useful advice! Use polystyrene foam sheets for interior cladding. They will keep the structure cool.
Profiled metal sheets are coated with a special protective coating even at the production stage. Thanks to this coating, the material is reliably protected from moisture, so the profile sheets can be safely used for the installation of structures placed outdoors.The most advantageous advantage of a profile toilet is the speed of its installation.

Wooden toilet with profiled sheet roof
Do-it-yourself brick toilet drawings for the dacha: design features
The construction of a brick closet has its own difficulties. First of all, they are due to the fact that if it is necessary to transfer the structure, this will not work. Therefore, it is recommended to first study various projects of the toilet in the country with your own hands, drawings and features of the site itself. You should also foresee the method according to which the cesspool will be cleaned. In addition, a brick building will require the installation of a concrete floor.
In fact, a brick toilet is a capital structure that does not need to be repaired for several decades. The costs of its construction are much higher than when using wood or profiled sheet. But you can save money if brick remains after the construction of the garage or house.
Note! The construction of a toilet in a summer cottage from the same brick from which the house and garage are built will allow to achieve unity in the exterior of the yard. Thus, the design of the site will be consistent with the same style, which looks very impressive and harmonious.

Toilet built of red brick
Since the weight of the finished brick structure is very large, a massive and solid foundation should be laid under it, as mentioned earlier. Professionals advise choosing a tape-type foundation for these purposes. It has many benefits:
- minimum earthwork;
- very small consumption of cement powder for filling;
- high security;
- reliability (provided on almost any type of soil).
For products that have a lighter structure made of other materials, a columnar foundation can be used.

Examples of brick toilets at their summer cottage
Closets without a cesspool: the main varieties and their features
A cesspool is considered the easiest and most budgetary way to solve the problem with a toilet in a personal plot. But even in this case, there are limitations with regard to structures of this type. The installation of pit latrines is subject to the following conditions:
- the soil of the suburban area consists of limestone or shale soil;
- groundwater flows too close to the surface;
- use of the toilet by a large number of people is expected.
All these factors do not allow organizing a toilet based on a cesspool on the territory of a suburban area. The way out of this situation will be the construction of latrines of a completely different type, based on a different principle of action.

The toilet is lined with moisture-resistant colored plywood
Types of bathrooms without a drainage pit:
- backlash closet;
- powder closet;
- dry closet or chemical toilet.
Each design has its own characteristics: device, construction technology, requirements for operation.
Backlash closet: drawings of a toilet for a summer residence and its features
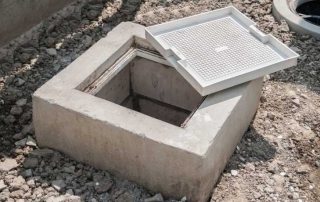
The backlash closet is a kind of improved construction based on a cesspool. It differs from standard versions only in that the waste storage tank is completely sealed.

3D project for arranging a backlash closet in a suburban area
Note! The backlash closet device allows the installation of a toilet bowl inside a heated room, that is, at home, and the storage tank can be located at a distance from it. Most often it is placed next to the wall where the bathroom is installed.
The connecting piece between the drive and toilet bowl the pipe protrudes. It can be vertical or tilted. This element is designed to feed waste into the drive, and in a gravity flow mode.
Due to the peculiarities of its design, the backlash closet needs servicing of the sewers, which can periodically empty the storage tank. But unlike conventional toilets based on a cesspool, this option is more hygienic and convenient to use.

Drawing of a backlash closet with a sealed cesspool
To facilitate the work of the sewers, a pit is dug when arranging a backlash closet. Its shape should be elongated. This will allow the installation of the hoses of the suction truck.
The design also has disadvantages. For example, during the winter season, the cleaning procedure is not possible. Many owners solve this problem by installing a special system for heating the drive.
Characteristics of powder closet at their summer cottage
This type of latrine is characterized by a small collection container. The maximum storage capacity under the chair is 20 liters.
Installing a powder closet is useful if groundwater passes close to the surface. These conditions can be problematic to operate. other toilet options, but the powder closet will be able to fully work even in such a situation.

A container with a volume of up to 20 liters is used as a storage for powder closets
The advantages of the design include the minimum level of costs for its arrangement. At the same time, the scheme for converting waste into an environmentally friendly organic fertilizer is very simple and also cheap.
The name of this toilet was given due to its operating principle. The fact is that the waste in the storage tank is, as it were, “powdered” using a dry composition. For falling asleep, a peat-sawdust mixture or peat is usually used. This eliminates the likelihood of putrefactive processes, which is why there is no unpleasant smell in the toilet.
As the container accumulates, all the waste that is in it and is covered with peat is transferred to a previously prepared compost pit... Here they will be composted.

Drawing of powder closet: 1 - ventilation hole 25x25 cm, 2 - toilet seat cover, 3 - toilet seat, 4 - storage tank, 5 - door, 6 - brick supports, 7 - clay pillow, 8 - glazed transom
Note! Constructions of powder closets can be both stationary and portable. In the second case, the toilet allows you to bring a small-sized structure into the house during the rain or at night.
What is the design of a dry closet
Dry closets are very popular today among summer residents. The design consists of a compact toilet, which is characterized by a convenient system of operational use. The principle of operation of a dry closet is in many ways similar to the work carried out by a powder closet. The processing process, as well as the further decomposition of waste, is carried out by means of a peat mixture.
Some models allow the use of biological products for waste processing. These substances can be in liquid or dry form. They contain cultures of special bacteria.

The principle of a peat composting dry closet
In models with a chemical principle of action, drugs of chemical origin act as active substances that enhance waste decomposition. When choosing a suitable option, do not forget about safety. Effective and safe drugs are expensive.
Some owners of summer cottages, due to their ignorance, use substances such as formaldehyde, bleach and others for waste disposal. Their use is strictly prohibited, since the composition of these substances is very toxic.
Average prices for eligible drugs:
| Drug name | Release form (volume) | Cost, rubles |
| Bio Favorite | liquid (950 g) | 700 |
| Microzyme SEPTI TRIT | liquid (250 g) | 700 |
| Atmosbio | powder (300 g) | 600 |
| Saneks | powder (100 g) | 230 |
| Tamir | liquid (350 g) | 200 |
Toilet for giving with your own hands.Step-by-step instructions for creating the most popular designs
Installing a toilet outside requires compliance with certain conditions and rules. The most important requirement for the installation of any type of structure is the absence of direct contact of the waste in the storage tank with groundwater. The interaction of these components should be minimized.
Important! The groundwater level is the first thing that is specified before construction. The construction of a toilet is possible only if this figure is more than 2.5 m under the soil.

The original round design of the country toilet
Toilet in the country: how to build a structure yourself and install it in the right place
Before you start drawing up the drawings and direct planning of the structure itself, you should take care of the correct choice of place for its placement.
The following conditions can affect the installation of a building:
- The minimum distance between the toilet and the nearest water source is 30 m. It is better if the water is located at a greater distance. In some cases, the geological location of the reservoir may be located lower than the level for the construction of the toilet. Then the structure will need to be transferred to another zone. As a way out of this situation, you can move the toilet lower than the water source lies.
- On the territory of the summer cottage there may be basements or cellars. By the type of placement, these pits can be adjacent to the closet, so the structure of the toilet should be located at a distance of at least 15 m from such buildings.
- From residential buildings and other buildings on the site, an indent of at least 8 m is performed.
- Places where animals live or settle should be located at a distance of at least 5 m from the toilet.
- Green spaces should be planted at a distance of 1 m.
- A distance of at least 1 m must be left to the fence separating the nearby territory, which may belong to neighbors.

Minimum distances from summer cottages to a street toilet
Note! Wind direction is also of great importance. Take care not to annoy neighbors with unpleasant odors.
Choosing a toilet cubicle in a suburban area
The modern choice of designs provides many variations. The summer resident can independently build the above-ground part of the structure or purchase an already finished product. Many companies allow buying cheap wooden toilets for summer cottages.
Average prices for common types of finished wood structures:
| Model, features | Dimensions (width / length / height), mm | Price, rubles |
| DT-4 | 1100/1100/2700 | from 15000 |
| DT-1 | 1000/1000/2500 | from 12000 |
| Wood | 1000/1000/2300 | 13000 |
| DT-3 (garden) | 1100/1000/2800 | from 17000 |
| DT-4 (with window and roof) | 1100/1100/2700 | from 18000 |
| Dachny | 1100/1100/2700 | 18000 |
| Wood | 1000/1000/2500 | 12000 |
| Large (with imitation of a bar) | 2500/2000/2300 | 30000 |
| Toilet-utility block | 3000/2000/2300 | 35000 |
| Rectangular | 1000/1200/2100 | 15500 |
| Euro | 1000/1000/2300 | 8700 |
Cabins, both ready-made and those that you can build yourself, are of several types:
- birdhouse;
- hut;
- hut;
- house.
They all have their own characteristics, size and structure.
Related article:
DIY construction of a toilet in the country, drawings, dimensions. What are the types of self-contained toilets. Choosing the best place for building a toilet in a suburban area.
Construction of a toilet for a summer cottage: a drawing with dimensions for a "Birdhouse" type structure
The "Birdhouse" structure consists of wood, which can be sheathed with any other type of material. Construction of a single or gable roof is allowed. This type of closet is mounted as an overhead structure above a cesspool.
Typical project "Birdhouse" with dimensional parameters:
| Structural element | Size, m |
| Back wall (height) | 2 |
| Width | 1 |
| Front wall (height) | 2,3 |
| Base area | 1x1 |
Useful advice! If you are not strong enough in drawing up drawings, use ready-made options. Based on them, you can create personal projects.
When installing the structure of a wooden toilet, it is necessary to control the placement of surfaces vertically and horizontally. For these purposes, it is recommended to use a building level.

Drawing of the toilet "Birdhouse": 1 - strapping, 2 - post, 3 - door, 4 - handle, 5 - door cross member, 6 - front wall, 7 - roof rafters, 8 - roof, 9 - ventilation riser, 10 - deflector, 11 - side wall, 12 - cesspool cover, 13 - brick supports, 14 - rear wall
Materials for the construction of the "Birdhouse"
To carry out the work, take care of the availability:
- roofing material - in the amount of 2 m²;
- concrete curb (2 pcs., length - 2 m) or sand-cement block (4 pcs.);
- door block (2000x900 mm);
- sand;
- lining (40 pcs., 87x3000 mm);
- edged boards (4 pcs., 50x100x6000 mm; 3 pcs., 32x90x6000 mm);
- profile sheet made of galvanized steel (2000x1520x0.4 mm);
- wooden bar (1 pc., 50x50x600);
- accessories for the door (latch, hinges, handles);
- fasteners (screws, nails);
- material for the top coat (varnish or paint composition).

Toilet "Birdhouse", photo 1: preparation of materials and installation of the frame
In order to insulate the structure, you should purchase foam. After the end of construction, the frame is sheathed with it from the inside. You can make the interior decoration with beautiful materials (optional).
How to build a toilet in the country with your own hands: phased construction of "Birdhouse"
Instructions for the construction of the Birdhouse (step by step guide):
- organization of a cesspool. The minimum size of the tank is 1x1x2 m. A cushion made of rubble or broken bricks is made at the bottom;
Important! Based on the dimensions of the cesspool, the dimensions of the aboveground part are selected. Agree on this point at the planning stage.

Toilet "Birdhouse", photo 2: installation of a technological hole in the floor
- construction of the foundation. For this, a concrete curb is installed so that the edges of the pit are located at a distance of no more than 0.2 m from it. The curb will play the role of an overlap. The process of installing the curb involves digging in such a way that the concrete base rises no more than 0.1-0.15 m above the soil level. If sand-cement blocks are used, they should be dug in at the corners. The entire frame will be installed on them in the future;
- installation of roofing material. The material is laid over the base in 3-4 layers as an insulator from moisture;
- construction of the aboveground part (frame made of wood), its finishing. A wooden board or lining can be used as a cladding material for the frame. The flooring is made of thick planks. The minimum thickness for the floor covering is 4 cm. It is recommended to use wood species with increased strength characteristics. These species include larch, beech, oak, etc.

Toilet "Birdhouse", photo 3: sheathing of external walls of the structure
Final work on the creation of the "Birdhouse"
The final works include the following stages:
- forming a hole in the floor. The shape of the slot in this case can be arbitrary (round, diamond-shaped, oval, in the form of a heart), the main thing is that its diameter is at least 30 cm;
- installation of the door structure. For convenience, a small slot in the form of a window can be made in the door leaf so that sunlight can penetrate into the frame. This window can be left free or glazed;
- arrangement of the roof. The roof of the Birdhouse can be covered with various types of materials. An asbestos-cement sheet, roofing felt, a profile sheet made of steel are best suited for these purposes;
- applying a finishing layer. The surface of the product should be treated with a varnish or paint. It is recommended to use oil dye.

Toilet "Skvorechnik", photo 4: installation of a ventilation pipe and arrangement of the roof
When arranging toilets, do not forget about the organization of ventilation.Even the simplest option will be enough. This system is designed to remove air from the waste pit to the outside. A pipe can be used as a material for the manufacture of ventilation. The minimum diameter of the product is 10 cm.
To install the pipe in the catwalk of the toilet, as well as in its roof, slots of the corresponding diameter are made. The pipe must rise at least 0.2 m above the roof.
Note! All areas where this element crosses the wooden frame are carefully sealed. A deflector is installed at the end of the system. He will be able to form the level of thrust required for air extraction.

Toilet "Birdhouse", photo 5: a country toilet built by your own hands
Based on the drawings, we are building a toilet in the country with our own hands, like "Shalash"
The above-ground structure "Shalash" has a more complex structure than that of the "Birdhouse". But all the work spent on its construction justifies itself, because in the end you get a spectacular appearance of the toilet.
Many summer residents stylize such a design to look like a fairy house. Thanks to this, very interesting design options can be found on the sites. For inspiration, you can use photos of toilets for a summer residence with your own hands, of which there are many on the Internet.
The construction of such an object as "Shalash" begins with the formation of a cesspool. Dimensional parameters can be taken from the previous typical project. In the area where the corners of the pit are located, recesses should be made. Concrete blocks will be placed in them. It is very important to keep the exact geometry. To make the structure rectangular, it is necessary to measure the distance between the concrete blocks. Remember to check the base diagonally. They also need to be measured and should end up being the same.

Toilet "Shalash", figure 1: drawing with dimensions, side and front view
Useful advice! A flat rail can be used to control the horizontal. It fits into two blocks adjacent to each other. On top of it is the building level. The maximum height of the concrete base is 0.15 m. At this height, this element must rise above the ground.
How to build a toilet in the country with your own hands: drawings and step-by-step instructions for the construction of "Shalasha"
According to this simple instruction, you can easily install the toilet based on the prepared drawings.
Phased construction:
- installation of the foundation on a material insulating against moisture. It is enough to use roofing material, which is designed just for these purposes. The material is laid in several layers. 2-3 layers will be enough;

Toilet "Shalash", Figure 2: front wall
- assembly of the lower part of the frame. For this, a bar with a section of 50x50 mm is used. The size of the base is 1x1 m. The hammering is done using edged boards. This peculiar formwork is covered with floorboards;
- manufacturing of a technological hole. A slot of any shape you like is made in the bottom. The same size restrictions apply here as in the case of the Birdhouse;
- processing of a wooden base with antiseptic agents. It is necessary to apply an antiseptic to the surface of the base from all sides. When doing the toilet with your own hands, follow the instructions to make sure that all the actions you perform are correct;
- assembly of the rear and front parts of the frame. To complete this step, use the drawings that you have, or sketches. Even photos taken from the network will do if you are quite good at sizing and have the skills in handling wood.

Toilet "Shalash", picture 3: back wall
The final stages of the construction of the "Shalash"
At the final stages of construction, all parts are installed and the frame is finalized. Further work is as follows:
- finishing of the "Shalasha" parts.The back and front walls from the inside are finished with clapboard;
- installation of the front and rear walls. These parts are installed on the floor and held together with the scraps left over from working with the boards;
- installation of wooden lathing from boards. After the manufacture of this element, its sheathing is performed;
- roof organization. With the help of boards, the length of which must be at least 1.8 m, the roof for the "Shalash" is made. To do this, the material should be resting on the back and front of the structure and fixed with fasteners on wooden slats. The result is a roof;
- laying of roofing material;

Toilet "Shalash", figure 4: frame, floor and platform sheathing
Useful advice! In this case, the finish can be absolutely any. However, it is important to maintain the overall style of construction. If you are making a fabulous house, it is not recommended to use metal tiles or corrugated board. Choose a material that matches your design. In an extreme case, you can use the same material that covers the roof of a residential building on the site or the roofs of surrounding buildings (garage, gazebo, shed).
- ridge installation (roof element). The ridge part of the roof can be decorated with a figurine made of wood. It will allow you to create a consistent design style;
- installation of a door structure. Before installing the door, fix the handle and hook on it in advance. From the outside, you can nail a windmill that has an arbitrary shape;
- applying final finishing. The wood should be coated with an oil-based varnish or paint.
This version of a toilet on a personal plot allows fantasies to roam and does not impose significant restrictions on design. Use numerous photo and video materials in order to find interesting ideas for your fairy house.

Toilet "Shalash", figure 5: outer casing
How to make a toilet in the country with your own hands: drawing and step-by-step instructions for creating a peat toilet
Peat toilets are no less popular among summer residents, as they can offer a lot of advantages to many owners of suburban areas. The method of sprinkling waste with a peat substrate is justified at once by several advantageous advantages:
- Peat has good odor absorption properties. With it, you can forget about the unpleasant moments associated with the operation of the toilet on the street.
- Due to the high level of hygroscopicity, the substrate absorbs moisture well, due to which the frequency of cleaning the drive can be reduced. In other words, the toilet can be operated for a longer period without the need to empty the storage tank.
- The processed mixture can be used to fertilize the site, since peat, even in its pure form, contains bacteria in its composition, which contribute to the transformation of organic waste into nutritious compost for the soil.

Drawing with the dimensions of a peat toilet for a summer residence
Note! Factory-made structures of peat toilets do not need to be connected to service systems: sewerage, electrical network and water supply. They can be considered independent and autonomous.
Features of peat products of factory production
Factory made peat-type toilets have a special principle of operation. Their design is designed to separate human waste products into several fractions: liquid and solid.
If a large number of people live in a suburban area, or if you simply plan to use the toilet frequently, a special hose or drainage system can be used to drain the liquid fraction that has already been cleaned.

Peat toilet, photo 1: assembly of a factory structure of a peat dry closet
At this time, the solid fraction accumulates at the bottom of the storage tank. These clusters are easy to remove. To do this, simply take out the container and empty its contents into the compost pit.Manufacturers equip the storage tanks of peat toilets with handles to facilitate transportation.
The main advantages of finished products include a simple operation system. The contents of the container are shaken out, after which the drive is rinsed, filled with peat substrate and installed back.
Average prices for factory products:
| Model name | Product type | Capacity, l | Cost, rubles |
| Peat | peat toilet | 110 | 24310 |
| Termo | peat toilet | 110 | 32510 |
| Ekomatic | peat toilet | 230 | 40110 |
| Biolan Eco | compost toilet | 200 | 38000 |
| Biolan Komplet | peat toilet | 140 | 21900 |
Buying a finished product greatly simplifies the task of organizing a bathroom on the site. For those who wish to save money, below is a step-by-step instruction on how to create a peat lavatory design yourself.
DIY peat closet guide
To make a toilet with a peat-based waste treatment principle, the following materials must be prepared:
- fasteners (screws, nails);
- boards;
- plywood sheet.
Useful advice! Use a normal toilet seat for added comfort. It should be purchased in advance at any store.

Peat toilet, photo 2: installing a seat inside the built house
Step-by-step instruction:
- assembly of the box. Four wooden boards are connected to each other with self-tapping screws. To facilitate the subsequent work on the installation of the storage tank, it is recommended to make a cutout in the front of the product;
- sheathing of the upper part of the box. Use a sheet of plywood to cover the top of the box. Do not forget to cut a hole in it in advance, under which the container will be located;
- installation of legs. Stable legs are installed to the corner parts of the box. Their height is calculated taking into account so that it is easy to replace the waste storage tank;

Peat toilet, photo 3: installation of a ventilation pipe
- fixing the seat to the technical hole. Factory options can be used for peat toilets that are sold as a replacement kit. It can be made of plastic or wood, as well as other materials;
- installation of a storage tank under a technical opening. For these purposes, a plastic bucket with an appropriate volume is used. Peat is preliminarily poured onto its bottom. The thickness of the interlayer is no more than 5 cm.
Average prices for factory seats:
| Name | Product material | Cost, rubles |
| Biolan Huussikka (thermal seat) | polypropylene plastic | 1500 |
| Separett (thermal seat) | polypropylene plastic | 1250 |
| Kekkila (thermal seat) | expanded polypropylene | 1850 |
| Biolan Pehvakka (thermal seat) | polypropylene plastic | 1650 |
| Summer resident (seat on the pit) | Styrofoam | 250 |
| Separett 500 PRIVI (thermal seat with separator for liquid fractions) | polypropylene plastic | 4550 |
How to build a toilet in the country with your own hands, video and additional recommendations
The previously mentioned instruction does not include the dimensions of the peat closet structure, since the construction of such a structure on the site is not accompanied by difficulties. As the above-ground part, you can make a booth of the "Shalash" type.
Additional recommendations:
- For ease of use, it is better to purchase several buckets with lids in advance.
- The procedure for emptying the tank (bucket) will become much easier if the waste is thrown away at the moment when the filling level reaches one third of the total volume.
- It is possible to enhance the efficiency of waste processing with peat using special additives in the form of biological accelerators.
- To achieve a quality result, only factory-made filler should be used.

Peat toilet, photo 4: installing the deflector
Useful advice! Immediately arrange for a compost pit to remove waste from the toilet, or dump it in a designated area.Over time, you can use the processed product to grow vegetables in your garden (soil fertilization).
Use video materials to visually see the technology for creating a toilet in a personal plot.
A little imagination and diligence, and your toilet on the street will turn from an ordinary necessity into a spectacular addition that decorates the local area.