The article will consider in detail surface drainage at a summer cottage: the easiest way to organize a drainage system and its features, the rules for the selection of materials and preparation for work. There will also be an analysis of step-by-step instructions and recommendations for arranging a sewage system for those people who do not have experience in this area, but want to independently organize protection for their home and adjacent territory from erosion by rainwater.

Installation of a drainage system is necessary both on the territory of a private house and in a summer cottage
Content
- 1 Drainage at their summer cottage: the easiest way to protect against water washout
- 1.1 How to make drainage on a site with your own hands: choosing a system
- 1.2 Surface drainage system on site: device
- 1.3 Types of surface drainage of an area with a high groundwater level
- 1.4 Features of point drainage of the site with your own hands on clay soil
- 1.5 Features of the storm drainage system on the site: how to make a drainage system
- 1.6 Turnkey site drainage installation: work cost
- 1.7 Installation of drainage at their summer cottage: the price of elements for the system
- 2 Drainage installation technology around the site: how to make the system correctly
Drainage at their summer cottage: the easiest way to protect against water washout
The use of drainage systems for the disposal of storm water solves many problems. Such designs eliminate the problem of excess moisture at the foundation of the house, preventing the development of putrefactive processes and the appearance of mold. In addition, such systems save the territory from flooding by storm water, as well as melt water, the level of which increases during the spring melting of snow.
Note! If you do not lay drainage pipes on the site or organize a system of surface ditches, you will have to constantly pump out water from the basement of the house in rainy weather. This is especially true for buildings built on loamy soil types.

The device of a deep water drainage system
How to make drainage on a site with your own hands: choosing a system
Drainage systems are conventionally divided into two large categories: surface and deep. If the installation of a deep system may require certain knowledge and the help of specialists, then the installation of surface drainage at a summer cottage can be done independently. This type of sewage can be called the simplest way to solve the problem with excess moisture on the site.
Note! There are certain restrictions regarding the installation of surface and deep systems. Some conditions do not allow the organization of this or that type of sewage system. Be sure to carry out a preliminary analysis of the conditions of the proposed construction site.
To develop a preliminary drainage scheme for the site, its territory should be inspected and key points identified. All factors that may have an impact on further work on the preparation of the site drainage project are considered.

Drainage system project on site
The following information is required to draw up a diagram:
- A plan of the territory with an indication of all buildings, the nature and density of plantings, as well as the boundaries of the site.
- Topographic data that reflects the features of the relief (not needed if the site has a flat surface).
- Dendroplane (the scheme is necessary if there are a large number of plantings on the territory or their planting is supposed, since the plants are dependent on water)
- Road-path net (scheme of the future paths and paved areas that need drainage).
- Communication system diagram.
- Hydrological data (level of water balance of the territory).
On the one hand, hydrological data have an impact on how to do drainage in suburban areas and are therefore very important. On the other hand, loamy soil types have the same structural structure, so this information may not be needed.
Surface drainage system on site: device
Surface drainage systems collect spring melt and rainwater, and then remove it outside the territory. The installation of such structures is especially needed for those summer cottages where there is stagnation of moisture or large accumulations of moisture.

The process of installing a water drainage system in the garden
Most often, such conditions are formed if:
- clay or loamy soil is located under an interlayer of fertile soil (such types of soil are considered waterproof or waterproof);
- the territory has a low-lying character of its location, for example, at the foot of the hills;
- the slope of the surface in the territory is partially zero, in other words, the surface is perfectly flat, which is why the water cannot move independently under the influence of gravity;
- the site has zones where the soil from time to time is oversaturated with water, for example, places where plants are watered.
Note! In addition, it is possible to install surface drainage in an area with a high groundwater level. In this case, the upper soil layers can be flooded with high precipitation.
The surface drainage schemes of the land plot in general terms are as follows:
- water collection points;
- trench ladders leading from the catchment points;
- a trench that connects together the ladder system;
- drainage well, where a common trench leads (instead of a well, leads to a ditch can be used drainage pipes or a natural reservoir, or a ditch specially dug outside the site).

Closed type drainage system
Types of surface drainage of an area with a high groundwater level
With regard to design features, two types of surface water drainage systems are distinguished:
- point, installed in areas where water accumulates;
- linear - whole networks of drainage pipes that collect water for its further transportation to storage wells.
How much will it cost to drain the site (price of materials for a point system):
| Drainage system element | Name and parameters | Price, rub / piece |
| Rainwater inlet | S'park, round | 290 |
| PolyMax Basic (300x300 mm), square | 490 | |
| PolyMax Basic (400x400 mm), square | 990 | |
| Lattice to storm water inlet | S'park, round | 100 |
| PolyMax Basic (300x300 mm), square, slotted | 490 | |
| PolyMax Basic (300x300 mm), square, cellular | 500 | |
| PolyMax Basic (400x400 mm), square, cellular | 900 | |
| PolyMax Basic (300x300 mm), square, snowflake | 1100 | |
| PolyMax Basic (400x400 mm), square, slotted | 1300 | |
| Components | Partition-siphon PolyMax Basic (300х300 mm) | 70 |
| PolyMax Basic basket (300x300 mm) | 110 | |
| Edging D380, circle, cast iron | 1100 |
Helpful advice! Experts recommend combining both of these systems to achieve the most effective result.
Drainage device on site (cost of materials for a linear system):
| Drainage system element | Options | Price, rub / piece |
| Drainage tray | S'park (70 mm) | 70 |
| PolyMax Basic (100 mm) | 490 | |
| PolyMax Basic reinforced (200 mm) | 1190 | |
| Lattice | PolyMax Basic (100 mm) | 180 |
| PolyMax Basic (200 mm) | 820 | |
| PolyMax Basic (300 mm) | 2505 | |
| Trash box | PolyMax Basic (100 mm) | 1300 |
| BetoMax Basic (100 mm), concrete | 1705 |
Features of point drainage of the site with your own hands on clay soil
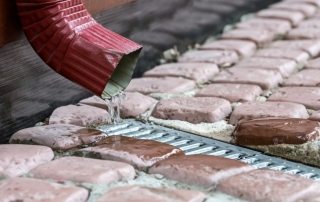
The point-type drainage system does an excellent job of protecting individual zones of the territory from excess moisture. Before drainage of a site on clay soil, as a rule, problem areas are identified, which can be:
- the location of the gutters leading from the roof of the house;
- door pits;
- entrance area;
- terrace;
- points where the analysis of water intended for irrigation of vegetation is carried out.

Laying perforated drainage pipes in a trench
For the arrangement of drainage of the site on clay soil, the following elements are used (prices for them are posted in the tables above):
- storm water inlets;
- sedimentation tanks equipped with containers for collecting large particles and debris;
- trench ladders transporting water to the storm sewer system;
- dampers that prevent backflow of water and the ingress of large particles of debris into the system.
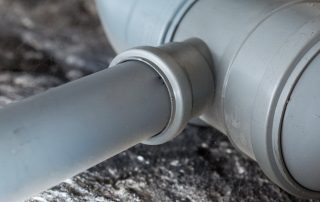
Features of the storm drainage system on the site: how to make a drainage system
The drainage system of the linear type consists of gutters that are buried in the soil. These canals move water from the site to the outside. When arranging such a drainage in a summer cottage with your own hands, it should be remembered that the liquid is discharged by gravity.
On sale you can find gutters made of various materials:
- polymer concrete;
- plastic;
- concrete.

Detailed diagram of the water drainage system
Helpful advice! To reduce the cost of purchasing consumables, you can make your own gutters. At home, you can make concrete elements using special pouring forms.
On top of the gutters, gratings are placed that perform a protective function. The material for their manufacture can be plastic or metal (cast iron, steel). These elements are removable.
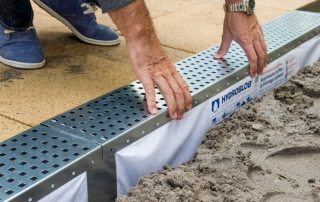
How to drain a site based on the key elements of the system:
- gutters are laid in pre-equipped trenches;
- sand traps are installed in the areas where drainage systems and other similar places are located;
- the gratings are fixed on the gutters.
Do-it-yourself installation of a linear drainage system on a site is performed if:
- the angle of inclination of the surface is more than 3 ° (in such conditions, water can be discharged by gravity, which without drainage can simply wash out the fertile soil layer);
- it is necessary to drain water from the base of the house in conditions of prolonged rainfall;
- it is necessary to divert water from the relief slopes of the territory;

The drainage system will help to cope with excess moisture in the garden
- household structures are located in the same plane with the surface of the summer cottage or below this level;
- there is a need to protect the territory of the summer cottage, as well as entrances and paved paths.
Turnkey site drainage installation: work cost
Water can destroy the foundation of a house, destroy some plant species, wash out fertile soil from the site and even provoke a landslide. Drainage of the site with drainage in combination with other protective measures avoids all these problems.
List of protective measures:
- Implementation of seamless waterproofing of the base of the house.
- Protection of the waterproofing layer from damage.
- Installation of a drainage system at the foundation.
- Organization of additional insulation of the waterproofing layer at the base.
- Construction of insulated blind area structures.
- Turnkey site drainage installation.

Installation of the drainage system by a team of workers
All items from this list (except the last one) are performed even at the stage of building a house. It is better to entrust these works to professionals. The device of a drainage storm system can be done independently, but first it is worth figuring out what the cost of drainage of a site, performed on a turnkey basis by professionals. This will allow you to make the final decision as to whether it is worth laying drainage pipes with geotextiles or limiting itself to surface mounting of the system, which you can do yourself.
Organization of drainage of the site (price of professional services):
| Work scheme name | Depth of pipes, m | Drainage pipes diameter, mm | The nature of the drainage layer, m | Price, rub / rm |
| Superficial | 0,4 | 110 (geotextile) | 0.3 (crushed gravel) | 1000 |
| Rational | 1 | 110 (geotextile) | 0.4 (crushed gravel) + 0.1-0.15 (sand) | 1600 |
| Convenient (1 revision well) |
1 | 110 (geotextile, double-walled) | 0.4 (crushed gravel) + 0.1-0.15 (sand) | 1800 |
| Eco-friendly | 1 | 110 (coconut fiber) | 0.4 (crushed gravel) | 1550 |
| Uncompromising (1 inspection well) |
1 | 110 (Wavin, geotextile) | 0,4 (crushed granite) | 2300 |
Installation of drainage at their summer cottage: the price of elements for the system
Regardless of whether the installation work is done independently or with the assistance of specialists, you must buy all the consumables necessary for this procedure before installing the drainage system.
Helpful advice! In order to save money, it is recommended to buy drainage wells and other consumables in advance. The main thing is not to be mistaken with the calculations. If you are not sure, use the advice of a specialist to draw up a preliminary estimate. The average cost of developing a project for the drainage system of the site is 15,000 rubles.
Drainage well prices:
| Well type | Options | price, rub. |
| Prefabricated (made of concrete rings, diameter 1 m). Complete set: pump, plastic hatch, pump clamp, drainage (no more than 10 m) | 3 rings | 36000 |
| 4 rings | 40000 | |
| Inspection (made of plastic pipe, diameter 0.315 m). Package contents: plastic hatch, plastic bottom | 1m | 6600 |
| 1.5 m | 6900 | |
| 2 m | 7700 | |
| 2.5 m | 7900 | |
| 3m | 8950 |
The average price of cast-iron gratings for storm sewers as part of storm water inlets is 3,500 rubles. Waste basket and walls can be included.
How much does it cost to lay drainage pipes in the country (price of services):
| Pipe type | type of instalation | Price, rub / rm |
| Flexible | Drainage trench | 500 |
| Shallow deepening (0.5 m) | 700 | |
| Deepening below the freezing level | 1200 | |
| Hard | Drainage trench | 700 |
| Shallow deepening (0.5 m) | 950 | |
| Deepening below the freezing level | 1600 |
The table shows that the cost of laying pipes for drainage of the site depends not only on the level of deepening, but also on the type of material. Hard pipes are much more difficult to work with. This nuance should be taken into account when choosing products.
Drainage installation technology around the site: how to make the system correctly
The simplest technology, describing how to properly drain a suburban-type site, implies the refusal to use gutters.
Note! In this case, the surface system is performed in a non-standard way with minimal costs, since there is no need to purchase finished parts from stores. In the process of work, materials at hand are used.

Simple device for drainage of a country-type plot
Do-it-yourself technology for creating surface drainage of a site:
- Trenches should be dug along the perimeter of the area that needs drainage. They should be positioned taking into account the slope of the surface. If the site is horizontal, this slope must be formed independently. Optimal parameters for calculating storm sewers: the width of the trenches should be 40 cm, the depth - 50 cm. The minimum angle of inclination of the surface (towards the removal of moisture from the site) is 30 °.
- The trench system must be connected, and then brought into a ditch or into a storage well.In this zone, you can organize a small artificial reservoir, for example, an ornamental pond, and plant there plants that love moisture.
- The system is checked for functionality. To do this, water is poured into the trenches and the direction in which it flows is checked.
- An embankment is formed at the bottom of the trenches. First you need to organize a layer of large crushed stone, after which there is a layer of small.

For the drainage system, pipes with a filter made of geotextile
Protection of the foundation of the house: the sequence of work of the storm sewer device
The technology of arranging a drainage system to protect the foundation involves the use of a linear structure:
- In areas where liquid is drained from drainpipes from roofs, storm water inlets are installed. For these elements, it is necessary to dig holes in advance, which are 10 cm higher than the depth and width of the water intake funnel. The grate should be placed 3 mm below the soil level.
- The funnel is installed on a concrete base so that there is enough space to remove the grate and clean the water intake if necessary. It is also not recommended to place this element too high, otherwise the liquid will spray on the sides and there will be no sense from the drainage.
- The water inlets are connected to the gutters for transporting water. To do this, you need to indent from the foundation of the house by 1 m and dig a trench. Its depth is selected so that the gutter can be installed, and there is still 10 cm of headroom left on top. The same amount of space should be in width. Do not forget about the slope of the drainage pipe towards the well.

An example of a storm sewer device
Helpful advice! In the process of installing gutters, which are also placed on a concrete pad, it is recommended to use a building level. The sides of these parts can be fixed with concrete for reliability.
Next, the gratings are installed, and the end cap must be on the last gutter of the system. Place sand traps and wells along the corner parts of the storm sewer, after which you can begin to connect all the elements of the system together. At the joints, the use of bituminous mastic is allowed, which will exclude leaks.
The system is completely ready, it remains only to fill it with soil, but so that a gap of 3 mm is preserved between the surface and the grating.

Open type storm sewer with concrete gutters
Additional tips for arranging garden drainage
Gutters made of plastic are lightweight and inexpensive. However, they are subject to deformational changes under the influence of the pressure exerted by concrete and soil. In order to exclude damage to the material, it is recommended to fix the drainage grates “on the bank”.
The system of drainage of water from the site with an open drainage often freezes in winter. So that in the spring the storm sewer can do its job without delay, the pipe must be attached to the sand trap. Thanks to this, the system will not freeze too much.
Using the technology described earlier, you can drain around the perimeter of walkways. Paved areas and paths on the site also need to drain excess moisture, since water has a destructive effect on tiles and other elements (curbs, flower beds).