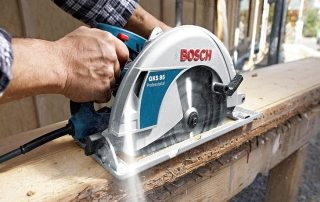
This article discusses homemade machines and accessories for the home workshop. Here are detailed features of the most popular and necessary DIY tools, as well as accessories for a workshop or garage, step-by-step technologies for their manufacture and other useful recommendations on this topic.
Content
- 1 Homemade machines and devices for the home workshop: general information
- 2 Making a joiner's workbench with your own hands: drawings, video, technology
- 3 Making a locksmith workbench with your own hands: how to make a metal structure
- 4 Features of creating a wood lathe for a home workshop
- 5 Accessories for sharpening knives with your own hands: drawings and recommendations
- 6 Instructions for creating a stationary circular saw with your own hands
- 7 The technology of creating a cutting machine for wood
- 8 Assembling a drilling machine with your own hands: video how to make a structure, recommendations
- 9 Features of do-it-yourself CNC milling machines
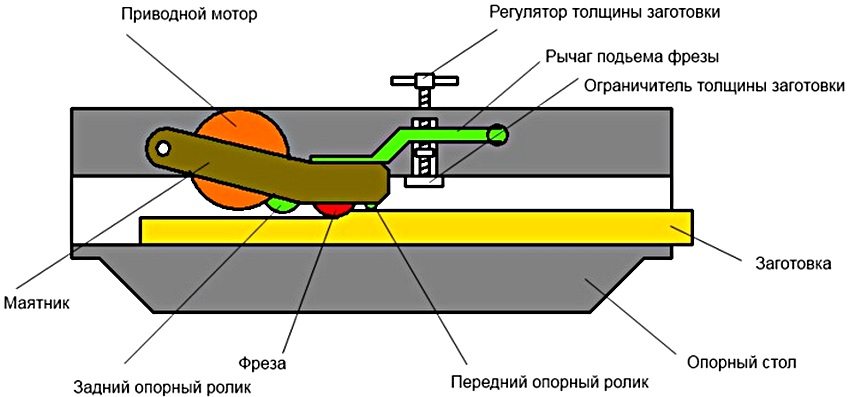
- 10 Features of making a thicknessing machine with your own hands
- 11 Diy scheme for creating a wood grinding machine
- 12 Do-it-yourself wood planing machine operating rules
Homemade machines and devices for the home workshop: general information
Each garage or workshop owner selects the equipment himself, depending on his needs. Many of them know how home-made machines and accessories for garages are made, so they manage on their own when arranging a room, adjusting the technical features of structures for themselves.
So, when creating a metal do-it-yourself workbench drawings and dimensions of the product on them can be adjusted to the parameters of the room and other conditions. Even a small home workshop will need to set aside enough space to accommodate at least the structure of a universal folding workbench and a minimum set of tools.The required area for this is at least 3-5 m².
Helpful advice! It is better to equip the workshop in a separate room so that the noise from the work of a homemade wood grinding machine and other tools does not interfere with the residents. For the placement of machines, you can take a garage, the area of which is sufficient for comfortable work and equipment installation.
Manufacturing of tools for storing tools: shelves, racks
It is actually very difficult to achieve optimal working conditions. It is desirable that the size of the room be at least 6.5 m. For the arrangement of the workshop, you can make an extension to the house or garage. This solution will be the most profitable in any case.
Before you design a drawing of a folding workbench with your own hands, which has the most overall design (therefore, its dimensions are taken into account in the first place), it is worth deciding on some points:
- indicate what types of work will be performed in the workshop;
- determine the list of required tools and equipment.
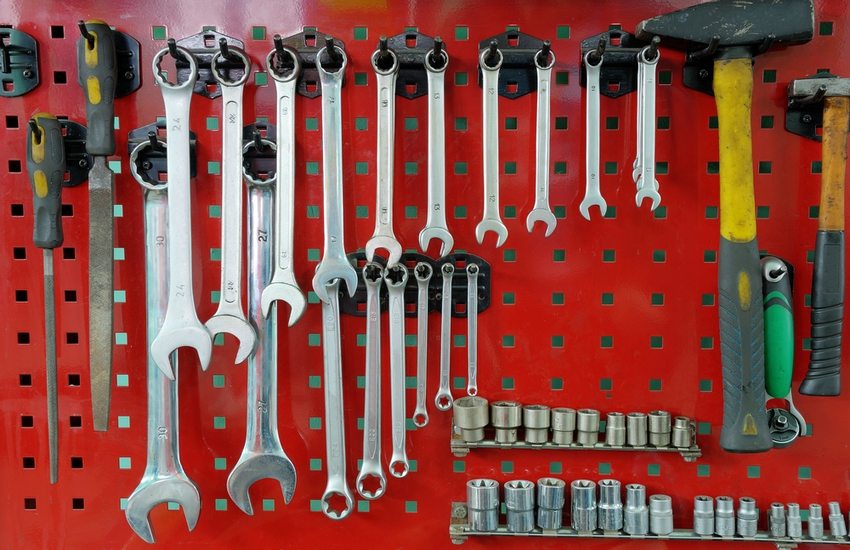
By mounting the tool on the wall, you can significantly save valuable workshop space. Shelves or racks are perfect for this. You can successfully arrange these structures, having achieved the most rational distribution of the area.

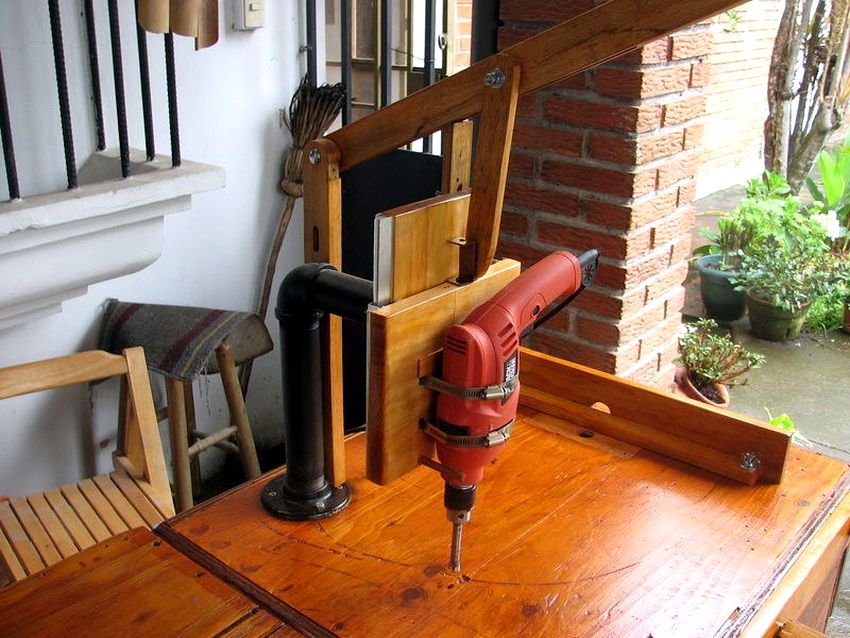
In order to save space, you can get a special device for a circular saw with your own hands, made on the basis of a conventional drill. Such a universal machine can perform several functions at once, combining the following capabilities:
- circular saw;
- grinding machine;
- sharpener;
- mini lathe for wood;
- cutting machine.
Desktop can be combined with in a vice for a joinery workbench and complete it with drawers for storing small tools.
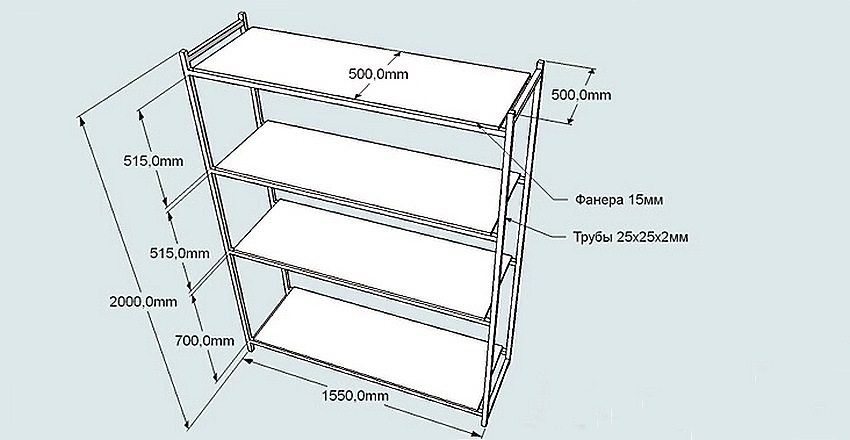
DIY tool shelves: popular designs
Metal structures are more durable and reliable, and wooden ones are affordable.
There are several options for the rational storage of tools:
- wall shelves;
- do-it-yourself tool racks;
- suspended ceiling shelves;
- shelves-shields for hanging small tools.
Helpful advice! The shelf-shield is very convenient for locksmith and joinery work. It can accommodate tool holders or hooks, small shelves or containers for fasteners. It is most advisable to hang such a structure above a folding joiner's workbench. You can even bring in additional lighting. It is better to use a small lamp for this.
DIY tool shelf manufacturing technology (shield):
- A shield is cut out of a plywood sheet, the places where the shelves will be installed are marked on it.
- Using a jigsaw, shelves with side walls are cut out. The length of these sides should match the length of the shield.
- Shelves for tools are assembled and fixed on the surface of the board using long self-tapping screws.
- Installation of hooks is in progress. Holes are made in the shield where the dowels are installed. They need to screw in special hooks equipped with threads. First, it is worth distributing the entire tool and marking the points where it will hang.
- Brackets or lugs are mounted on the rear wall of the structure.
It remains only to fix the shelf-shield on the wall. To prevent the lugs from sliding off the anchors, it is recommended to fix them with special washers.
Making a joiner's workbench with your own hands: drawings, video, technology
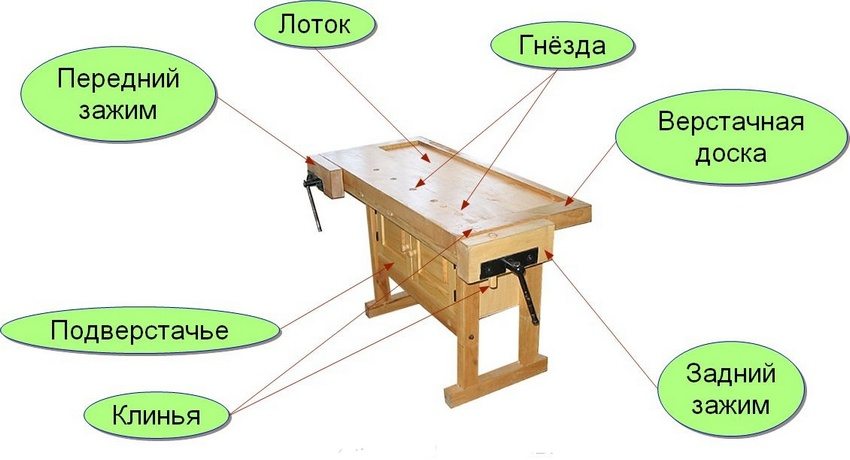
The following details should be present on the carpentry workbench drawing:
- Working surface - for its manufacture it is recommended to take a board 6 cm thick or more. Wood species such as oak, hornbeam or beech are suitable. It is allowed to use several narrow boards, pre-treated with drying oil.
- On the top cover, the construction of a self-made vise is attached with your own hands, which should also be included in the drawing. If it is planned to install a large-sized product, it is better to take wood for its manufacture. The manufacture and subsequent installation of small do-it-yourself locksmith vice made of steel is allowed.
- Workbench Supports - Can be crafted from Linden or Pine. A longitudinal connection in the form of strips must be installed between them. This will increase the stability of the table.
- Tool Shelves - Mount under the workbench. Structures can be fixed or retractable.
Helpful advice! The linear parameter of the workbench can exceed 1 m. The increased size of the structure can be used to install two pieces of carpentry vice with your own hands.
There are several modifications of workbenches:
- mobile;
- stationary;
- folding (universal).
Having familiarized yourself with the device of the joinery workbench, you can start making it.
Diy carpentry workbench technology and drawings: how to make a simple design
Step-by-step construction manufacturing technology:
- To make the lid of a wooden joinery workbench, you need to take thick boards. The size must be chosen so that, as a result of their connection, a shield with the parameters of 0.7x2 m is obtained (the length may be less than 2 m). Long nails should be used as fasteners, which must be hammered from the front side and bend from the inside out.
- You can finish the lid by fixing a bar with a section of 50x50 mm along its lower perimeter.
- Depending on the size of the joiner's workbench (its cover), vertical supports are located. For their manufacture, a bar is taken (12x12x130 cm). At this stage, it is necessary to take into account the height of the working surface, because it should be comfortable. The upper border of the support should be at the level of the lowered hands. Subsequently, due to the installation of the cover, about 8-10 cm will be added to this indicator. The markings for the installation of the bars should be applied to the ground and these elements should be dug to a depth of 0.2-0.35 m.
- Next, the installation of the frame part and the lid of the workbench made of wood is carried out with your own hands. The installed support bars must be connected in pairs. For this, wide boards are used, fixed at a height of 0.2-0.4 m with long self-tapping screws. The cover is fixed on the ends of the supports using the same fasteners.
Note! Do not use nails to mount the cover. In the process of hammering them, the frame part of the product may move.
DIY technology for making a universal wooden workbench
Despite the fact that the technology for creating this structure is in many ways similar to the previous version, for the manufacture of a composite joinery workbench, dimensional drawings will be required without fail. But in this case, bolts are used instead of screws.
In addition, you can install drawers for storing tools in a foldable universal workbench with your own hands.
DIY folding workbench manufacturing technology:
- Vertical supports are installed in a similar way and are connected to each other using horizontally located jumpers. Before installing the jumpers, grooves should be made on them for nuts and washers. To do this, it is better to use a hammer and chisel.
- When the jumpers are set at the required level, through holes are made in the horizontal bar and the vertically installed support. A long bolt will be inserted here. On the side where there is a groove for fasteners, a nut and a washer are put on, after which the element is well pulled together.
- Horizontal jumpers for the frame part of a homemade carpentry workbench will need 2 pcs. on each of the 4 sides. You will also need a couple of jumpers to be installed under the work surface (center). The under-counter elements are designed for drawers. The distance between these jumpers must correspond to the dimensions of the boxes.
- Bolts are also used to fix the work surface. Mounting grooves are prepared at the ends of the supports, and holes for fasteners are prepared on the tabletop. The bolts are installed so that their heads are recessed (1-2 mm).
Note! The drawings of the folding workbench are not as complicated as it might seem. The advantage of the design is that any damaged part can be easily replaced with a new one.
DIY workbench vise design
Usually workbenches are equipped with a vice. Many garage workshop owners know how to make such a device with their own hands. For a homemade design, you will need special studs. These fasteners are sold at hardware stores.
For beginners, experts recommend using additional materials to create a vice with their own hands: a video of how to make such a tool can be easily found on the Internet.
To work, you need a special screw pin. This threaded part is the main active component of the structure. The minimum diameter of the pin is 2 cm, the length of the thread is 15 cm. The longer this part is, the wider the vice can be spread. If you take these dimensional parameters into account in the drawings of the vice with your own hands, you can get a structure that is divorced by almost 8 cm.
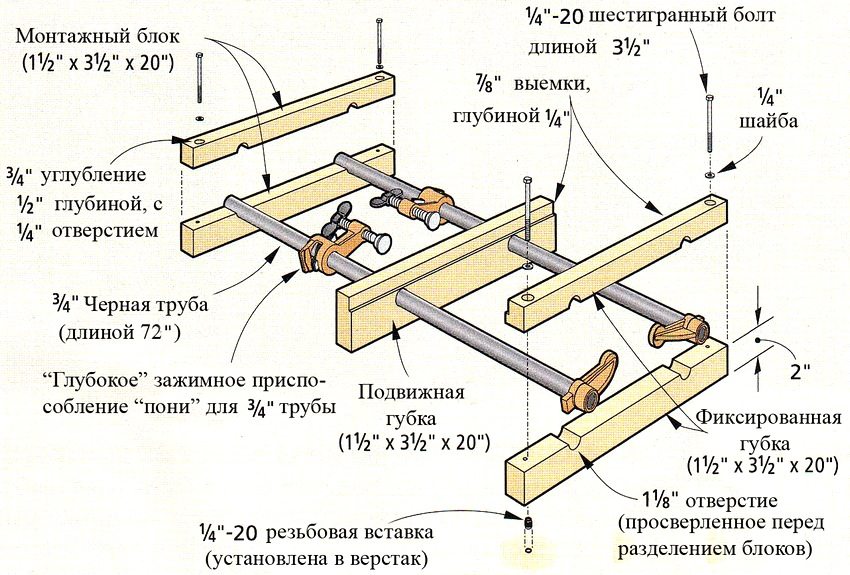
Tool jaws are made from a pair of planks. One part of the part will be fixed. To make it, you need to take a pine tree. The second part 2x1.8x50 cm will move. In each of these boards you need to complete drill screw hole. Using a drill with a diameter of 1 cm, holes for studs are simultaneously formed in all boards. To prevent the holes from moving in relation to each other, you can connect them with nails.
After all the holes are made, the screw and all the pins are inserted into them, along with the washer and nut.
Helpful advice! To be able to process workpieces of different sizes, you need to make the pins repositionable. You will need to make a couple of additional holes in each of the boards, located near the screw clamp.
Additionally, you can use the video material below to create a vice with your own hands.
Making a locksmith workbench with your own hands: how to make a metal structure
For locksmith work, it is better to make a metal workbench with your own hands, because a wooden one will not work for this. The point is that wood is not that strong. In addition, when working with metal blanks, a tabletop made of this material will be constantly damaged and quickly become unusable.
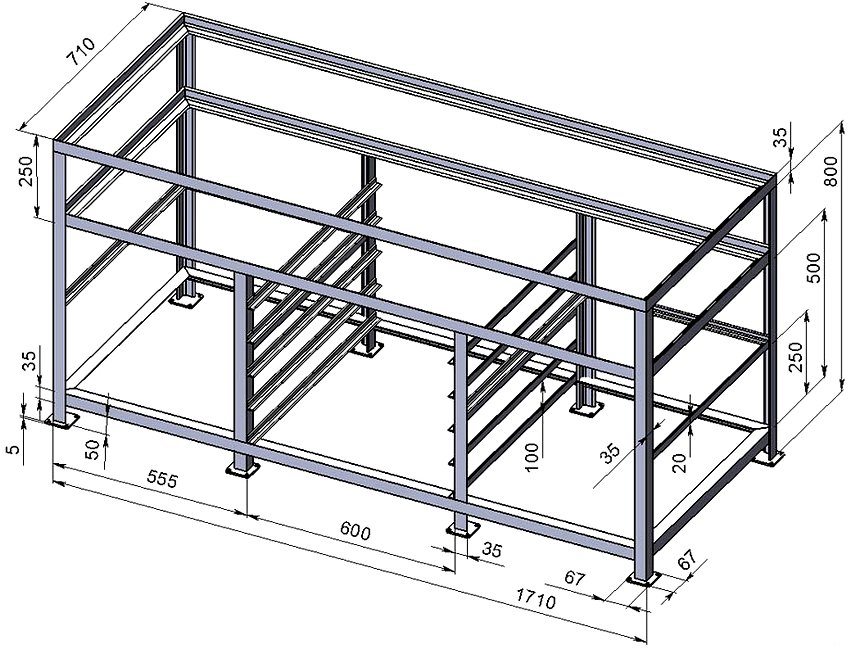
In the general drawing of a do-it-yourself workbench, five main structural components can be distinguished:
- For the longitudinal rigidity of the product, horizontal beams (3 pcs.) With a size of 6x4 cm are used. Length - slightly more than 2 m.
- Small-sized rack beams (9 pcs.) Made of profiled pipes measuring 6x4 cm. They are used to assemble the frame part of the pedestals. In the corner area there are weld-on struts made of steel strips. Due to all these elements, the frame is rigid and very strong.
- Rack beams (4 pcs.) 9-10 cm long (section 6x4 cm). For this, it is better to use metal profile pipes with thick walls (more than 2 mm).
- Corner no. 50 (4 pcs.), Which will be used as uprights. The height of these elements is 1.7-2 m.The working tools will be attached here.
Dimensions of the locksmith workbench:
| Workbench parameters | Size, cm |
| Construction length | 2200 |
| Construction width | 750 |
| Construction height | 950 |
| Cabinet width with drawers | 750 |
| Clearance between the pedestals | 700 |
Helpful advice! In order to make quality seams, it is recommended to use a carbon dioxide semiautomatic device. Experienced craftsmen can use a pulse-type welding machine. In the absence of skills in handling this tool, it is better to entrust the work to professionals.
DIY workbench manufacturing technology: how to make an assembly
Making a universal workbench with your own hands begins with assembling the frame. To do this, you need to take a couple of short and a couple of long beams. During the welding process, these elements may twist.
To prevent this, you must:
- Lay out the details on a perfectly flat plane.
- At the locations of the docking nodes (there are 4 of them), the beams are tacked using the spot welding method.
- After that, all welding seams are fully performed. First on one side of the frame, then on the back.
Then the rear vertical struts and the rear beam (long, one of three) are attached. It is imperative to check how evenly they are placed in relation to each other. If there are any deviations, the beams can be gently bent with a hammer. At the end, the rest of the upright elements are assembled with a vertical arrangement, as well as elements that provide rigidity.
When the frame is ready, corners can be welded to it, designed to strengthen the structure. The table top is formed from wooden planks. They must first be impregnated with a fire-resistant liquid. Then a sheet of metal is laid on top.
Plywood tool shields can be attached to the upright posts. The same material is used to sew the pedestals. For boxes, you can use metal boxes or make wooden structures.
You can use it to understand in more detail the technology of making a workbench with your own hands, the video, which is posted below:
Features of creating a wood lathe for a home workshop
In the technology of making a wood lathe with your own hands, the bed occupies a special place. The work of other parts, as well as the stability of the entire structure, directly depends on this part. It can be metal or wood.
Helpful advice! For manufacturing according to standard drawings of a wood lathe with your own hands, it is better to use an electric motor, which is capable of developing a speed of 1500 rpm. The optimal power indicator is 200-250 watts. If you plan to process large workpieces, you can increase the power indicators.
To create a lathe - copying machine for wood with your own hands, you can use the old manual frezerwhich is no longer needed. This tool is placed on a plywood platform 1.2 cm thick and 20x50 cm in size.Previously, holes must be made in it designed for cutters and fasteners. Stops made of bars will also be mounted here. They are necessary to keep the cutter in a fixed state. The router itself is attached with two nails between the clips.
In fact, it is quite easy to make a copying structure of a homemade wood lathe with your own hands - there are enough video materials on the network.
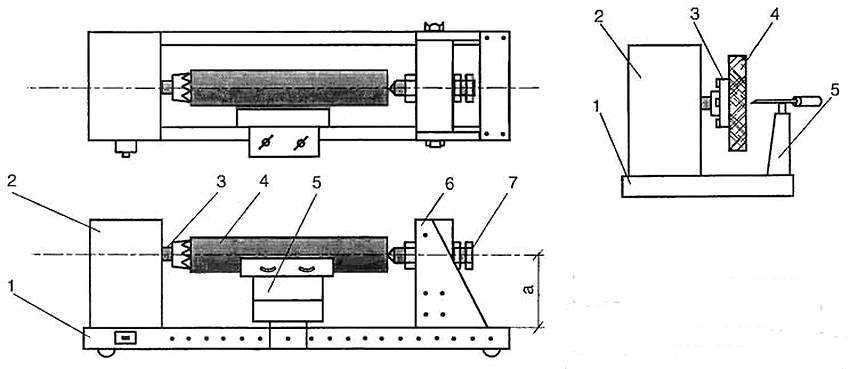
An example of a homemade wood lathe with your own hands
For the base, it is better to take a steel profile with thick walls.To make the structure reliable, it is recommended to use two supports. A frame will be installed on top of them. For fastening parts, a groove type of connection is used. You first need to make support platforms designed for the headstock (rear and front).
List of parts for a wood lathe (it's easy to understand how to assemble a structure yourself based on this list):
- Power Component - You can use an electric motor from an old pump or washing machine.
- Headstock (back) - a head from a drill with a high power reserve will do.
- Headstock (front) - to organize this part, it is better to buy a factory spindle equipped with 3-4 pins. This makes it possible to displace the workpiece in relation to the rotary axis.
- Supporting element - a table for cutters can be of absolutely any configuration, the main thing is that it provides comfort during work.
- Pulley - is a connecting element between the headstock and the shafts in the electric motor.
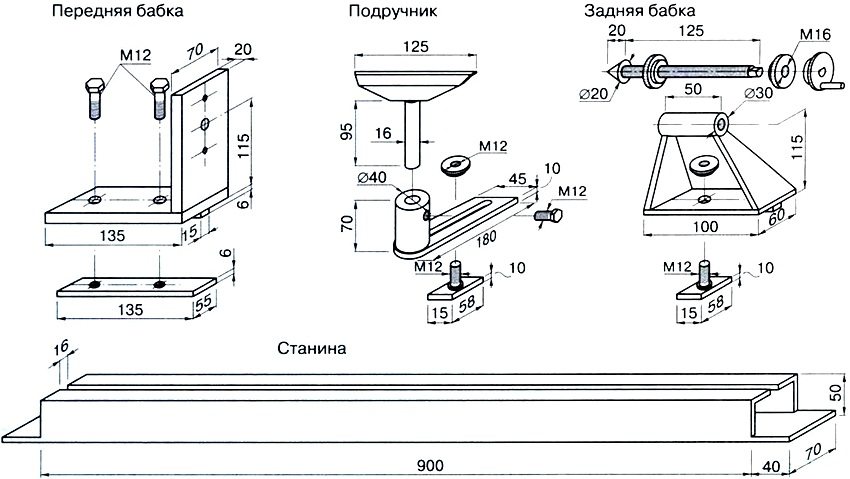
Note! To work with this design, you will need to purchase a set of factory cutters. If you have the right tool, you can make your own, but you need tool steel.
As an auxiliary information, you can use a video describing this process in detail to assemble a wood lathe with your own hands.
The second example of a woodworking lathe with your own hands
An alternative solution would be to make a construction of the simplest mini-lathe for wood with your own hands based on an electric drill. This example of technology can be used as a sample before building a more serious tool.
This type of machine is suitable for small-sized wooden workpieces. The material for the bed can be wood beams. The headstock can be replaced by a combination of a shaft mounted on a journal bearing. To fix the workpiece, you will need to get the appropriate drill bit.
This design has its drawbacks, they are associated with:
- a high probability that there will be errors in milling;
- low level of reliability;
- the inability to process large wooden blanks.
But do not give up this option, because it is the basis for technologies for creating more advanced and complex turning tools. To correctly calculate the structure, determine for yourself the required operational properties and technical characteristics.
The principle of making cutters for a wood lathe
The technology in this case is complicated only by the correct choice of workpieces, which should not only have the level of hardness of the cutting edge corresponding to the requirements, but also be correctly installed in the fixture-holder.
Note! In the absence of tool steel, you can do with the tools at hand. After the preliminary preparation stage is completed, the material is additionally tempered.
Recommended types of blanks:
- Reinforcing steel bars - it is better to use options that have factory original dimensions and a square section shape.
- Files or rasps - worn-out workpieces will do, but do not use material with deep chips or cracks.
- Automotive springs - before using these blanks, they will need to be squared, which not everyone can do. A welding machine is useful for this purpose. An autogen will do.
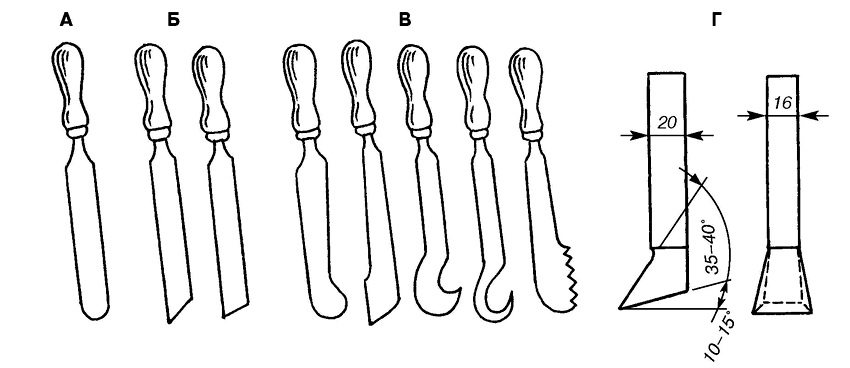
The machine can provide for the possibility of changing cutters.For this, a special modification of the housing is made with the necessary mounting parts. These elements must be strong enough to withstand the loads during operation while maintaining the original position of the edge portion.
When the cutter is made, it is sharpened and the cutting edge is hardened. After the cutting part is heated, the cutter must be dipped in machine oil. With the help of slow hardening technology, the surface of the product can be made as hard as possible. In this case, the heated work piece must cool naturally.
Accessories for sharpening knives with your own hands: drawings and recommendations
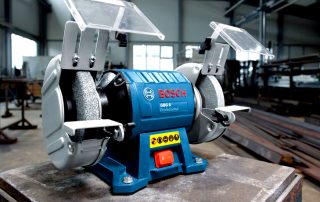
To make a sharpener from an engine from a washing machine with your own hands, you can limit yourself to a motor from an old Soviet design, for example, SMR-1.5 or Riga-17. Power of 200 W will be sufficient, although this figure can be increased to 400 W by choosing a different engine option.
The list of parts required for a do-it-yourself grinding machine includes:
- tube (to grind the flange);
- a nut for fixing the stone on the pulley;
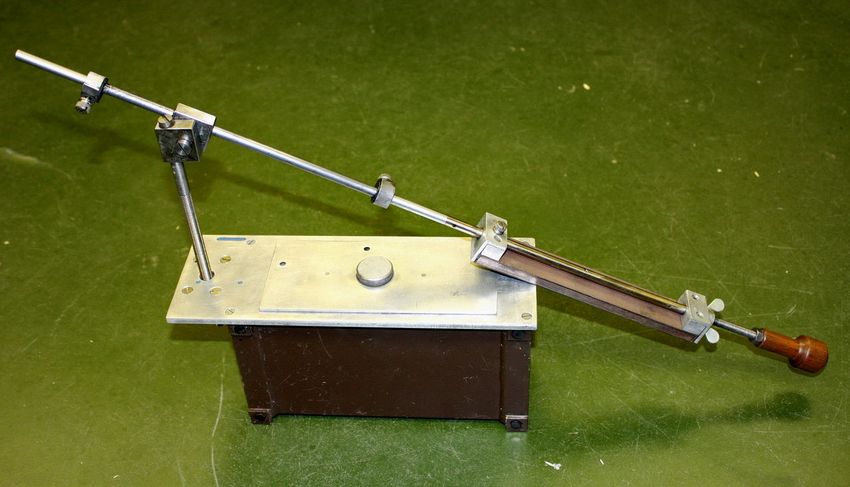
- metal for making a protective casing for a sharpener with your own hands (thickness 2, -2.5 mm);
- whetstone;
- an electric cable cord having a plug;
- device for starting;
- a corner of metal or a bar of wood (for the bed).
The flange diameter must match the bushing on the motor. In addition, a whetstone will be worn on this part. On one side, a thread is made on this element. The distance should be equal to the thickness of the wheel multiplied by 2. The thread is tapped. On the other hand, the flange must be heat pressed onto the motor shaft. Fixation is carried out by bolting or welding.
Helpful advice! The thread should go in the opposite direction to the direction in which the rotational movements of the motor are performed. Otherwise, the nut fixing the circle will loosen.
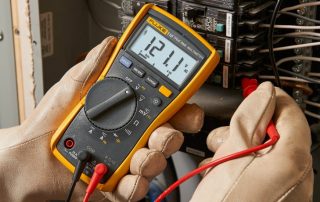
The working winding of the motor is connected to the cable. It has a resistance of 12 ohms, which can be calculated using a multimeter. The starting winding for a do-it-yourself knife sharpener will have 30 ohms. Then the bed is made. It is recommended to take a metal corner for it.
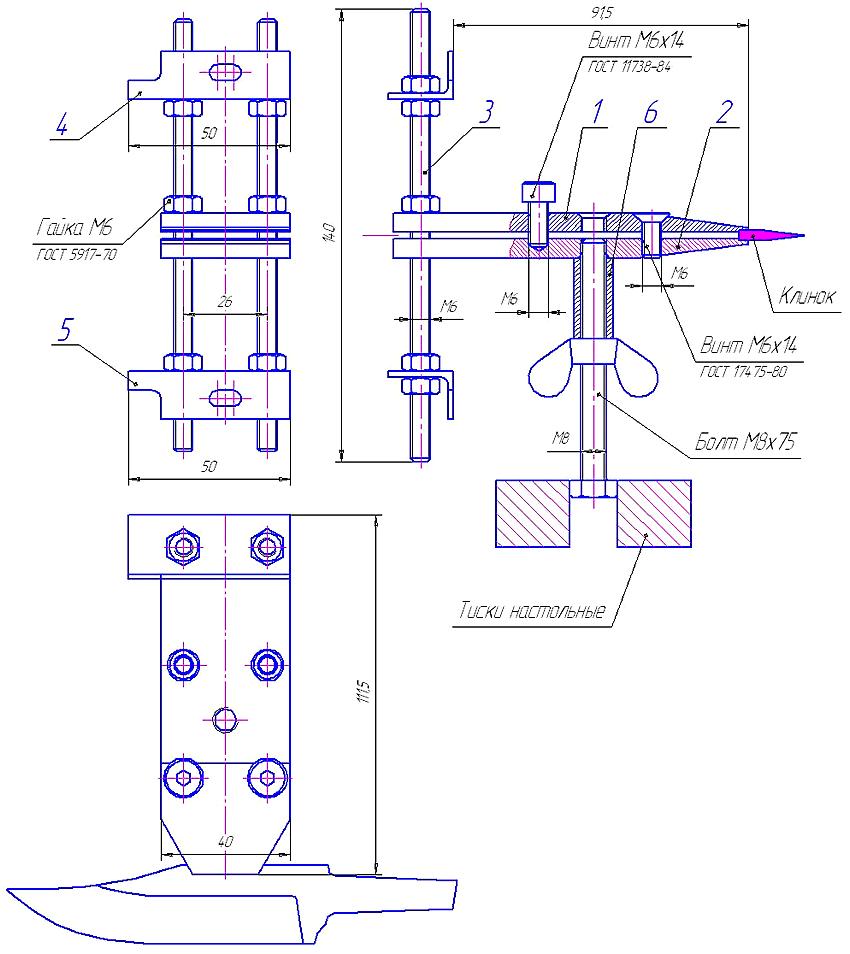
Some people need sharpening machine for chainsaws... You can make such a structure with your own hands from a bed with 3 supports, two spindles, a stepper motor (2 kW) and pipes used as holders.
Instructions for creating a stationary circular saw with your own hands
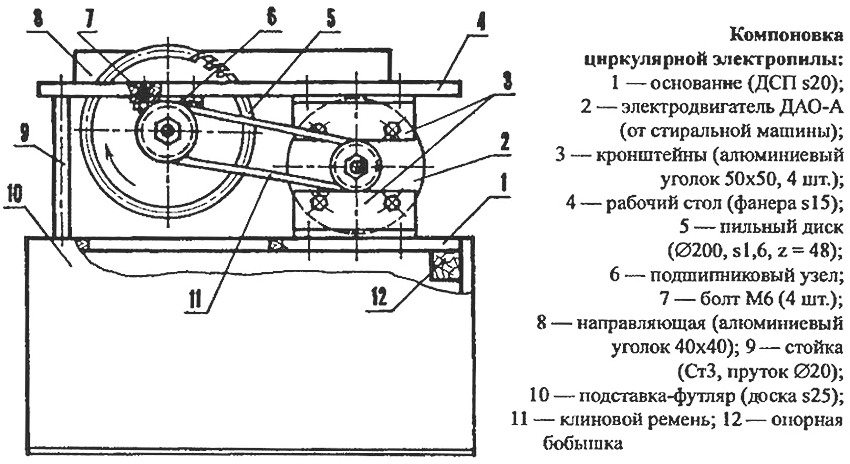
Creating a table for a hand-held circular saw with your own hands is the most important stage in creating a machine, since the main parts of the equipment will be placed on this structure in the form of:
- power unit;
- control unit;
- cutting component;
- other components.
The support bed on the hand tool table acts as a guide for the do-it-yourself circular saw. It controls the direction in which the cut is made and fixes the workpiece.
Sawmill is a modification of a circular saw. The only difference is that the disc is located at the bottom. The do-it-yourself function of the bed is assigned to the design of the table for the circular saw. A power unit, a block holding a disk and a control system are also installed here.
At the design stage for a circular saw with do-it-yourself drawings, some factors should be taken into account:
- The depth to which the material will be cut - the indicator depends on the geometry of the disc.
- The power level of the electric motor - a specific indicator of 800 watts will be enough.
- Control System Mounting Area - Controls should be located as far from the disc as possible.
- Rotational speed - the minimum allowable value is 1600 rpm, otherwise color changes will occur during the cutting process.
Helpful advice! If the table is made for a manual version of the tool, it is recommended to make the table top metal. A sheet of metal should be equipped with stiffeners at the base.
How to make a circular saw from a grinder with your own hands
First, the table top is made of sheet material. Marking is applied to it in accordance with the dimensions of the instrumentation. Cutouts are made along these markings for installing the saw.
Then it runs:
- Installing a parallel stop for a circular saw with your own hands, made from a wooden strip. The element is fixed to the table top.
- Stop groove - these elements are formed on the tabletop by milling.
- Measuring Ruler Mounting - The mounting area is located at the leading edge of the cutting element. The ruler will be used to control the dimensional parameters of the workpieces.
- Installation of clamps is an additional component for fixing the workpiece.
For a machine from a circular saw with your own hands, you will need legs. They are mounted taking into account the dimensions of the table top made of wooden beams with a section of 4x4 cm. It is allowed to use steel corners... To provide additional stability, stiffeners should be installed between the supports. A control unit is placed next to the workplace. You should not refuse to install RCDs and devices that protect the engine from overloads.
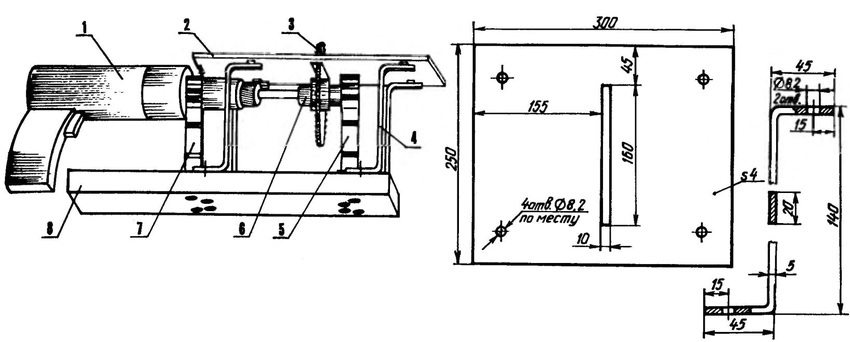
The technology of creating a cutting machine for wood
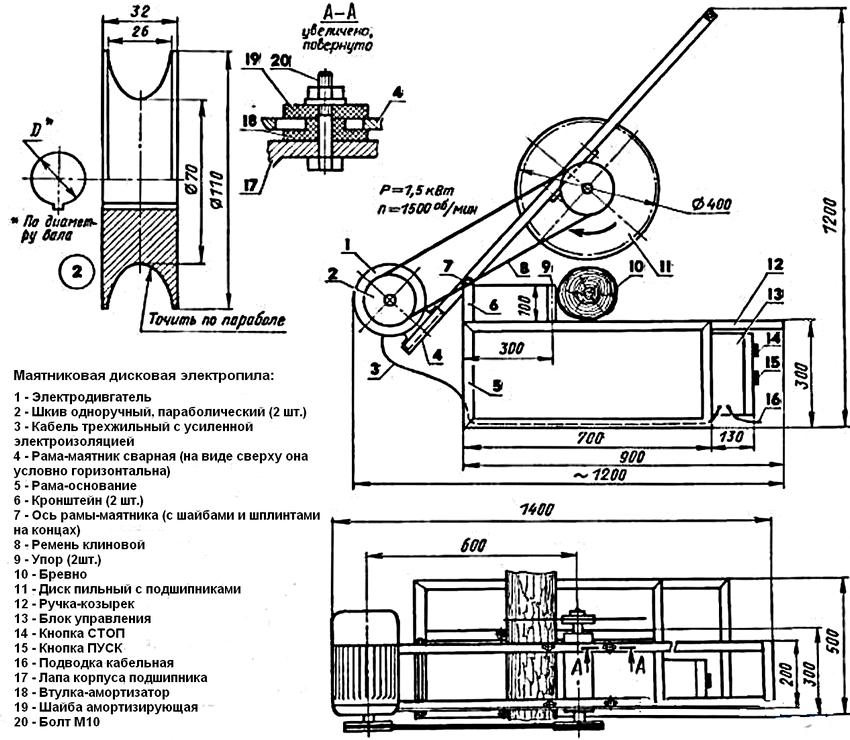
Manufacturing technology of a homemade cutting machine:
- Cutting parts from a corner for frame assembly (total size - 120x40x60 cm).
- Assembly of the frame by welding.
- Fixing the channel (guide) by welding.
- Installation of vertical uprights (2 pcs.) On the channel (bolted connection).
- Assembling a frame from pipes for installing an electric engine and a shaft at the required slope (45x60 cm).
- Installing the engine plate at the rear of the frame.
- Manufacturing of a shaft complete with flanges, supports and a pulley (flange protrusion height - 3.2 cm).
- Installation of supports, bearings and pulleys on the shaft. The bearings are fixed on the upper frame in the recesses made in the plate.
- Installation of a box with an electrical circuit on the lower section of the frame.
- Installation of the shaft in the area between the posts. Diameter - 1.2 cm. A bushing should be put on top of the shaft with the minimum possible gap, so that these elements slide.
- Welding a rocker arm made of a channel (80 cm) onto a bushing. The size of the rocker arms should be within the following ratio: 1: 3. The springs must be secured from the outside.
Helpful advice! Experts advise using an asynchronous motor. Such a motor is not particularly demanding. For networks with 3 phases, a motor with a power of 1.5-3 kW is required; for single-phase networks, this figure must be increased by a third. A capacitor connection is required.
It remains to complete the installation of the motor on the short arm of the rocker arm. The cutting element is placed on the long arm. The shaft and motor are connected by a belt drive. For the countertop, you can use a sheet of metal, a planed board.
Assembling a drilling machine with your own hands: video how to make a structure, recommendations
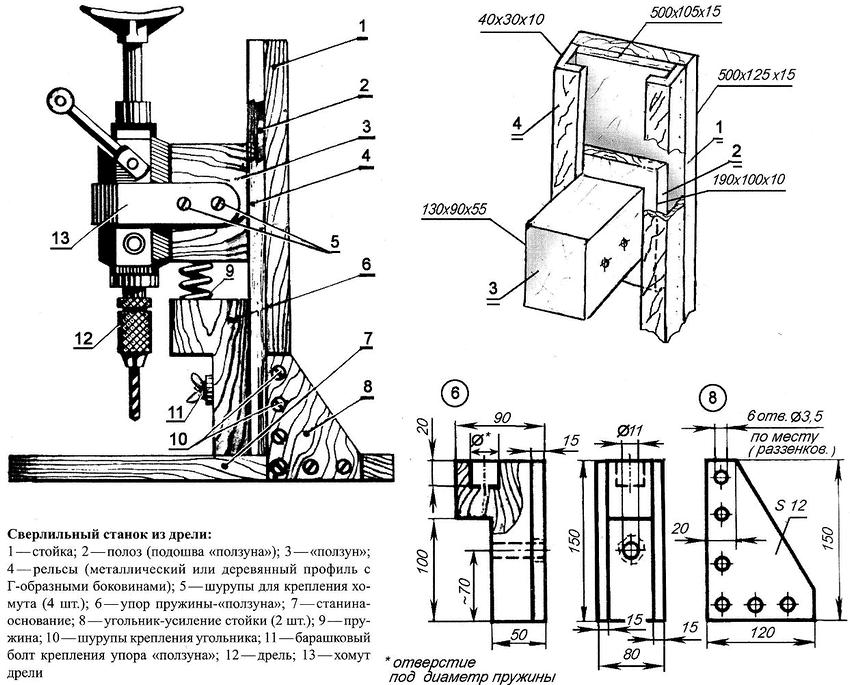
A good drawing of a drilling machine from a drill with your own hands is the main condition to acquire the necessary tools.To create such a machine, you do not need to use special materials and buy additional components.
Components for the construction of a homemade drilling machine with your own hands:
- bed (base);
- rotary mechanism (drill);
- feed device;
- vertical stand for fixing the drill.
In the development of the technology of manufacturing a drilling machine from a drill with your own hands, video material can provide invaluable help.
A guide to creating a drilling machine with your own hands (how to make the simplest design):
- For the rack, it is better to use DPS so that the part turns out to be massive or a furniture board with a thickness of more than 20 mm. This will negate the vibration effect of the tool. It is allowed to use a base from an old microscope or enlarger.
- The accuracy of a drilling machine from a drill with your own hands depends on the guides (2 pcs.). They serve as the basis for moving the block on which the drill is located. It is best to use steel strips for making guides. They will then be securely screwed to the rack.
- For the block, you need to take steel clamps, thanks to which the rotary mechanism will be securely fixed on this part.
For a DIY mini drilling machine, a rotary tool feed mechanism is required. The classic design involves the use of a spring and a lever. The spring is fixed between the block and the post.
There are many devices for sharpening drills do it yourself, video - material will help you understand this topic.
Features of do-it-yourself CNC milling machines
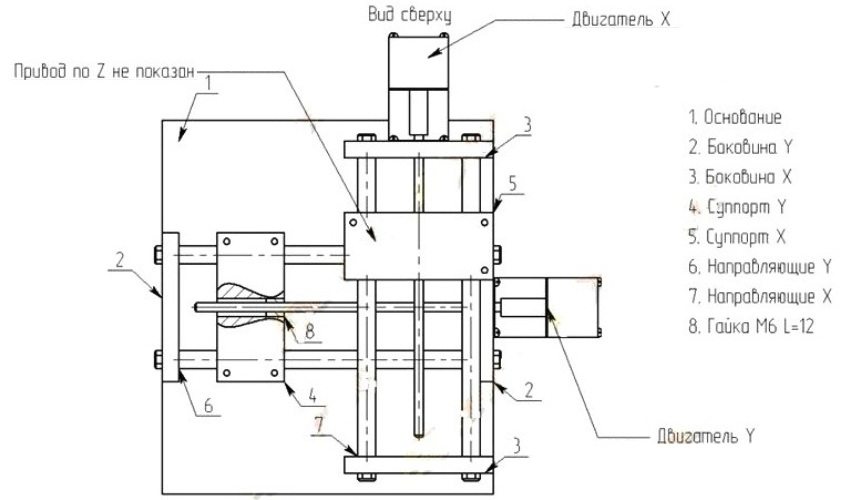
Software is considered to be an important component in a do-it-yourself CNC wood router. Drawings of a conventional design, taking into account this condition, must include additional elements for it:
- LPT port;
- CNC unit.
Helpful advice! For making a copy-milling machine for wood or metal with your own hands, you can use the carriages belonging to the old printer. Based on these parts, you can create a mechanism that allows the cutter to move in two planes.
Assembling a wood router for a home workshop
At the first stage, do-it-yourself drawings are drawn up for a wood milling machine, which include information on the location of all structural components, their dimensions, as well as fixing methods.
Next, a support frame is assembled from pipes pre-cut into parts of the required size. For fastening, you need to use a welding machine. Then the dimensional parameters are checked in order to start manufacturing the working surface.
You need to act within the framework of the following scheme:
- On Fiberboard the plate is marked and the tabletop is cut out of it.
- If the cutter will be placed vertically, a cutout must be made for it in the slab.
- The spindle and electric motor are being installed. In this case, the spindle should not go beyond the plane of the working surface.
- The limit bar is installed.
Be sure to test the machine before work. The included router should not vibrate too much. To compensate for this disadvantage, it is recommended to additionally install stiffeners.
DIY metal milling machine assembly
Step-by-step instructions for making a homemade metal milling machine:
- The column and the frame are made of a metal channel. The result should be a U-shaped structure, where the base of the tool acts as the lower cross member.
- Guides are made from the corner. The material must be sanded and bolted to the column.
- The rails for the console are made from the square section tube. Here you need to insert pins with a screwed thread. The console will be moved by a diamond-shaped car jack to a height of 10 cm.In this case, the amplitude to the side is 13 cm, and the tabletop can move within 9 cm.
- The work surface is cut from a plywood sheet and screwed in place. The fastener heads must be recessed.
- On the working surface, a vise is installed, made of a square tube and a metal corner, welded together. It is better to use a threaded pin as an element fixing the workpiece.
Note! It is better to fix the rotating element in the bed so that the spindle is pointing down. For fixing, the jumpers must be welded in advance; screws and nuts are required.
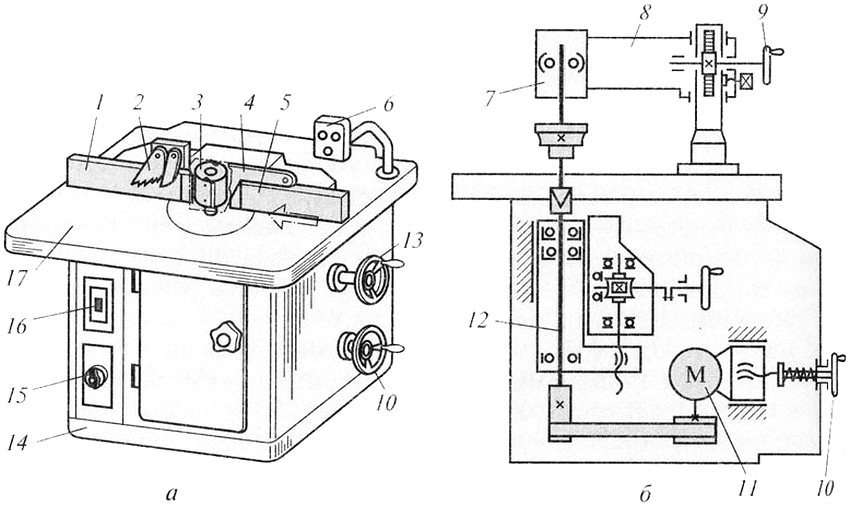
After that, you need to attach a cone (Morse 2) to the spindle and install a collet or drill chuck on it.
Features of making a thicknessing machine with your own hands
Do-it-yourself planer drawings with a complex design involve the use of expensive components:
- bearings with increased wear resistance;
- rolled steel sheets;
- cog;
- pulleys;
- powerful electric engine.
As a result, the cost of making a homemade planer increases significantly. For this reason, many try to limit themselves to the simplest design.
Instructions for a homemade thickness planer for wood:
| Structural element | Data |
| Stanina | Frames (2 pcs.) Made by welding on the basis of a corner (4-5 cm). The connection of the frames is carried out by means of studs (cut-off hexes - 3.2 cm). |
| Broach | Release-type rubber rollers from a washing machine. Turned to fit the size of the bearings and put on an axle with a diameter of 2 cm. Acts by rotating hand movements. |
| Table | The ground board is attached to the bed using a bolted connection, the heads must be countersunk. Boards need to be treated with oil (already used). |
| Engine | for 3 phases, power - 5.5 kW, rotational speed - 5000 rpm. |
| Protective cover | Made of sheet metal (6 mm), worn over the frame corner (20 mm). |
Assembling a planer from an electric plane with your own hands
To create a homemade thicknessing machine, you need to place the plane on a block, fix it with a device such as clamps, while not forgetting to leave a gap.
Note! The size of the gap is set taking into account the thickness of the workpiece, which will be processed on the machine.
The scheme for making a planer from a plane with your own hands is very simple:
- the support bar is fixed on a comfortable surface;
- the required gap size is selected by adding plywood interlayers;
- on the resulting base, the structure of the planer from the electric planer is fastened with clamps.
Two clamps hold the base on the table, the other two hold the plane. After making sure of the reliability of this fastening, you can start using the tool.
Diy scheme for creating a wood grinding machine
Recommendations for making a consumable belt sander with your own hands:
- The optimum sanding belt width is 20 cm.
- The emery cloth of the tape is cut into strips.
- The abrasive tape is applied end-to-end.
- To strengthen the seam, you need to put a dense material under the bottom.
- It is not recommended to use low-quality glue, as it will provoke material tearing along the seam.
- The ribbon shaft diameter in the center should be 2-3mm wider than at the edges.
- To prevent the tape from slipping, it is recommended to wind it with thin rubber (bicycle wheel).
Calibrating - grinding machines for wood belong to the group of drum structures. This category is extensive and includes many types of equipment.
To make a drum sander for wood with your own hands, you can choose the following designs:
- surface grinding - the workpiece is processed within the same plane;
- planetary - with its help a flat plane is formed on the workpiece;
- circular grinding - with its help, cylindrical workpieces are processed.
From the video below, you can find out how to make a grinding type machine with your own hands.
Do-it-yourself wood planing machine operating rules
In the designs of a do-it-yourself planing machine, it is very important to correctly set the equipment settings so that the errors do not exceed the permissible values:
- perpendicular - maximum 0.1 mm / cm;
- plane - 0.15mm / m.
You can familiarize yourself with the technology of making a jointer with your own hands using the video.
If, during operation, the effect of mossiness or tanning appears on the treated surface, then the cutting elements are dull. To make the processing of parts with dimensions less than 3x40 cm more comfortable, they need to be held with the help of pushers.
The curved surface of the workpiece after the completed processing indicates that the correct placement of the knives and the working surface is violated. These elements need to be re-exposed.
All of these machines can be useful for home repairs or basic things. Therefore, their presence in the home workshop will be useful. Regardless of what the garage equipment will be, all machines require careful and attentive attitude. During work, you should never forget about safety.

