Grounding is a necessary measure in any private house or apartment. It guarantees the safe use of electrical appliances and protects against the risk of short circuits. If you need to do the grounding in a private house with your own hands: 220V and 380V are two networks, for which grounding you will have to perform various actions. For the first option, ordinary grounding without circuit installation is also suitable, but for the second, a grounding circuit is mandatory.

Installation of grounding is a necessary measure for safe living in the house
Content
- 1 Why do you need a ground loop
- 2 Ground loop elements
- 3 How to do grounding in a private house with your own hands: 220V and 380V with old wiring
- 4 Grounding requirements
- 5 How to mount grounding
- 6 What not to do when installing grounding
- 7 How is grounding different from a lightning rod
- 8 What is the difference between grounding and grounding
- 9 Popular manufacturers and prices for grounding kits
- 10 General tips for arranging grounding in a private house
- 11 Checking the ground loop for operability
Why do you need a ground loop
Electric current can be fatal to humans - this is a well-known fact. As a result of an emergency, the body of the electrical appliance may be energized, due to which touching it will become a threat to life and health. Do-it-yourself installation of 220V grounding in a private house helps to avoid this risk.
How it works? The surface of electrical equipment becomes dangerous when the zero phase is cut off. The ground loop just plays the role of such a phase through which electricity goes into the ground.

Protective grounding significantly reduces the voltage that a person can come under
A grounding device is mandatory not only for private houses, but also for any industrial equipment, electrical installations for household purposes, etc. The grounding circuit reduces the risk of overloads, the fire hazard of equipment, and also increases the safety of working with it.
Ground loop elements
The grounding scheme in a private house includes the following elements:
- three earthing switches of the vertical type, which are driven into the ground, they can be made in the form of a corner;
- three horizontal steel strips that connect vertical ground electrodes;
- a steel strip that acts as a conductor between the ground loop and the switchboard.

Installation of grounding in a private house can be done with your own hands
Helpful advice! Armature cannot be used for the ground loop, since its surface quickly oxidizes, and also does not allow the electric current to be evenly distributed.
Usually, the ground loop is made in the form of an isosceles triangle, which is located at a distance of 1-3 m from the foundation of the house.It is at this distance that a trench is dug about a meter deep, into which the horizontal elements of the contour are laid. The vertical steel elements are driven to a depth of about 3 m so that about 20 cm remains on the surface.

Lightning protection system layout. The numbers indicate the locations of the current leads. Dotted lines show grounding elements connected to lightning protection current leads
Then a steel strip is welded along the perimeter of the contour, which connects the vertical pins. The steel conductor for earthing is bolted to the switchboard housing. How to make the ground loops in a private house more efficient? For this, the junction of the core and the ground loop must be carefully cleaned. Also, one of the options is to lay a steel strip with a cross-sectional area of at least 16 mm² from the switchboard to the circuit.
Another option to increase grounding efficiency is to replace the steel core with a flat steel strip. Due to the larger area of contact with the ground, its current conductivity is also higher. However, it is more difficult to lay a steel strip in the ground than a vein; it has to be laid in pieces in the ground, and then welded together. In this case, only the welding method is used.

Diagram of a private house grounding device
If you have read or heard how to make proper grounding in private houses, then you probably know that using bolts to connect structural elements can lead to very negative consequences. The fact is that the bolts oxidize quickly enough, which is why the circuit stops conducting electricity. For the same reasons, you cannot paint the frame of the contour, since due to the paint the current stops flowing into the ground.
Helpful advice! If you cannot do without the use of bolts when constructing a ground loop, then they should be located above the ground surface, be securely tightened and carefully cleaned. From time to time, the bolts should be lubricated with a special conductive grease.

Working grounding will not interfere with stationary household appliances, increasing their safety and technical performance
How to do grounding in a private house with your own hands: 220V and 380V with old wiring
Many owners of private houses and apartments are familiar with the problem of old and dilapidated wiring firsthand, to which it can be very difficult to connect grounding. The only correct option in this case is a complete replacement of the old wiring to a new one. However, not everyone can afford it, so sometimes you have to make do with what you have.
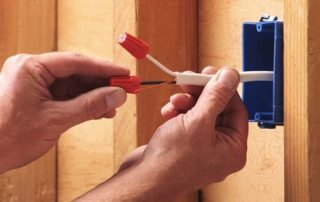
If it is not possible to replace all the wiring, then you need to at least install new sockets, switches and junction boxes. In this case, there is no need to change their arrangement. When installing new outlets, a very important point is the control of the ground wires. They should be located in junction boxes and go to the ground bus through the distribution board. Its mount is mounted on the shield body.

Connection RCD with grounding allows you to implement the most complete and reliable scheme of electrical protection of a person, household electrical appliances, electrical wiring and structures
Another relatively simple and cheap option on how to properly make grounding in private houses is to completely disconnect the old wiring. In this case, it simply disconnects from the shield and remains in the wall, and new wiring is laid outside. Plastic covers work well for this purpose, and new switches and sockets can be installed in existing holes in the walls.
To update the junction boxes, it will be enough just to remove the old wires from them. The new wiring diagram is relatively easy to assemble if you have all the necessary components at hand:
- cable channels to protect external wiring;
- wires;
- sockets, switches and junction boxes.
If you need to install new wiring in an old house and ground the electrical equipment, you will also need to install a new switchboard. In this case, the old wiring can be left, but only low-power electrical appliances should be connected to it.

Three-phase circuit of a shield in a private house with a separated neutral and grounding conductor: 1 - plastic or metal shield body; 2 - connecting elements of zero working conductors; 3 - connecting element of the PE-conductor, as well as potential equalization; 4 - connecting element of the phase conductors of group networks; 5 - differential current switch; 6 - automatic switches; 7 - lines of group circuits; 8 - differential circuit breaker; nine - counter
Overhaul of electrical wiring in an old house is long and expensive, a more budgetary option to protect yourself from fire and the possibility of a short circuit is to supplement this wiring with one ground wire. You can even not lay it inside the wall, but simply lay it in a plastic cable channel.
The advantages of this option are obvious: the cable duct fits perfectly into any interior and is well attached to any material. The duct is usually run between junction boxes as well as from a distribution board. In each junction box, all ground wires must be interconnected and go out to the ground bus.

The most preferred wire color coding for Russia, Belarus and Ukraine
Grounding requirements
Grounding is the connection of parts of electrical devices to the ground loop. It is mounted so that the voltage that may arise on the device case goes into the ground. There are the following parts of grounding:
- An earthing switch is a collection of all conductors that are in electrical contact with the ground.
- Grounding devices - ground electrode plus grounding conductors.
- Conductor - connection of an electrical appliance, which may be energized, with a ground electrode.
Helpful advice! The earthing switch must always be made of unpainted metal with good electrical conductivity, otherwise it will be ineffective.
Any grounding is characterized by a number of parameters, the most important of which is spreading resistance. It is the value of this parameter that shows how easily the electric current will travel the distance from the body of the electrical appliance to the ground. The lower the spreading resistance, the better. This parameter is influenced by the depth of the grounding rods, soil moisture, the metal from which the conductors are made, and much more.

Connection of electrical appliances via TT system: grounding does not depend on the power supply
By the way, the best place to bury ground loops in a private house with your own hands is the north side of the house, since the soil moisture is usually maximum there. Accordingly, the spreading resistance will be the least.
The following requirements are imposed on grounding:
- the length of the vertical bars must be at least 16 mm;
- horizontal - from 10 mm;
- minimum steel thickness - 4 mm;
- the minimum diameter of steel pipes is 32 mm.
How to mount grounding
Before starting the installation of the ground loop, you must choose a place for it. There should be no communications at the place chosen for driving the rods, and in order to be sure of this, the site must be coordinated with the relevant services: gas, water supply, telephone and heat and power supply. Even if you are sure that there are no communications on your site, it is better to check it through the appropriate services, otherwise the restoration of damaged lines will be very expensive.

Installation of a ground loop in the courtyard of a private house
Ideal location for a ground loop - blind area at home... It is best to make the contour linear, you can also lay it around the entire perimeter, if you have the means, time and desire. Most often, grounding is done in the form of various geometric shapes, for example, a triangle, polyhedron or rectangle. Linear installation of the contour is good because, if desired and necessary, it can always be increased.
How to make grounding in a private house as simple as possible? To do this, it is enough to drill a hole about 2 m deep with a hand drill and drive the first grounding rod into it. If it entered the ground easily, the next one can be driven a little deeper, but you should not exceed the depth of 3 m, otherwise the ground electrode may simply get stuck.

Elements of a modular pin grounding system
After all the ground electrodes are driven into the ground, they must be cut from the top about 15-20 cm below ground level. Then, between them, you need to dig a ditch of the appropriate depth, along which to lay the connecting rods. They can be fixed by welding or bolted connections, but the latter option will have to be periodically checked, cleaned of rust and tightened the contacts.
Helpful advice! It is best to connect the elements of the ground loop to each other by welding. Then you do not have to constantly check the circuit, and the spreading resistance will remain constant even after several years.
Do-it-yourself grounding in a private house 220V and 380V has different resistance. With proper installation, for the first option it is up to 30 ohms, for the second - up to 10 ohms. Also, this parameter largely depends on the resistivity of the soil in which the contour is laid, for example, for rocky soil, high rates are simply impossible.

The process of installing a ground loop for a country house
Remember that with a three-phase power supply, it is imperative to do grounding in a private house with your own hands 380V.
What not to do when installing grounding
The principle of grounding is based on the elementary laws of physics. One of them says that the larger the contact area of the circuit with the ground, the more efficiently grounding works. A number of simple rules follow from this:
- Do not assume that one metal pin driven into the ground will be enough for a complete ground loop. The best option is one or even two triangles, buried to a depth of about 3 m.
- Never use metal products that have a hardened surface, such as rails, fittings, or channels, to mount the ground loop. Due to the increased density of the surface, contact with the ground can be very poor or not at all.

The larger the contact area of the circuit with the ground, the more efficiently grounding works.
If you choose between one or two ground loops, and also calculate the total area, then you should focus on the number and total power of electrical appliances in the house. If we are only talking about grounding the washing machine with your own hands, then one small triangle will be enough here, but if there are many more electrical appliances in your house, then it is better not to risk it and make grounding around the entire perimeter of the house.
Helpful advice! Whichever metal you choose for mounting the ground loop will still be susceptible to corrosion, which in 2-3 years can reduce the loop's efficiency to a minimum. Therefore, before digging the circuit elements into the ground, they should be covered with special protective conductive coatings.

When installing grounding, three corners with a length of 1.5 meters are welded to the electrodes
Do-it-yourself grounding in a private house 220V and 380V must necessarily be deeper than 1 m.Otherwise, the capacity of the house may become higher than the capacity of the circuit, which will lead to the emergence and growth of excess current within the network. This, in turn, can seriously damage the electrical equipment in the house.
Good grounding should be constantly increasing in cross section. For example, if the cross-sectional area of the conductor that goes from the switchboard is 5 mm², then the cross-section of the tape should be twice as large, and the pins driven into the ground should be twice as large as the tape.
Related article:
Do-it-yourself grounding in the country. Electrode installation diagram. Arrangement of grounding elements and strapping. Grounding schemes in private houses, materials for the circuit, installation.
How is grounding different from a lightning rod
Many people mistakenly confuse grounding in a private house with their own hands 220V and 380V with a lightning rod or, more correctly, a lightning rod. In fact, there is a difference. Grounding is done so that the excess electricity generated in the power grid goes into the ground without overloading the electrical circuits. The lightning rod also conducts the atmospheric electrical charge to the ground. But the ground loop always works, but the lightning rod only works when lightning strikes it.
If you need to install a lightning rod in a private house with your own hands, then you should not load it with the functions of an ordinary ground loop. Why? Because the lightning rod must lead the charge of atmospheric electricity into the ground in such a way that it does not pass through the house. Otherwise, the conductor or its attachments may become very hot, which in turn could result in a fire.

Diagram of a catenary wire lightning protection device
When installing the ground loop, it should be borne in mind that the current in it is much less than that from lightning. In addition, the installation of the circuit provides for a two-way process: the current goes not only to the zero core, but also from it. That is, if you mount the grounding in a private house with your own hands 220V and 380V and combine it with the functions of a lightning rod, then the lightning charge may not completely go into the ground, but return to the internal network. Because of this, an overload of the network, failure of electrical appliances or a fire can occur.
So is it possible to combine a ground loop and a lightning rod? Yes, if you use specialized factory production circuits for this. They will allow you to combine two functions, but the cost of such a circuit will be higher than two independent devices.

Lightning rod protection zone diagram
What is the difference between grounding and grounding
Many people mistakenly confuse these two terms, although there is a very big difference between them. Grounding is intended for use in industrial plants, but most developers neglect this rule when installing grounding contours in residential buildings. This is not entirely safe and is done either due to a lack of knowledge, or if you want to save money.
Helpful advice! If a three-wire cable is installed in a single-phase wiring system (zero, ground, phase), and in a three-phase wiring system, a five-wire cable (three phases instead of one), then this is definitely grounding without zeroing.
It is important to remember that grounding is designed only for the probability of a short circuit and does not perform the function of grounding. This function is very useful when using industrial equipment, but completely useless in a domestic environment, on the contrary. For example, if a neutral wire is connected to an electrical appliance, then if it burns out or if you accidentally confuse zero with a phase, then the equipment can easily burn out.

Zeroing is designed exclusively for the possibility of short circuits and does not perform the function of grounding
If, nevertheless, you decide to mount together with a grounding kit for a private house and grounding, then it is highly recommended to additionally install protective equipment. For example, a voltage limiter and a residual current device (RCD) are very popular.
Popular manufacturers and prices for grounding kits
Installing grounding on your own is a rather laborious process, therefore, if you do not have the time, desire or skills, it is much easier to order ready-made kits from popular manufacturers:
- 10Ohm is a popular domestic manufacturer that offers grounding kits for mounting to various depths. The installation depth varies from 6 to 30 m, and prices - from 6,000 to 25,000 rubles;
- ZandZ - universal earthing switches in the form of one or more prefabricated stainless steel electrodes. They are mounted to a depth of 10 m, the price depends on the number of electrodes, installation depth and other parameters. The average cost of a kit for mounting on 5 m is 23,000 rubles;
- Galmar is another popular manufacturer of prefabricated grounding electrodes. Installation is possible to a depth of 30 m, such a kit will cost 42,000 rubles;

Example of a grounding kit from a factory
- Elmast - grounding kits from a domestic manufacturer. They are made of stainless steel, delivered unassembled, and can be mounted to various depths. They are characterized by a long service life. A distinctive feature of these earthing switches is their high resistance to aggressive chemical environments and adverse natural influences. The average price for a set for installation at a 6-meter depth is 9,000 rubles;
- Ezetek are relatively inexpensive mid-range kits. The advantageous advantage of the kit for mounting to a depth of 6 m is the price of 6,000 rubles.
There are many other manufacturers offering both ready-made kits for grounding a private house, and individual components. Only trusted companies should be trusted in this matter. It also makes sense to listen to the recommendations of friends or at least read reviews on thematic forums. If you want to know exactly how to make grounding in private houses, on the Internet you can find a huge number of video clips and photo instructions on this topic.

DIY ground loop installation
General tips for arranging grounding in a private house
If you still do not want to use a ready-made factory grounding kit and have firmly decided to do grounding in the house with your own hands, then you should remember a number of simple rules:
- always take into account corrosion, under its influence, the resistance of grounding materials can increase;
- if the soil is very wet and the likelihood of corrosion is quite high, then use ground electrodes with galvanized coating or at least with a large cross-sectional area;
- do not locate the ground loop near pipelines, i.e. where the earth is dried out by heat;
- the distance between the grounding electrodes must always be greater than their length;
- the depth of the location of the electrodes should be below the freezing point of the soil;

Read the grounding installation instructions carefully before operating
- the resistance of the entire grounding system should not exceed 4 ohms;
- it is highly recommended to connect the electrodes to each other by welding;
- the cross-sectional area of each electrode, as well as its cross-section, must comply with the established PUE standards.
If all these requirements are met, you can be sure that the grounding system you have installed will reliably protect your electrical appliances from breakdown, and your house from fire as a result of a short circuit.
Helpful advice! It is best to mount the ground loop according to the ready-made instructions from the Internet. This will help you get everything done in a short time and avoid the most common mistakes.
Checking the ground loop for operability
After completing the installation of the grounding, it is imperative to perform a control check of the circuit operability. This is done using a special and rather expensive device, but there is an easier way.

A simple way to test the functionality of the ground loop
A lamp with a power of at least 100 W is connected to one of the ends of the circuit, and only one of its contacts is connected to the circuit, the second goes to the phase. If the light is bright, then you did everything right and the circuit works well. If the light is dim, then this indicates a weak contact between the elements of the contour. If the light does not light at all, the circuit is assembled incorrectly.
Do-it-yourself photos of 220V grounding in a private house can be found in large quantities on the Internet, as well as video instructions. Therefore, if you are confident in your abilities, you have the necessary tools and skills, then you can safely assemble the ground loop yourself. This will cost much less than buying a finished factory-made device.