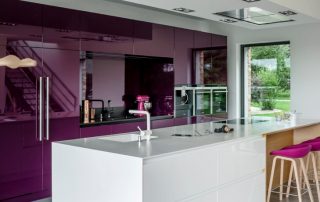
Competently thought-out and made lighting is one of the ways to decorate the kitchen space, making it more attractive and comfortable. One of the most common options is LED kitchen lighting under the cabinets, which allows you to give the interior a special mood. Consider how to independently select everything you need and carry out the installation without the help of specialists.

Proper lighting of the room and LED lighting for the kitchen under the cabinets create a comfortable environment for cooking
Content
- 1 LED lighting for the kitchen under the cabinets: the advantages of this solution
- 2 Where can the kitchen lighting be located under the cabinets
- 3 Kitchen lighting for cabinets: LED lamps for this purpose
- 4 How to choose an LED strip for kitchen lighting
- 5 DIY LED strip installation rules
- 6 How to make a backlight in the kitchen: instructions for work
- 7 How to install a touch switch with your own hands
LED lighting for kitchen under cabinets: the benefits of this solution
LED lamps appeared on the domestic market long enough for everyone who was at least somehow interested in this issue to learn about the advantages of such a solution in comparison with the usual incandescent lamps and even energy-saving ones. First of all, diode lighting in the kitchen is famous for its economy, as well as its long service life. In addition, the LEDs light up at maximum power from the first second, since they do not need time to warm up, and the frequency of switching on and off does not affect their service life.

Everyone knows about the advantages of LED lighting compared to both traditional incandescent lamps and energy-saving lamps - these are extremely high efficiency and durability
Of course, not everything is so smooth, and LEDs have one significant drawback - and cost. The price of such a backlight really will not be low, however, as all those who have already used it claim, such an investment fully justifies itself very quickly.
The lifespan of an LED strip can be several decades, and the level of electricity consumption will be so low that the money spent will soon be compensated.
Helpful advice! If your kitchen already has some kind of lighting, chances are you can only replace the lamp while keeping the lamp. This is possible due to the fact that manufacturers of LED lamps offer a huge range of products and you can almost always choose the right option.

An important advantage of LED lighting is its durability, the kitchen tape can work for 14 years or more.
Where can be located lighting for the kitchen under the cabinets
In an effort to decorate the interior of their kitchen in an appropriate way, each owner should understand that, ideally, the backlighting should be multi-zone. That is, one lamp on the ceiling, most likely, will not be enough. Therefore, in most cases, in addition to the main lighting, they also provide lamps above the dining area and, of course, LED lighting for the kitchen above the work surface.
But that's not all, because the backlight is mounted not only as a functional element. It is often used as a decoration. Consider where the backlight might be located:
- LED lighting for the kitchen working area is just the case when light sources are mounted under wall cabinets;
- illumination under the hood;

LED strip can be installed inside shallow drawers and cabinets
- internal lighting of glass cabinets. This solution looks especially beautiful if there is frosted glass in their doors;
- lighting above the top cabinets is a great way to visually expand the available space. Like all other options, illuminating the ceiling with an LED strip with your own hands is a completely feasible task;
- under the lower kitchen cabinets. This is perhaps one of the most original options that allows you to create an unusual effect of furniture floating;
- separate lamps to illuminate the working area in the kitchen.
Helpful advice! Depending on the purpose for which you are installing the LED backlight, you can choose one or another lighting color. So, if you plan to use it as an additional light source for work, it is better to give preference to white backlighting. But for decorative design, you can mount and color.

The light source should not be visible under the lower tier of cabinets, so a thin and unobtrusive LED strip for the kitchen is best suited
Kitchen lighting under cabinets: LED fixtures for this purpose
In order to understand what the choice of LED strip is based on and how to properly organize the illumination of a particular zone, first of all it is worth considering what kind of light sources are. Let's analyze all the types, and then determine which of the options is best suited for a specific purpose.
So, the main types of LED devices:
- surface mounted linear luminaires. They can be purchased individually or as a whole set, in which there are several modules and adapters. By connecting several of these separate elements together, you can make a fairly long light source;
- spotlights of the overhead type - work according to the same principle as the first type, but they are not assembled into a general structure;

Linear surface-mounted luminaires are traditionally used to illuminate countertops in the work area
- spot or linear recessed lamps. They differ from the others in their subtlety, which allows them to be installed directly into the bottom of kitchen cabinets. This is an easy-to-use option, however, it will be difficult to carry out the installation work on your own and most likely you will have to resort to the help of a specialist;
- led strip for the kitchen. This is one of the most popular options for today, which is not much inferior to all of the above. This type of device owes its popularity to a huge variety of colors, ease of installation and low cost.
Helpful advice! Today, you can find both linear and turned lamps with touch control on sale. Such devices turn on and off all with one touch and look very aesthetically pleasing.

The main point of overhead lighting is to create a cozy and most comfortable atmosphere in the house.
How to choose an LED strip for lighting in the kitchen
Despite the fact that most of the LED strips look very similar, in fact there are several types and a special classification, which is made depending on such factors:
- the number of crystals (can be from 1 to 4);
- full color or monochrome glow;
- size, which can range from 1.06x0.8 to 5.0x5.0 mm.
Simply put, before you buy an LED strip, you need to decide what type of backlight you want to get. And to make it easier, we will consider several recommendations of specialists that can be used as guidelines in order to buy lighting for the kitchen under the cabinets:
- if one of the tasks of the mounted backlight is to provide additional illumination of the working surface, then a uniform and contented bright light can be achieved using a 50x50 LED strip;

LEDs are special semiconductors that emit light when electrical energy passes through them.
- if there is no practical use for the backlight, and its only role is to decorate the interior, a single-chip 35x28 LED strip will be enough.
Considering the fact that the diode strip in the kitchen is several LEDs placed in the same plane, several more types of this product are distinguished, depending on how tightly the elements are located to each other. So, the most popular options are 30, 60, 120 and 240 pieces per 1 meter of tape.
It is this parameter that determines how powerful the tape will be, how much energy it will consume, as well as its brightness.
There is one more extremely important point - the degree of protection from moisture. In this case, you need to pay attention to the marking, which may be as follows:
- IP20 - low level of protection. Such tapes are not recommended for use in the kitchen or bathroom, where the air humidity is quite high;

To purchase the right LED strip, you need to clearly understand what kind of lighting you would like to see as a result.
- IP65 - medium level of protection. This option will perfectly cope with the task at hand and the humidity in the kitchen will not affect the operation of the LEDs in any way;
- IP68 is the absolute level of protection. Such products are not susceptible to moisture and can even be used to illuminate the pool.
Kitchen lighting with LED strip: how to choose a power supply
In addition to the fact that the installation of an LED strip in the kitchen requires close attention when choosing, it is worth paying attention to which power supply will be used for this purpose. It is very important to choose an option in which the power of the transformer will be sufficient, but at the same time it was not excessive.

Wiring diagram for LED strip with power supply
Let's consider how the required power of the transformer is calculated using the example of a 50x50 LED strip and a power of 12 W:
- provided that the length of the tape is 5 m, 12 W must be multiplied by 5. We get 60;
- the stock is provided using a factor of 1.25, thus getting 75;
- we purchase a transformer with a power of 75 watts.
Related article:
Diagram of connecting a 220V LED strip to the network: correct installation of the backlight
Self-adhesive 220V models. Diagram of connecting a 220V LED strip to the network. The price of tapes and their installation by hand.
However, power is not the only parameter of the transformer that you need to pay attention to if you want to make a lamp from an LED strip with your own hands. The design of the block is also of great importance, which in turn can be different:
- Plastic sealed housing of compact size.
- Aluminum sealed housing. It is usually much more expensive, but it is highly resistant to external factors, which makes it possible to use it even for mounting street lighting.
- Perforated body.These are open-type blocks that are large and inexpensive. The main drawback is that such a block will require additional protection against moisture, but it is among devices of this type that you can find quite powerful models to use one device for several LED kitchen lamps at once.
- Power supply unit. These devices have a low power, which does not exceed 60 W, so you will have to use a separate unit for each tape. The main advantage is that they do not require installation.

The main component of the LED system is Power Supply, which is a small transformer that provides power to the LEDs
Important! If you purchase a case that is not protected from moisture, then the installation must be carried out in a place where the risk of contact with water will be minimal. In addition, it is beneficial for the device to be protected against voltage surges, as this will have a positive effect on the lifespan of the LEDs.
How to make the lighting in the kitchen under the cabinets best can be determined by evaluating the lighting area, as well as your own preferences and financial capabilities, since different models will have different costs. In addition, before you buy LED kitchen lighting for cabinets, you need to understand that the cost of a product in most cases directly determines its service life.
rules DIY LED strip installation
Installation of LED strip is a task within the power of everyone. By adhering to a few simple rules, you can make high-quality and beautiful lighting yourself. Here's what to consider:
- polarity must be observed;

So that the LEDs installed on kitchen furniture do not blind your eyes, they can be fixed in special boxes, so the main light will be directed downward
- depending on what type of tape you are using, connect the power through a 12 or 24 watt unit. In this case, the block should be located as close to the tape as possible (the distance to be removed is 10 m);
- in order for the backlight to last long enough, it is advisable to avoid bends and twists. It is preferable to cut the tape and make the required angle by brazing. But this must be done carefully, with the obligatory insulation of the conductive tracks using heat shrink tube... It is believed that with the help of soldering, you can provide high-quality contact without losing electricity;
- in order to reduce electrical losses, you need to try to use a wire of the maximum cross-section and make as few connections as possible;
- if it is necessary to install a high-power tape, then it is advisable to use a special profile box for this;
- if necessary, connect together two pieces of tape, the length of which exceeds 5 m, this must be done in parallel;

Installation diagram of LED strip
- for the unit to function properly, it must be protected from overheating by placing it in a well-ventilated place.
Helpful advice! In order to cut the LED strip and not damage it, it is necessary to do this in the specially indicated places on it. Usually the manufacturer makes the appropriate notes himself.
What tools are needed to connect led strip in the kitchen
Before installing the LED strip in the kitchen, you need to make sure you have all the necessary tools and materials. Depending on how the elements will be connected, you may need a soldering iron and solder, rosin, heat shrink tube, or special connectors. Another option is wire lugs and crimps for them.
In addition, you need scissors and duct tape, as well as double-sided tape or other fasteners. If you need to make a niche in the furniture for laying the tape, then you can use a jigsaw.

It is most convenient to cut the LED strip with scissors, since the substrate and copper tracks on it have a small thickness
Naturally, one cannot do without the tape itself, a suitable power supply, as well as a diagram according to which the installation will be carried out. As already mentioned, in some cases, a profile box is also used to lay the tape.
It is extremely important to take into account the fact that during operation, LEDs generate heat, which is directed to the base of the element. To avoid overheating and extend their service life, it is recommended to glue the tape to an appropriate base - a heat-conducting substrate or an aluminum profile.
Helpful advice! Usually, in order to make a backlight in the kitchen, use a cable with a cross section of 0.5 to 2.5 mm². Calculations are made based on a special formula.

One of the options for connecting LED strip are lugs for wires and crimps for them
How to make a backlight in the kitchen: instructions for work
Before attaching the LED strip under the cabinets in the kitchen, you need to distribute it in such a way that the dividing strip of light and shadow is located at the border of two objects. In this case, it will be the bottom wall of the cabinet and the wall. The easiest way is to place the tape on the wall, however, in this case it will be visible, which can spoil the visual effect. Therefore, in order to provide the illumination with the required depth, fastening is carried out mainly to the surface of the cabinets.
It is best to attach a diode tape under the cabinet, the glow sector of which is quite narrow. In this case, the wall will not be illuminated at all. An excellent aid for light distribution can be an aluminum profile, which has a protective light-scattering film. And with the help of different heights of the profile sides, you can even form light spots.
Otherwise, for the successful installation of the kitchen unit backlight, it is enough to adhere to the following simple instructions:
- the power cable must be passed to the connection point as inconspicuously as possible, carefully drilling a small hole for this in the back of the kitchen cabinet;

One way to attach ribbons for decorative purposes is horizontally to an open shelf
- before attaching the LED strip, the surface must be thoroughly degreased and prepared. Some tapes already have a special adhesive that is applied to the back. In this case, installation is as simple as possible and is reduced to applying the tape to the surface. If the back of the tape is smooth, you can use double-sided tape;
- if you want to disguise the tape, you should use a profile whose color will match the color of the cabinet;
- we mount the power supply and install the electrical wiring. In this case, the wires also need to be fixed very carefully, using special clips or double-sided tape for this;
- all elements must be connected according to the selected scheme and checked using a tester. This is necessary to make sure there is no short circuit between the elements. If everything is in order, the backlight can be connected to the network.

LED strip on which there is already a special adhesive applied to its back side
Separately, it is worth considering the case when it comes to installing a high-power LED strip. In this case, for greater aesthetics, the tape is laid in a profile. First of all, laying is done, and only then the power leads are connected. After that, the tape must be fixed with the same double-sided tape, and the profile itself must be fixed on the cabinet.
Important! If the profile is fastened using self-tapping screws that are screwed in from its inner side, the sequence of actions will have to be changed accordingly.
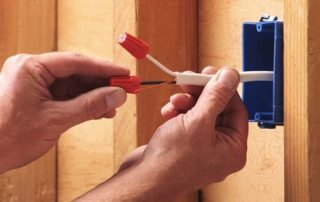
How to install a touch switch with your own hands
Another important element of LED lighting is a switch. And if you wish, you can even make a touch version yourself. But for this you need to understand how this device works. And given the fact that no matter what type of switch we are talking about, the principle of operation is always the same, it is quite simple to figure it out.

Touch switch for flush-mounted LED lighting
So, the first thing to understand is that any switch consists of 4 elements:
- external (front) part. This is the panel we see. Sometimes, for convenience, manufacturers supply it with illumination;
- touch sensor - an element that responds to touch and, accordingly, sends a signal that turns on or off the backlight;
- a switching system that converts the signal, turning it into an electric current, which activates the system, including lighting;
- device body. In this case, there are two types - built-in and overhead. Depending on the type, the installation method will differ and you will either just need to fix it on top of some surface, or mount it inside the wall.
The quality of all the elements of the switch determines its life and service life. Therefore, when buying a ready-made switch for an LED strip or assembling it yourself, pay attention to the fact that the price of the elements corresponds to their quality.

The process of connecting the LED backlight to the touch switch
Touch switches are usually located directly next to the tape itself, since they look like a module and do not spoil the appearance of the kitchen. But at the same time it is very important to remember that the sensor reacts to any contact, therefore the location should exclude accidental touches to which the sensor can react.
Thus, we can conclude that everyone can buy LED lighting for the kitchen and install it on their own. To do this, it is enough to familiarize yourself with some of the most important characteristics of the elements and follow simple instructions, trying to avoid common mistakes. Otherwise, the lighting in the kitchen under the cabinets with LEDs does not present any difficulties, but it brings a special mood to the interior.