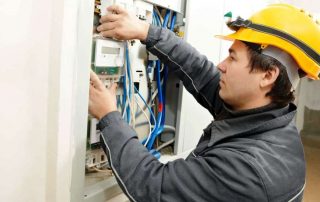
Today, the load on old electrical wires has increased several times. This is due to the fact that there are many household appliances in almost every apartment. Old wiring cannot always withstand such a load. Electrical wiring in an apartment requires certain knowledge of drawing up diagrams, as well as compliance with a number of rules. Therefore, in order to perform this operation yourself, you will need to familiarize yourself with all its nuances.

In order for the electrical wiring in the apartment to be done correctly, you need to have knowledge in the field of electrical engineering
Content
- 1 Rules for wiring electrical wiring in the apartment
- 2 Electrical installation in an apartment: stages of work
- 3 What is the wiring diagram in the apartment for?
- 4 How to wire a cable around an apartment: an example
- 5 Wiring diagram in an apartment: options for connecting elements in electrical circuits
- 6 Independent project drawing and wiring diagram
- 7 Installation of wiring in the apartment: calculation of materials
- 8 Which cable to choose for organizing electrical wiring in an apartment?
- 9 Do-it-yourself electrical wiring in the house: tools and materials
- 10 Installation of electrical wiring in the apartment: the preparatory stage
- 11 Installation of external wiring in the apartment: an algorithm of actions
- 12 Installation of internal wiring and its check
- 13 Programs for designing electrical wiring in an apartment
Rules for wiring electrical wiring in the apartment
Any construction activity is regulated by the relevant documentation approved by the state. This also applies to the huge variety of materials used in this or that case. Today, GOST and SNiP act as regulatory documents. In turn, any work related to electricity is subject to the Electrical Installation Rules (PUE).

The wiring diagram in a private house or apartment should always start in the same way, with drawing up an electrician plan
Before starting work with the power grid, it is necessary to thoroughly study all the points specified in the PUE. It is recommended to pay special attention to the paragraph that describes the features of installation and selection of electrical equipment. Consider the basic rules for conducting electrical wiring in an apartment.
All important elements of electrical equipment must be visible. They need to be quickly and easily accessible. When installing the switches, it is recommended to take into account the height of their placement (from the floor).In accordance with the norms, this figure should be in the range from 50 to 150 cm. The location of the switches is selected in such a way that open doors do not cause inconvenience when using them. The wiring to the switches is from top to bottom.
The minimum recommended height for the outlets is 50 cm, and the maximum is 80 cm. This rule protects electrical appliances from water in case of flooding of the apartment. The sockets must be located at points that are at a sufficient distance (at least 50 cm) from the gas stoves. The same distance should be to radiators, pipes and other items equipped with grounding. The electrical wiring is supplied to the sockets from the bottom up. These rules must be taken into account when drawing up an electrical plan.
Note! The number of outlets in one room is determined based on the square of the room. There is one rule, using which, you can easily determine the required figure. According to him, one product should fall on an area of 6 m².

Recommended height for the location of sockets and switches in the apartment
However, this method is not suitable for determining the number of outlets in the kitchen. For a given room, their number is assigned individually and depends on the number of household electrical appliances. As for the toilet, the installation of sockets in it is prohibited. It is allowed to install these products in the bathroom, but they require an individual transformer.
When laying wires in an apartment, you need to know that this operation can be done with a hidden or open method. In the first case, the cable is placed in the groove inside the wall, and in the second - outside. The gasket itself is made strictly vertically or horizontally, and its place should be fixed on the general plan.
When arranging wiring, you must maintain a distance from pipelines and ceilings. For lines laid in a horizontal plane, the recommended distance to the ceiling is 10 cm.For them, the distance to the cornice or floor beam must be at least 15 cm.In addition, horizontal lines must be installed at a certain distance from the floor (at least 15 cm) ...
There are also certain rules for lines that are mounted vertically. For example, the distance from a door or window opening must be at least 10 cm. Also, vertical wires must be installed at a distance of 40 cm from gas communications.

The number of outlets in the kitchen must match the number of household electrical appliances in it.
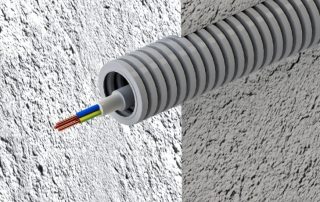
It is very important when wiring electrical wiring that the cables do not come into contact with metal elements in the walls or outside. If it is necessary to install several parallel (with respect to each other) wires, a distance of 3 mm must be maintained between them. Such cables can touch, but for this they are placed in a special protective tube - corrugation.
When wiring in the shield, the places of their connections are carefully insulated. It is important to remember that joining copper and aluminum cables is prohibited. It is customary to use bolts to organize connections. This method is used for grounding and neutral wires.
Electrical installation in the apartment: stages of work
With a clear plan, the installation of electrical wiring in a residential area can be done not only faster, but also cheaper. This activity includes 5 main stages:
- Development of an electrical circuit in the apartment.
- Preparation of a wiring plan for electrical wiring, as well as its approval and registration (together with a diagram).
- Arrangement of a repair hut.
- Installation of electrical wiring.
- Installation of machines, sockets, switches and necessary household appliances.

Any work related to electricity requires a serious, competent approach, therefore, the wiring diagram in the apartment must be well thought out and performed with high quality
Note! Before proceeding with the installation steps, you need to take care of providing protective grounding. For safety reasons, grounding can be performed. The direct electrical wiring around the house is carried out at the last stage, when all the necessary mechanisms are installed.
Savings in this case take place. For example, you can perform some of the installation steps yourself. Experts do not recommend saving money on equipment or electrical appliances. All the necessary mechanisms must be of the highest quality, since cheap products can fail in a short period of time.
What is the wiring diagram in the apartment for?
Modern electrical wiring is a very complex undertaking that requires professional knowledge and skills. It is best to hire a qualified professional to perform this operation. If it is necessary to make a wiring in a new building, it is recommended to draw up a drawing that will contain all important objects related to electricity. It is very convenient to do this before starting the repair. Key objects related to electricity:
- sockets;
- switches;

The layout of the route in the apartment
- lamps, chandeliers and other lighting fixtures;
- electrical panel with a residual current device (RCD).
The specialist must draw up a diagram taking into account all the necessary wishes of the owners and the individual characteristics of the layout of the dwelling. The main job of the wizard is to split the cable into separate lines that will function effectively. This task requires the correct distribution of the load, as well as the organization of control and protection systems for electrical wiring in the apartment.
Before starting to draw up a drawing or plan, it is recommended to study the purpose and features of all individual constituent elements of the electrical network. The machines that protect the network from overloads and are located in the electrical panel are a very important component of this system. How the power grid will function, as well as its safety, depends on their competent installation.
Wires supplying electric current to various points must be correctly selected. They can have different sections. The choice of this indicator is made individually. Sockets and switches must be equipped with reliable contacts.

The circuit breakers located in the panels are designed to protect against overloads and short circuits and are a very important component of the entire system.
The electrical wiring in the house has some peculiarities. In particular, one more element is added to the above - an introductory automaton. From it the power cable is connected to the shield. Its main function is power regulation in the network. If necessary, this element is able to turn off the power supply.
How to wire a cable around an apartment: an example
Control over the power grid is simplified if it has several directions. Separation of the mains on the lines allows you to turn off one of them and use the others if necessary. The most common wiring option, which takes into account 4 directions:
- kitchen;
- bathroom;
- Large home appliances;
- lighting system.

It is better to divide power grids into lines, as this will allow you to turn off one of them and use the others
Helpful information! In some cases, the wiring in the apartment takes into account the arrangement of a separate cable (for example, for a washing machine). This is because the old system may not be able to withstand the stress required by modern technology.
Each of the above 4 directions is distinguished by its own wiring features. And also there are certain rules that must be followed during the installation of electrical elements in the kitchen or in the bathroom. Experts recommend that you familiarize yourself with the arrangement of each line in more detail. This will give you an idea of how to do the wiring correctly.
Electrical wiring in the kitchen: what you need to know
In most cases, it is the kitchen line that accounts for the main load in the electrical network. It is quite simple to explain this: there are a lot of household appliances in the kitchen. Fridge, dishwasher, washing machine, microwave and other appliances are connected to the mains and consume a lot of electricity. In addition to large household appliances, most families use electric grills, multicooker, toasters, etc.
It is worth remembering one important rule, which tells that for the most powerful household appliances it is recommended to install separate machines in the switchboard. It is best to make a separate electrical connection, since a common line may simply not withstand the simultaneous use of several large devices.

When designing electrical wiring, it must be borne in mind that the main current loads fall on the kitchen
If a separate cable is drawn to a powerful electrical appliance, then it becomes possible to use several units of household appliances at the same time without fear that the network will not withstand the load.
Installation and connection of sockets in the network in the kitchen requires knowledge of certain rules. It is not recommended to place them closer than 0.5 m to the gas stove. Cable routing also requires a distance to the gas stove and pipes (at least 40 cm). Do not forget about the heating radiator. Do not place electrical points and wires in close proximity to the battery. Compliance with these rules will allow you to competently conduct an electrician in the kitchen.
Electrical wiring to the bathroom: basic rules
The location of electrical appliances in the bathroom and toilet requires special attention from the master. This is due to the fact that these rooms have a high level of humidity. In order to secure the power grid, it is necessary to study a number of important rules and recommendations that will help to carry out a competent installation of the line.
First of all, you need to remember that it is strictly forbidden to place a junction box in the bathroom. It must be installed outside a wet room. The ideal option is the location of the shield in the hallway. It is recommended to consult a specialist to design an electrician in the bathroom.

In the bathroom, it is better to install waterproof sockets equipped with a cover that prevents moisture penetration
The second point that should be remembered: for each electrical appliance, be it a washing machine or a hairdryer, it is necessary to equip a separate outlet. It is advisable to indicate on the diagram according to which the wiring will be carried out, all electrical appliances in the bathroom, as well as their connection points.
Helpful information! Currently, it is possible to purchase waterproof outlets equipped with a cover and a seal that prevents moisture from penetrating into the device and oxidizing contacts.
It is strictly forbidden to place the switch inside the bathroom. It is usually installed from the outside, not far from the front door (for ease of use).
Related article:
Socket: how to connect electrical fittings without the help of a specialist
Description of preparatory measures and installation technology. Electricity handling and safety requirements.
When installing an electrician in an apartment with your own hands, you will also need to pay attention to cable wiring in a wet room.The best option for its location would be a place near the ceiling at the top of the wall. Experts recommend placing the wire parallel to the floor. In this case, a special corrugated tube is used to protect the cable. Bathroom fixtures are individually selected. Standard devices that correspond to a voltage of 220 V are best replaced with low-power 12 V analogs.
The bathroom also requires matching wiring. For small electrical appliances, use cables with a cross section of 2.5 mm. It is best to connect wires with a diameter of 4 mm to large household appliances.
Electricity wiring in the apartment: Large home appliances
Household appliances that consume large amounts of electricity are most often located in the bathroom and kitchen. When installing large electrical appliances, there are a number of rules that should be followed.
Experts do not recommend installing sockets in such a way that they are covered by household appliances. They should be prominently displayed for easy access. The most acceptable option is to install waterproof models equipped with a cover. When drawing up a project for the power supply of an apartment, it is necessary to fix the points at which the dimensional devices will be located.

In order to correctly draw up a wiring diagram in an apartment, you need to know in advance the approximate power of household electrical appliances and their location
During the renovation, a separate connection of the kitchen area must be made. In the future, this will allow the replacement of electrical appliances without disconnecting the entire apartment from the network. This option is especially suitable for kitchens that include built-in appliances. This is due to the fact that such devices are connected in hard-to-reach places, so their repair can take a long time.
Electrical wiring in the apartment: lighting group
Today it is possible to organize one or several lighting lines. The choice of their number depends on how many devices that produce light are located in the dwelling. For example, if a powerful chandelier is installed in the living room, which includes 6 shades, and in the bedroom there are 1-2 sconces, then everything can be connected in one line.
As a reverse example, consider a hall that is illuminated not only by a chandelier, but also by point lighting devices, as well as other elements, for example, lighting for furniture. Such a room will require the organization of a separate line.
Note! At the design stage of electrical wiring, you need to clearly define the number of lighting fixtures, calculate their power. Based on this data, a decision is made whether to split the lighting line into two or more directions. This information also needs to be recorded on a general plan.

Layout of lighting devices in the apartment
It should be noted that in some cases, in addition to lighting devices, transformers are included in the network of one of the rooms. In this situation, it is necessary to connect this direction to a separate automatic protection device.
Wiring diagram in the apartment: options for connecting elements in electrical circuits
Drawing up an electrical wiring diagram in a residential area is a serious task. A person engaged in such work must clearly understand the basics of electrical engineering and have certain skills. Therefore, it is not recommended to take up this business if you are not confident in your abilities. Errors in the schema can have serious consequences. Most fires nowadays are due to wiring problems.
It is best to entrust the work of drawing up an electrical diagram to a specialist. For the independent implementation of this process, one should not only have knowledge in this area, but also know what are the options for connecting electrical circuits.Let's consider these methods in more detail.
Consistent. In this case, each of the elements of the electrical circuit follows the previous one. Serial connection is made without the organization of nodal joints, which is indicated in the wiring diagram in the apartment. An example of such a method is a conventional Christmas tree garland, which includes light bulbs located on one wire and following each other. It is worth remembering that this method has some disadvantages. For example, in the event of a breakdown of one element, all others will also turn off.

Electrical circuit elements can be connected in several ways: serial, parallel, mixed
Parallel. This option differs from the previous one in that the elements that make up the electrical circuit do not fit together. They are arranged in parallel and are grouped into two separate nodes. Thus, if one line fails, then the second will continue to operate normally.
Combined. This method is also called mixed, since it takes into account the use of both serial and parallel connection of electrical circuit elements. This wiring scheme in the house is not used as often as the previous two.
How to properly organize the wiring: the main types
Before starting the installation work, it is necessary to determine the option of wiring the electrical cables in the room, in accordance with which the wiring diagram of the house or apartment will be carried out. How the electrical network will function depends on this choice, therefore it is recommended to consult with a specialist who understands this issue. Today, you can find three main wiring options.
With a switchboard. Connecting the constituent elements of the electrical network by this method is the most common. In this case, the junction box is installed in a pre-prepared niche on the landing.

Wiring type "Star"
An electric meter and circuit breakers are placed inside the panel to protect the system from overloads. From the junction box, a cable is routed to the dwelling. Its cross-section must comply with the standard. In the future, electrical wiring is done. In a new building, such an operation is easiest to perform.
In this case, each room is equipped with a junction box. It is customary to place it at the entrance to the room (above the switch). It is through the use of such boxes that all electrical appliances in the room are powered.
"Star". This type of wiring takes into account the presence of separate lines for each electrical appliance (socket, switch, etc.). All of them are connected directly to the switchboard. The presence of a separate switch for each cable line is not mandatory, but it is quite common.
Note! The star option is the most expensive. This is due to the increase in the amount of required wiring, the need to purchase a more capacious shield. Also, do not forget about the installation costs for laying cables in the apartment.

A meter and circuit breakers are placed in the electrical panel, which protect the systems from overloads
Despite the high cost, this type of wiring is the most convenient and reliable. The "star" variant provides the possibility of individual control. In this way, you can turn off an individual element while all other devices are functioning. This type is quite often used for electrical wiring in new buildings. Price is not an obstacle when it comes to the safety of the residents.
"Plume". The last type of wiring that shares similarities with the star option.The main difference is that there can be several electrical devices per cable line. Accordingly, in this case, the cost of the system decreases, since less materials, time and effort are required to organize it.
The type of wiring is determined individually, according to which a diagram is drawn up. On the Internet, you can find programs for calculating electrical circuits that allow you to independently perform this operation in the shortest possible time.

Wiring type "Loop"
It is important to remember that the second and third types are often combined. This allows you to reduce financial costs and increase the capabilities of the system. Maximum efficiency and safety of residents are the main goals that are achieved during the installation of electrical wiring.
Independent project drawing and wiring diagram
The first thing to do before starting the installation of electrical wiring is to draw up a project that takes into account all the steps step by step, and a wiring diagram. Self-drafting is not recommended as the future performance and safety of the system depends on it. A professional will cope with this matter much faster and, most importantly, better.
In the case of an independent drawing up of an apartment power supply scheme, you will need to study the basic principles and delve into the features of the operation of this system. And also it is necessary to draw up a general drawing, which includes all the elements (without exception), and to calculate the loads on the network.
In the diagram, all electrical elements that make up the system are indicated by means of special designations. This allows you to transfer communication, including devices, to paper as laconically as possible. In order not to get confused, it is recommended to write down all the designations and their decoding in advance.

It is better to provide the process of drawing up a project to professionals, they will cope with this matter much faster and, most importantly, better.
Using the designations, it is necessary to put on the wiring diagram in the house or apartment the points at which the electrical appliances will be located. It is important to remember that such a document is drawn up precisely in order to mark on paper the installation locations of sockets, switches and lighting fixtures, as well as connecting wiring.
Note! Before you start creating a circuit, you need to determine the amount of household appliances, as well as designate a place for each device. Otherwise, the location of the outlets may be incorrect.
After marking the key points, it is necessary to mark the cable paths on the apartment wiring diagram. To do this, you will need to select the option for joining individual elements in the circuit and the type of wiring. Experts advise, for convenience, to divide the electrical wiring in the room into separate zones:
- lighting area (corridor, kitchen, living rooms and a separate one for the bathroom);
- power supply zone (divided into three groups: a corridor and living rooms, a kitchen and a separate one for an electric stove).

The wiring diagram is necessary to determine the location of the installation of power elements, such as: distribution board, circuit breakers, meters
This option is one of the many possible ways to electrify an apartment or private house. It is worth noting that today it is possible to draw up a diagram using a special program for electricians.
If necessary, you can contact a specialist who will draw up an individual scheme that is most suitable for specific housing circumstances. Zoning allows you to combine disparate electrical appliances and wiring and organize them, which will save material during installation.
In order to simplify the installation of cables in the room, it is recommended that the wiring be routed along the floor (for example, in the cavity of the plinth) or under it. All lines must be indicated on the diagram as a dotted line.
Among other things, you need to perform an individual calculation of materials, as well as determine the current in the system. There are special formulas for this. As a rule, the current strength in a modern residential building does not exceed 25 A. Based on this parameter, it is necessary to select materials that will meet the requirements of the system.

To simplify the installation of cables in the apartment, it is recommended to do the wiring on the floor, for example, in the cavity of the baseboard
The apartment wiring diagram must contain information about the length of the cables. The length of the wires is determined using a conventional tape measure. It is recommended to add 3 meters of headroom to the final figure.
All cables are connected to a light panel, which is most often located in the hallway near the door. It also includes an RCD, which is divided into 2 types: 16 and 20 A. In the first case, the circuit breaker is responsible for lighting fixtures and switches, and in the second, for sockets. With a separate connection of the electric stove, another type of RCD is installed - 32 A.
In order to complete the circuit, you need to count the number of outlets and junction boxes. The last step will be to enter auxiliary materials (electrical tape, corrugated pipes, etc.) into the apartment's power supply scheme.

All cables are connected to the distribution board
Installation of wiring in the apartment: calculation of materials
After the wiring diagram is ready, it will be necessary to calculate the materials that will be used during installation. First of all, it is necessary to calculate the number of cables, since it is they who supply the electrical current, which allows the devices to function normally.
In order to calculate the footage of wires that will be used when laying electrical wiring in an apartment, several factors should be taken into account:
- number of sockets and switches;
- number of lighting products;
- places of installation of electrical appliances.
Next, you need to measure the distance to each electrical point (from the junction box). The footage is determined using a construction tape. The data obtained during the measurement must be indicated in the electrical wiring plan in the apartment, and then added up.

First of all, a diagram is needed to compile a list of required consumables
Helpful information! Experts recommend adding 10 to 15% of the stock to the total amount of wiring. This need is due to the fact that often during installation, various unforeseen situations occur.
During the operation of the electrical network, the wires are heated. Because of this, they should not be placed in one place in large numbers. You always need to pay attention to the standards that are spelled out in the regulatory documents that regulate the electrical network. Often during installation, parallel wiring with bends and turns is required.
Modern cables have a three-core structure, in which copper is the key material. Aluminum wiring in an apartment is very rarely used, as copper is a more acceptable material and meets current standards. The cross-section of the wires is selected individually depending on the rated power in the system. In order to choose the desired section, you can use one of the tables on the Internet.

Experts recommend adding 10 to 15% of the stock to the total amount of cable
The standard option is to use a cable with a cross-section of 2.5 mm (for supplying electrical current to the outlets).In turn, the lighting fixtures are fed using 1.5 mm wires. After calculating the required amount of posting, you can start calculating the required number of other materials:
- sockets and switches;
- lighting devices;
- junction boxes;
- protective tubes (corrugated);
- cable channels;
- terminal blocks and fasteners.
The correct calculation of all the necessary materials will simplify the work of arranging the electrical wiring in the apartment with your own hands. In order to protect yourself from power surges in the electrical system, you should purchase a special stabilizer. Today, you can choose a powerful device that can cover the needs of the entire apartment, or divide the zones of influence by installing several small models.

Most often, professional electricians use a cable with a cross section of 2.5 mm
Which cable to choose for organizing electrical wiring in an apartment?
The modern electronics market is able to surprise any consumer with a variety of devices, cables and other elements used in the installation of power grids. Today there is a possibility of purchasing several types of wires of foreign and domestic production.
NYM. An expensive option produced by a German company. It features a high degree of security and can include from 1 to 5 cores. However, the disadvantage of such a cable is that it does not have sufficient resistance to moisture. In addition, the outer sheath of such a wire is made of polyvinyl chloride, which makes it vulnerable to ultraviolet radiation.
Note! NYM cable is not recommended to be installed in places not protected from direct sunlight. Also, it is not advised to use it for organizing electrical wiring in a wooden house.
VVG. This cable is quite expensive, but its insulating characteristics are superior to other domestic counterparts. It consists of a single core, which is advantageous for installation inside walls. Such a cable is most often used when installing or replacing electrical wiring in an apartment with your own hands.

NYM power cable is designed to power electrical appliances with voltage up to 500 Volts AC
PUNP. This cable contains 2 or 3 copper conductors. The outer protective sheath of such a wire is made of PVC, so it is not recommended to install it in places that are not protected from sunlight. It costs less than other analogues. However, for self-installation, you should not purchase this cable, since its laying is more laborious in comparison with the arrangement of VVG (due to its rigidity).
It should be remembered that not only efficiency depends on the choice of wiring, but also the operational life of the entire system. Therefore, before buying a cable, you need to calculate whether it is suitable for a specific power.
Do-it-yourself electrical wiring in the house: tools and materials
Before starting the installation of the wiring, you need to purchase all the materials and prepare the appropriate tools. First of all, you need a puncher. With the help of it, channels are grooved for future wiring. And also it is worth preparing the following nozzles for the hammer drill:
- concrete drill (16-20 mm);
- core drill (90-100 mm);

Replacing electrical wiring in an apartment requires the use of such tools: pliers, screwdrivers, building level, multimeter tester and many others
- chisel for concrete (25-30 mm);
- set of drills.
The wiring rules take into account the use of other tools. For example, you will need a grinder equipped with a circle that allows you to work on stone. You also need to purchase a soldering tool, an indicator for determining the phases and a universal electrical multimeter.
Auxiliary tools include side cutters, which must have insulated handles, a mounting knife, and a flashlight. Among other things, you will need a building level and a cord, as well as tools for finishing the channels (spatulas).
Installation of electrical wiring in the apartment: preparatory stage
Indoor electrical wiring can be done alone. The main thing to adhere to is to comply with installation rules and safety precautions. The master is required not only to understand the basics of this area, but also to know the working nuances.

Replacing the electrician in the apartment must begin with dismantling the old electrical network
Note! If you replace the old wiring with a new one, you must first find and dismantle the old cables. In order to find these lines, you can use the wiring sensor.
The preparatory work includes several stages. First, it is worth making markings on the walls that correspond to future channels with wires. Wall marking is carried out in accordance with all the necessary rules for placing cables. It is important that all actions are thought out in advance and indicated in the electrical project. The apartment should have a sufficient number of electrical appliances that meet the needs of the owners.
After the lines are marked, the points are marked at which electrical appliances will be installed, namely: switches, sockets, a junction box, as well as lamps.
When wiring electrics in a new building, the shield is located in a special niche. In turn, in old-style buildings, the box is simply installed on the wall. Of course, you can complete the niche yourself, but this will complicate the work of wiring an electrician. At the end of the marking, you can proceed directly to the installation work.

An important stage in the installation of electrical wiring is the execution of markings on the walls corresponding to future channels with wires
Installation of new wiring in the apartment: wall chipping
Before proceeding with the organization of channels for cables, you must remember that they must be straight. Slitting is performed only in the horizontal and vertical planes. This is due to the fact that diagonal elements are much more difficult to perform, as a result of which such work can lead to injury.
In the case of arranging a horizontal channel under the ceiling, it is required to observe the distance specified in the building codes, namely 50 cm. Strobing is quite within the power of each person and is easily done with his own hands. The wiring to the apartment is pulled from the dashboard.
Consider the sequence of actions for strobing. First of all, it is necessary to apply the boundaries of the channel with a grinder. This operation is performed strictly according to the markup. Next, using a perforator equipped with a chisel, a groove of the desired width is made. For smooth bends of the line, it is necessary to make oblique cuts inside the corners. For this, a grinder is used.

Walls are channeled for cable only in horizontal and vertical planes
The next step is to drill out small niches in the wall that will be used for sockets. To do this, the hammer drill bit is replaced with a core drill. It is important to remember that with the help of such a tool, holes are made in brick walls. For concrete surfaces, an ordinary chisel is also suitable, which will not deteriorate if it hits the reinforcement during the organization of the power supply of the apartment.
The recess, intended under the VShch at the counter, is also performed by means of a chisel. It is worth noting that experts do not advise using a double strobe when organizing holes for switches. The best option in this case is to purchase a corrugated tube that will accommodate both wires.
Helpful information! When working with a hammer drill, you need to prepare a comfortable and reliable support that can support the weight of a person. For this purpose, ladder with lateral thrust elements. It is not recommended to use a regular ladder, as it may tip over.

With the help of a grinder, you need to drill small niches in the wall that will be used for sockets
Separately, it is worth analyzing the nuances of the wiring in the apartment on the ceiling. Today there are 3 popular ways to organize lines on this surface. The first method takes into account the masking of cables with stretch ceilings. The second option is the organization of a shallow groove with its subsequent finishing.
The third method has some nuances. It takes into account the location of the cables in the ceiling. For panel buildings, ceilings with internal voids are used, so the wire can simply be pulled through one of them by making two holes (entry and exit).
At the end of the chipping in the walls, you need to make connected holes between the rooms. This work is also done using a hammer drill. For maximum discretion, through holes are organized in the corners of the room. Then it is necessary to pass the cable to the lighting box from the shield. Do-it-yourself wiring in the apartment is required to be done in protective equipment (glasses and gloves).

When working with a puncher, during chasing, in addition to protective clothing, it is imperative to have gloves and goggles
Electrical installation: installation of the lighting shield
After the channels for wiring are ready, you can proceed to the installation of the shield responsible for lighting. In this case, there are two installation options: in a niche or on a wall. An RCD must be present in the dashboard, the number of which depends on the number of devices in the dwelling.
For a clear explanation of the design of the flap, experts divide it into three conventional parts: upper, middle and lower. The first of them must contain zero terminals. Grounding clamps are mounted at the bottom, and circuit breakers are located in the middle part. The installation location of this structure must be indicated in the electrical plan. In the apartment, VVG cables (5x6 and 2x6) are led to the lighting panel.
The cables are connected to the junction box with the assistance of an electrician. Therefore, at this stage, you do not need to do this type of work. The wires that connect to the light shield have a multi-colored external marking, which allows them to be connected to the desired points without error. For example, a cable colored yellow with a green stripe is tied to ground. In turn, blue connects to zero, and white to the upper contact of the RCD.

The operability of the entire electrical network in the apartment will depend on the lighting panel, therefore, if it is damaged or incorrectly installed, the power of all consumers may be cut off
Next, you need to connect the circuit breakers in series. This operation is performed with a jumper related to the white cable. The circuit breakers are connected from above.
Installation of external wiring in the apartment: algorithm of actions
In order to run the cables in an open way, you will need to install cable channels. Installation of these elements is carried out according to the markings prepared earlier. The most acceptable option for the location of such channels is the baseboard area or, conversely, the place under the ceiling itself.
In order to fix the box, self-tapping screws should be prepared. Their step should be approximately 0.5 m. The process of fixing the canal is quite simple. It is necessary to step back from its edge from 5 to 10 cm and make a hole. Then, using a punch or drill, you need to drill a hole in the wall and insert a dowel into it. It remains only to fix the box on it - and you're done.
Helpful information! Open wiring has other features that relate to basic electrical appliances: sockets, switches, etc. During installation, such elements are placed on the surface of the wall, and not inside the holes.

Concealed wiring is best done under the skirting board, not in the gutter
The next stage involves routing open wiring. This process has some distinctive features that are worth paying attention to. All work is carried out in accordance with the wiring diagram. First of all, you need to extend the main line from the outlets to the light shield.
It is important to remember that a VVG 3x2.5 cable is used to lay the main highway. In order not to get confused, experts recommend marking the wires, indicating their function. The next thing to do is to extend the lines from the switches and lighting elements to the distribution boards. For this, a wire of a different diameter (3x1.5) is used.
It is important to select cables with the correct cross-section. This will allow you to perform reliable and efficient do-it-yourself electrical wiring in the apartment. The diagram in this case is a hint according to which installation work is carried out.

For laying the main highway, VVG cable 3x2.5 is most often used
The wires are connected to the lighting panel using PPE caps. All connections must be equipped with reliable insulation in accordance with safety regulations. Next, you need to connect the main cable to the light panel and check all the wires with a tester. After that, you need to call an electrician (to connect the system to the panel).
Installation of internal wiring and its check
The hidden location of the wiring has a lot in common with the outdoor method. The main difference with this method is the arrangement of the wires so that they are not visible to the eye. This event has a clear algorithm of actions that must be followed when wiring an electrician in a private house or apartment.
First of all, the lighting box and circuit breakers are installed. Then it is necessary to lead the input cable from the side of the distribution board. As with outdoor wiring, it doesn't need to be plugged in by yourself. An electrician is also required for this job.

With proper internal cable installation, the conductors must be enclosed in a corrugated pipe
The next step is to drill holes in which to mount socket boxes... The same operation must be done with indoor junction boxes. At the end of this work, you can proceed directly to the electrical wiring in the apartment. The price of arranging this turnkey system (for new buildings) may be different and depends on the number of rooms. For example, for a one-room apartment, the total cost ranges from 25 to 35 thousand rubles, and for a two-room apartment - approximately 30-45 thousand rubles.
Note! Self-assembly will save finances, but the organization of power supply is not only a responsible, but also a dangerous task. Therefore, if you are not confident in your abilities, it is better to use the services of a specialist.
Many people are interested in the question of how to conduct wiring in an apartment in a hidden way. Wiring begins with extending the main line, for which it is necessary to prepare the VVG wire in advance. The cable diameter must be suitable for the operational needs. It is recommended to use a wire with a cross section of 3x2.5.

Network test is performed using a multitester
The inner laying can be done in the floor. In this case, the cables are laid in a protective corrugated sheath, which is led to the electrical appliances. Next, the wire is pulled and placed in a socket box.Then you need to stretch cables with a cross section of 3x1.5 from switches and lighting devices to junction boxes. After that, they are connected to the main line using PPE and insulation material.
The above procedure is suitable both for wiring in a new building, and for organizing a new system to replace the old one. The final step is to test the network using a multitester and connect it to the light box. Upon completion of the work, it remains only to call an electrician to connect the system to the panel.
Wiring design software in the apartment
Today there are many programs, the use of which allows you to independently draw up an electrical wiring diagram. Among them, there are several graphical editors that are most popular among users.

In Visio, you can create diagrams to scale to help you calculate the required lengths of wires and cables
Autocad. One of the most popular programs that allows you to independently draw an electrical diagram of an apartment. At the moment, you can find many versions of this software on the Internet, and there are both paid and free samples. The advantages of this program include a simple and intuitive interface, as well as the ability to use the Russian language.
Visio. This program is great when you need to draw for an electrical circuit. Novice electricians most often use it, as it is easy to use and has a user-friendly interface. On the Internet, you can easily find a free version of this software. The disadvantage of the program is its limited functionality.
Eagle. Similar software is used for drawing single-line type electrical wiring drawings. The functionality of this product allows you to work in two modes: manual and automatic. If you wish, you can use the free version of this program. To draw up an electrical diagram, it is better to purchase a paid option, since it includes more options.
Elf. Convenient software that was developed for people involved in the design of electrical wiring in apartments and private houses. The advantages of this system include a built-in database that contains all the necessary elements of the electrical network.

When installing electrical wiring, it is strictly forbidden to deviate from the basic rules of work
Helpful information! If necessary, you can draw an electrical diagram online. To do this, you need to use the search bar of your browser and go to one of the many sites that provide this service.
Self-calculation and installation of the electrical network is a complex undertaking. However, in this case, you can significantly reduce the final cost of electrical wiring in the apartment. Before starting work, it is required to study the basic principles of the operation of this system, building codes, safety rules. During electrical wiring, it is strictly forbidden to deviate from the work algorithm.