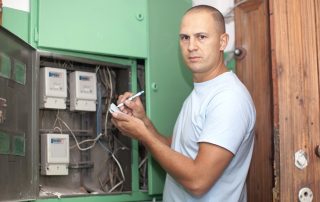
Panels that are integrated into worktops are gradually being replaced by freestanding counterparts. This is due to the fact that they have a wide range of functions and are more economical. You can connect the hob to the mains yourself using the appropriate instructions. Before proceeding with the installation of the device, it is recommended that you familiarize yourself with the safety rules and the main nuances of work.

To easily mount the hob, you need to familiarize yourself with basic safety rules.
Content
- 1 Features of connecting the hob to the mains
- 2 How to choose the right cable for an electric stove: recommendations
- 3 Hob connection diagrams: selection of stove models
- 4 Connecting the hob to the mains: single-phase and two-phase version
- 5 Connecting the Electrolux hob (4 wires) to a three-phase power supply
- 6 Features of connecting an electric hob
- 7 How to connect an induction hob: a sequence of actions
- 8 Choosing the right socket for your hob
- 9 Expert advice on connecting hobs and ovens
- 10 Common mistakes when connecting the hob to the mains yourself
- 11 How to connect a Bosch hob: instructions
Features of connecting the hob to the mains
It should be said right away that the power of the integrated panels is comparable to that of traditional electric stoves. It follows from this that a 380 V power line is required to install the hob. For these purposes, it is necessary to extend a separate cable from the switchboard. At the same time, there are certain rules (PUE) that should be followed.

It is best to entrust the connection of the induction hob to specialists, since the probability of making mistakes is very high
For example, if the network is single-phase, then a cable for the hob is used, made of copper material, the cross-section of which is 6 mm². In turn, for a three-phase network, wires with a minimum cross-section of 2.5 mm² can be used.
Note! It is very important to ensure that the device is correctly connected to the line. In no case should several household appliances be connected to the same line, as this can provoke an overload in the network.
It should be noted that when using a separate line to connect the hob, the installation of a circuit breaker (RCD) is required. For these purposes, 32 or 40 A devices are best suited.
Features of the process of connecting a gas hob entirely depend on the type of device.Currently, you can find dependent and independent embedded slabs on sale. The first ones are installed together with oven, and the latter - as an independent device. Independent devices are connected to the mains through a special box that is mounted at the entrance. Through it, wiring is made to the heating zones.

The process of connecting the hob depends entirely on the type of device.
You should be aware that there are integrated plates containing rapid-type heaters. In this case, you will need to carry out the electrical wiring for each element separately.
Another common type of integrated cookers is induction. Such models are the most difficult from the point of view of self-installation. It is best to entrust the connection of the induction hob to qualified specialists, since the probability of making mistakes in this case is the highest. In city apartments, gas or combined appliances are most often installed.
How to choose the right cable for an electric stove: recommendations
The correct cable selection is a necessary item that should not be ignored. There are two main parameters that you should pay attention to when choosing a wire for a hob:
- number of lived;
- thickness.

Choice of cable for connecting the hob
The number of cores in the cable is selected depending on how many contacts are in the terminal block of the connected electrical device. Cooking surfaces, as a rule, have only two connection options - to 3 or 4 conductors. A stove cable containing 3 cores is usually used when it is necessary to connect a cooking surface to a single-phase network. In such a system, the voltage is 200 V.
If the junction box contains 2 or 3 phases, which corresponds to a voltage of 380 V, then it is recommended to install the device according to different rules. The best option in this situation would be to connect the device according to a scheme that takes into account 4 wires. The extra wire will reduce the line voltage, which will increase the line efficiency.
After determining the number of cores located inside the wire for the hob, you need to choose its optimal thickness. The choice of this indicator is made taking into account the power of the panel for cooking. The most common section options today are 2 and 4 mm².
It should be noted that cables with a thickness of 6 mm² are not suitable for low-power devices. When choosing a wire, it is also recommended to pay attention to its type and design features. Both hard and soft wires are available on the market. Both of these options are suitable for connecting a brewing device.

The number of cores in the cable is selected depending on how many contacts are in the terminal block of the connected electrical device
Note! When installing the hob on your own, in addition to the connection wire, you will need to purchase a separate network cable. Such elements are not implemented in a set with slabs, since there is no way to know in advance the number of phases in a particular building.
Experts recommend cables that have good open flame resistance. There are several types of wires that are most suitable for connecting the hob and oven. As a rule, they are all characterized by increased security. The following brands are most widely used in the domestic market:
- NYM;
- VVGNG;
- VVGNG-LS.
Experienced experts recommend using soft wires. This is quite easy to explain, since such cables are less susceptible to heat than their rigid counterparts.In addition, they are more flexible, which greatly simplifies their installation.

Experts recommend cables that have good resistance to open flames
Hob connection diagrams: selection of plate models
Modern models of slabs that are integrated into the worktop are most often compatible with all types of phases. In Russia, there are two strictly defined network standards:
- single-phase - 220 V;
- three-phase - 380 V.
Separately, it should be said that in some houses the 220 V network may have two phases. Before starting work on connecting the hob, it is necessary to study the features of each type of network in order to understand the nuances of work. Each type of system has its own characteristic differences.
Single-phase. Most often, this type of network can be found in residential buildings that were built a long time ago. Single-phase networks are divided into two types: two-wire and three-wire. In old-style houses, single-phase systems have a voltage of 220 V.

Hob connection diagram using a terminal block
The first step is to deal with a two-wire network. It should be noted that its distinctive feature is the wires of the same color. Phase detection in this case is done by using a probe (a screwdriver equipped with an LED) or a special tester.
Three-wire single-phase networks include multi-colored wires. The following shades correspond to a certain electric line:
- phase - red, brown;
- zero - blue, light blue;
- the ground is yellow-green.
Single-phase connection is quite common. In rare cases, such a network may have wires of the same color. In such a situation, it is recommended to use a tester, which will allow you to more accurately determine the purpose of each wire.

Hob and oven connection diagram
A two-phase network, which has a standard voltage of 220 V, is extremely rare. As a rule, such communication can be seen in new buildings. In this case, black is used to indicate the phase (less often brown). Zero has the usual blue tint, ground is defined by a yellow-green wire.
The last connection diagram is three-phase. In such a system, zero and ground are standard colors. In turn, the wire corresponding to the phase can be indicated by yellow, red or green.
Helpful information! According to another scale of shades, the colors of the phases can be as follows: white, black or brown.
Connecting the hob to the mains: single-phase and two-phase option
The greatest number of questions arises if it is necessary to connect the cooking surface to the network, the voltage of which is 220 V. Situations are especially problematic when the number of panel wires does not coincide with the number of cables in the network. Take the Hansa electric stove as an example. The connection of such a device is made via 6 wires.

Hob connection diagram - single-phase version
If the network includes 3 lines, then the problem with connecting such a panel can be solved quite simply. To connect in this case, special jumpers are used, which are quite simple to purchase at any specialized store. Sometimes they are supplied with the device. If necessary, you can do them yourself.
How to connect the stove in this case? Before starting to connect the device to the mains, it is recommended to carefully study the instructions. The step-by-step process for connecting the panel to a single-phase system is as follows. The first thing to do is to find a lid on the back of the cooking surface. Next, you need to open it. To do this, you can use a regular screwdriver. The terminals are located under the cover.
In the event that there are 6 terminals, and there are only 3 cables in the apartment, it is necessary to connect the contacts. To perform this operation, you will need to connect 3 wires that correspond to the phases to each other. Next, one zero cable is connected to another. There is no need to touch the ground. The result is 3 lines.
In some models, the device already has jumpers. In such a situation, it is easiest to connect the hob. You just need to dock the network wires and the contacts of the electrical appliance together. Video materials on this topic will help to answer the question of how to connect the electric stove on your own.

Two-phase wiring diagram for 380 V electric plate
Note! Single-phase networks can consist of only two wires. In this case, you need to act differently. In such a situation, a mandatory item is the purchase of a separate circuit that will be used for grounding. If you ignore the ground connection, then the device can quickly fail.
Two-phase slabs are very rare. Often, people encounter difficulties when installing such a device on their own. However, there is nothing difficult about this. When connecting such devices to a three-phase network, one of the cables is insulated.
How to connect the hob to the mains three-phase (380 V)
Before starting to connect the cooking appliance to a three-phase electrical network, a special cable must be prepared. It must contain 5 copper conductors. In this case, the section of each element is 2.5 mm². And it is not so important what the cable will be. For this, both single-core and multi-core options are suitable.
Related article:
Sockets in the kitchen: location, diagrams and design features
How many sockets do you need. Placement rules, schemes, norms and recommendations. Features of the installation of sockets for various devices.
Before connecting the hob and oven, it is necessary to check the network for lack of current. In this case, the jumper is only used for the two wires that are zeros. These cables are designated by the Latin letters N. Thus, the jumper is used for the N1 and N2 wires. It should be noted that some models of hobs have a digital designation of lines. In this situation, zeros correspond to numbers 4 and 5.
As for the phase wires, they must be connected to each phase (one at a time). The diagrams in the pictures help you understand how to connect an electric stove. It is also recommended to study the relevant video materials. As mentioned above, the color of the phase wires can be different depending on the standard. The most common cables are red, yellow and green. When connecting, you should be careful, as there is a possibility of incorrect connection of the wires to the plug.
With a three-phase network, the neutral (zero) is connected at the top, and the ground, on the contrary, is at the bottom. In turn, the wires representing the phases are located in the middle. This order must also be followed at the outlet.

Connecting the device to a three-phase 380 V network
Connecting the Electrolux hob (4 wires) to the mains three-phase
Most of the models of hobs manufactured by Electrolux are sold complete with a cord. However, this is not always an advantage, since many are confused when connecting the device to a three-phase electrical network. This is due to the fact that the cord contains 4 wires: zero, ground, and two phase lines. Before starting the installation, you must study all the nuances of the work.
Connect the Electrolux hob to start by opening the lid located on the back of the device. This will allow access to the terminals.The next step is to find the "ground" exit, which has a traditional yellow-green color. There must be a jumper with 2 inputs in close proximity to it.
Note! To answer the question of how to connect the Electrolux hob, the instructions that come with the device will help.
Then, using the jumper that was discovered earlier, you need to combine the two outputs for the phases. They are designated by the Latin letters L1 and L2 (black and brown). It is important to remember that only a brown cable is used to connect the plug. In turn, the black line will need to be carefully insulated.

Before you start installing the Electrolux hob, you need to study all the nuances of work
Features of connecting an electric hob
All modern hobs are divided into types depending on the principle of operation. For this indicator, electrical, induction and gas appliances are distinguished. Connecting each of these types of equipment has its own characteristics. Panels operating from the mains require mandatory grounding for any number of phases.
When self-installing such a panel, minimal knowledge of electrical engineering will come in handy. It will be much more difficult for a beginner who does not have such experience. You will need to study in detail the design features of the device and follow the instructions for connecting the electric hob. Typically, electronic models have all the parts needed to get the job done.
It is important to remember that when working with electrical engineering, you should remember about safety rules. Before starting the connection, it is imperative to de-energize the apartment (disconnection is performed on the panel). All work must be done carefully. Checking the final result avoids many problems.
Bosch hobs are connected to the mains, as well as other modern devices, usually using a four-core cable. It should be noted that electric models are gradually fading into the background. They were replaced by more functional induction devices. Their peculiarity lies in the fact that they do not heat up themselves, but act directly on the dishes.

For correct installation and connection, it is necessary to study the passport for the installed product, as well as the manufacturer's recommendations for installation and maintenance.
How to connect an induction hob: algorithm of actions
Connecting an induction hob resembles a similar process involving electrical panel... However, there are some nuances that require consideration. The first step is to prepare the tools and materials required to install the device.
The connection of the induction device begins with the wiring of an independent power line from the junction box. Next is to install socket... Correct height selection is very important here.
Helpful information! The distance from the floor to the electrical appliance should not exceed 90 cm. There are two ways to lead the cable to this device: hidden and in an installation box fixed to the wall.
The next step in connecting the induction hob is to lead the cable from the device to the panel. The connection is made to a separate circuit breaker. Also, do not forget about the ground loop, which is very important in this case.

For sealing, you need to glue the seal supplied by the manufacturer
After the installation of the socket is made, it is necessary to strip the ends of the cables. Next, they need to be inserted into the socket terminals and fixed in this position using special clamps. Then you need to install the power socket for the hob into the socket.The plug of the integrated brewer is connected in the same way.
For a single-phase network, the voltage of which is only 220 V, copper jumpers are used. Parts made of brass are also suitable. Before starting to connect the device, it is recommended to draw your own diagram corresponding to specific conditions. Compliance with the pairing of cables is a mandatory rule when connecting an induction hob. How does the connection process complete?
The three phase lines are interconnected. The same must be done with two wires corresponding to zero. After connecting all cables, you can close the terminal box. It is very important to check the device at the end of the work.
Choosing the right socket for your hob
In order to correctly connect the cooking surface to the mains, it is necessary to select a suitable outlet. Today on sale you can find a huge variety of different types. It is recommended to pay attention to special devices called power devices. They are made of durable plastic material and are usually rated for amperage in excess of 10 A.

Sockets for connecting an electric stove
Such sockets for hobs and ovens are divided into two types: two-pin and three-pin. The connection process is carried out using the power plug and the outlet itself. There is another connection option, which takes into account the direct connection of the hob to the terminal block of the junction box.
If necessary, you can purchase a regular shoe and a separate installation box. In order to connect cables in such a terminal block, you first need to strip the end of the copper wire. Then rings are made from it, into which you need to insert screws with plates.
At the next stage, the prepared wire is fixed in the socket of the socket under the hob. The oven can be connected using the same circuit. You need to purchase a separate socket for it.
Note! It is possible to connect two electrical appliances to one outlet.

A separate socket is used to connect the oven
The cable fixed in the socket must be tightened with a screwdriver. The best option for installing the socket in the case of installing the oven is to fix it below the level of the box. However, the electrical appliance should not be too close to the floor, as this could lead to a short circuit if the water supply leaks.
The connection of the hob and oven to the mains is carried out taking into account safety precautions. It is very important to strictly follow the installation algorithm. Any deviations from the instructions can lead to equipment failure.
Hob power plug: tips for choosing
The choice of the power plug determines the reliability of the connection of the cooking device to the electrical network. The choice of this element is made taking into account several nuances. The appearance of this part plays a secondary role.
It should be noted that it is not recommended to use conventional plugs when connecting the hob for cooking. This is due to the fact that over time, their technical characteristics deteriorate. Experts advise using only power parts for such purposes.

The choice of the power plug determines the reliability of the connection of the cooking device to the electrical network
The main requirement for plugs for electric stoves is reliability. The part must be made of high-quality, heat-resistant material. To connect the stove and electrical communication, it is very desirable to equip a separate line, which will include a special-purpose socket.
There is a common mistake that the wires are not properly connected to the plug. When performing this operation, it is necessary to check the correctness of the connection several times.
It should be noted that if you wish, you can connect the hob and oven to the same outlet. As a rule, inexperienced people run into problems at this stage. If there is no special knowledge, then it is recommended to choose the simplest option for general connection - installation of a twin socket.
Expert advice on connecting hobs and ovens
Before starting the installation and connection of the cooking surface, it is recommended that you read the advice of a specialist. During installation, it is necessary to use a special sealant that is applied to all joints. It is very important that the composition has good high temperature stability.

The service life of the hob depends on the intensity of care of the hob.
The correct outlet must match the power of the hob. Only in this case the operation of the device will be safe. The socket for the hob must also be made of quality materials. It is not recommended to purchase the cheapest options, since they are most often implemented with elements of marriage.
Note! The service life of the hob depends on the intensity of care for the hob. Preventive cleaning helps to extend this time, and also helps prevent various problems.
To connect such equipment, it is strongly recommended to lay a separate power line from the shield. In order to check how correctly the connection of the equipment is made, you must use a special device - a multimeter.
If desired, you can connect the hob and oven to the same outlet. For this purpose, a special electrical appliance is used, which has two inputs for power plugs.

To check how correctly the panel is connected, you need to use a special device - a multimeter
It is not recommended to independently combine devices from different manufacturers. This is due to the fact that a beginner can make a mistake when choosing conductors. For self-connection, it is best to choose equipment items made by one company.
Common mistakes when connecting the hob to the mains yourself
In some cases, miscalculations made when connecting the cooker to the network can lead to serious consequences. The stove can simply fail or cause a fire. In order to exclude the possibility of making mistakes when installing the stove yourself, it is recommended to pay attention to common omissions.
Quite often, people who do not understand electricity have difficulties when choosing a socket for a hob. It is important to remember that it is strictly forbidden to dock induction-type cookers, the power of which exceeds 3.5 kW, with standard plugs and sockets for 16 A. The power of the hob is a mandatory factor that should be taken into account when connecting the device on your own.
Quite often, users of such panels complain that the devices turn on and off on their own. As a rule, this behavior of the device is regarded as a wiring error, but this is not always the case. The most likely reason in this case is the operation of the program included in the set of functions of a particular model. For example, when a large number of buttons are pressed, the child lock mode may be activated.

The power of the hob is a mandatory factor that should be taken into account when connecting the device yourself
To connect a Bosch hob (or any other) with a power exceeding 7 kW, you cannot use wires with a cross section of 2.5 mm². If the panel does not turn on, it is recommended to check the terminals. In this case, one of them may be missing a phase jumper.
Another common mistake is single-phase connection of three-phase devices. This error can be easily identified. In this case, when the stove is turned on, only half of the burners are functioning. In order to solve this problem, you must carefully study the instructions that come with your particular device. To repair the plate, you will need to reconnect the terminal blocks.
How to connect the hob Bosch: instruction
Devices manufactured by the German company Bosch are most often connected via a four-core cable. Moreover, this rule works even when the socket has fewer contacts. The wire strands connect to terminals located in the box on the back of the cooking panel.
Note! What socket do I need for a Bosch hob? In this case, the standard rules for the selection of an electrical device work. The socket must be a power outlet, since conventional options may not withstand the high power of the stove.

Bosch hobs, most often connected via a four-core cable
Each surface for cooking has a drawing on its body, which indicates its connection diagram. Guided by it, you can avoid installation errors. Another important point is that the wires must be well fixed in the terminals.
To connect a four-pin plug to the wire, you must study the marking on its cover. If a three-pin socket is installed in the wall, then it is necessary to connect the two phase lines into one. These contours are painted in traditional colors: black and brown. All these recommendations allow you to answer the question of how to connect the Bosch hob to the electrical network.
If desired, you can connect the cooking panel directly to the dashboard. In this case, the plug and socket are not used. However, this option has some disadvantages. For example, the process of completely disconnecting the device from the power supply will become more complicated.

Each hob has a drawing on its body, which indicates its connection diagram
When connecting the hob to the electrical system, you must read the instructions that come with the equipment. Before starting work, it is worth determining the number of phases in the network and choosing the required plug and socket option. Another important condition is that safety rules must be followed.